Introduction
In this article, we will introduce the new object detection model YOLOv6 which has been making buzz in the computer vision community ever since its GitHub was made public a few days back. We will take a brief look at its architecture and the improvement that its author claim. Then we will explain how to use YOLOv6 with step by step tutorial and example.
What is YOLOv6?
YOLOv6 is the object detection model created by a team at Meituan which is a Chinese e-commerce platform company. The actual name is MT-YOLOv6 but the creators are using the name YOLOv6 for brevity. At its core, they have built the model on the base of YOLO (You Look Only Once) architecture and claim several improvements and novel methods over other models of the YOLO family. This framework is written in PyTorch.
Debate on Name of YOLOv6
It should be noted that the original author of YOLO – Joseph Redmon left the field after publishing YOLOv1 (2016), YOLOv2 (2017), and YOLOv3 (2018). Alexey Bochkovskiy who was the maintainer of the original YOLO work by Joseph Redmon later published YOLOv4 in 2020 which is the last work by the original team.
YOLOv5 was published by a separate team at Ultranytics in 2020 after a few days YOLOv4 was released. YOLOv5 was just the PyTorch implementation of YOLOv3 with great ease of use. But the fact they used YOLO branding without releasing any paper or making any improvements did not go down well with the community. It was widely believed that it does not deserve to be called the 5th version of YOLO.
A similar debate has also started raging on YOLOv6 where the community is voicing concern that it is unethical on the part of Meituan to use the branding of their model as the 6th version of YOLO. Meituan team has however put up a GitHub page explaining that their work is quite inspired by YOLO and they have implemented some novel techniques and improvements over the existing versions. Further, they have claimed that they are trying to reach out to the original authors of YOLO regarding the branding of YOLOv6.
YOLOv6 Research Paper
Meituan team has not published any research paper for peer review, however, they have published a technical report on their website. There we can get insights into the architecture and performance of YOLOv6.
YOLOv6 Architecture
YOLOv6 architecture focuses on the 3 main improvements –
- Hardware Friendly Backbone and Neck Design
- Decoupled Head for Efficiency
- Effective Training Strategies
1. Hardware Friendly Backbone and Neck Design
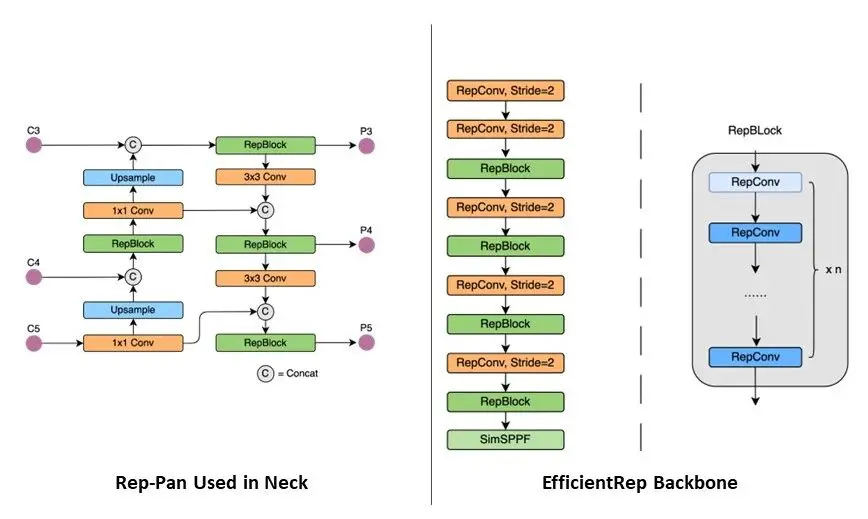
The backbone and neck of YOLOv6 have been designed by taking inspiration from the hardware-aware neural network design. The idea is to take hardware aspects like computing power, memory bandwidth, etc. into consideration for efficient inferencing. For achieving this, the neck and backbone in YOLOv6 have been redesigned by using Rep-Pan and EfficientRep structures respectively.
The experiments conducted by the Meituan team show that with this design of YOLOv6 the latency at the hardware is reduced significantly along with an improvement in detection. E.g. Compared to YOLOv5-Nanao, the YOLOv6-Nono has a 21% faster speed and 3.6% faster AP.
2. Decoupled Head for Efficiency
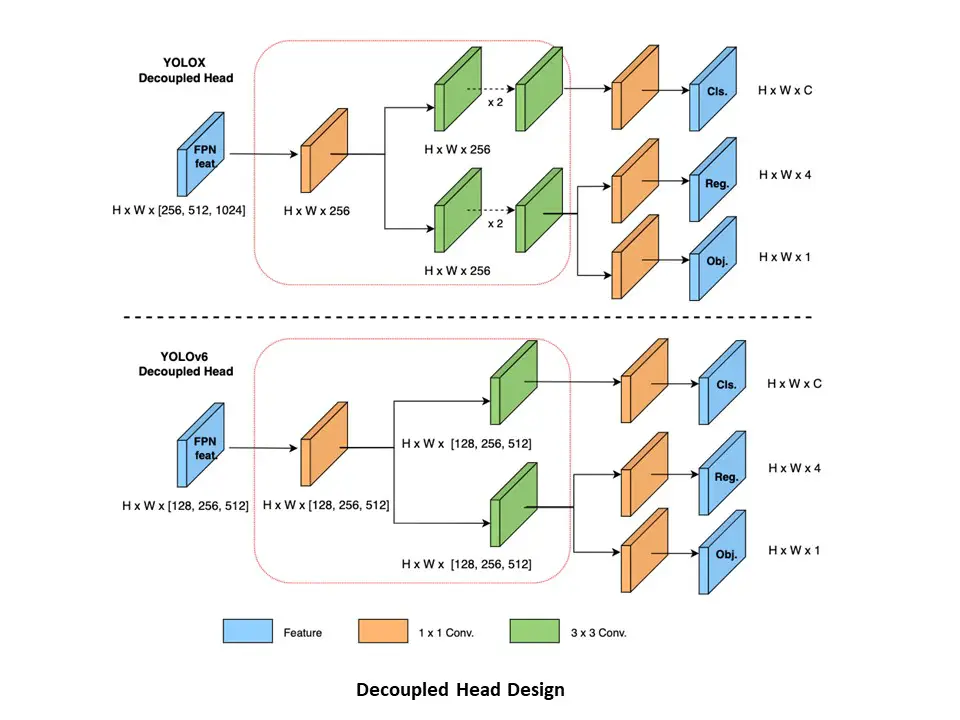
The earlier versions of YOLO architectures until YOLOv5 used to have a common feature for classification and box regression. Another variation of YOLO known as YOLOX first came up with decoupled head architecture which has been adopted and improved by YOLOv6. This has again helped YOLOv6 to increase its speed and detection accuracy over its predecessors.
3. Effective Training Strategies
In order to improve the detection accuracies, YOLOv6 makes use of an anchor-free paradigm, SimOTA label assignment policy, and SIOU Bounding Box regression loss.
Different YOLOv6 Models
Currently, only three variations of YOLOv6 – Nano, Tiny, and Small have been released by the creators and they have mentioned on their GitHub pages that Medium, Large, X-Large will be released soon. Below are the details of the variations –
| Type | Name | Size | Parameters |
| Nano | YOLOv6n | 9.8 MB | 4.3M |
| Tiny | YOLOv6t | 33 MB | 15M |
| Small | YOLOv6s | 38.1 MB | 17.2M |
| Medium | Coming Soon | ||
| Large | Coming Soon | ||
| X-Large | Coming Soon | ||
YOLOv6 Performance
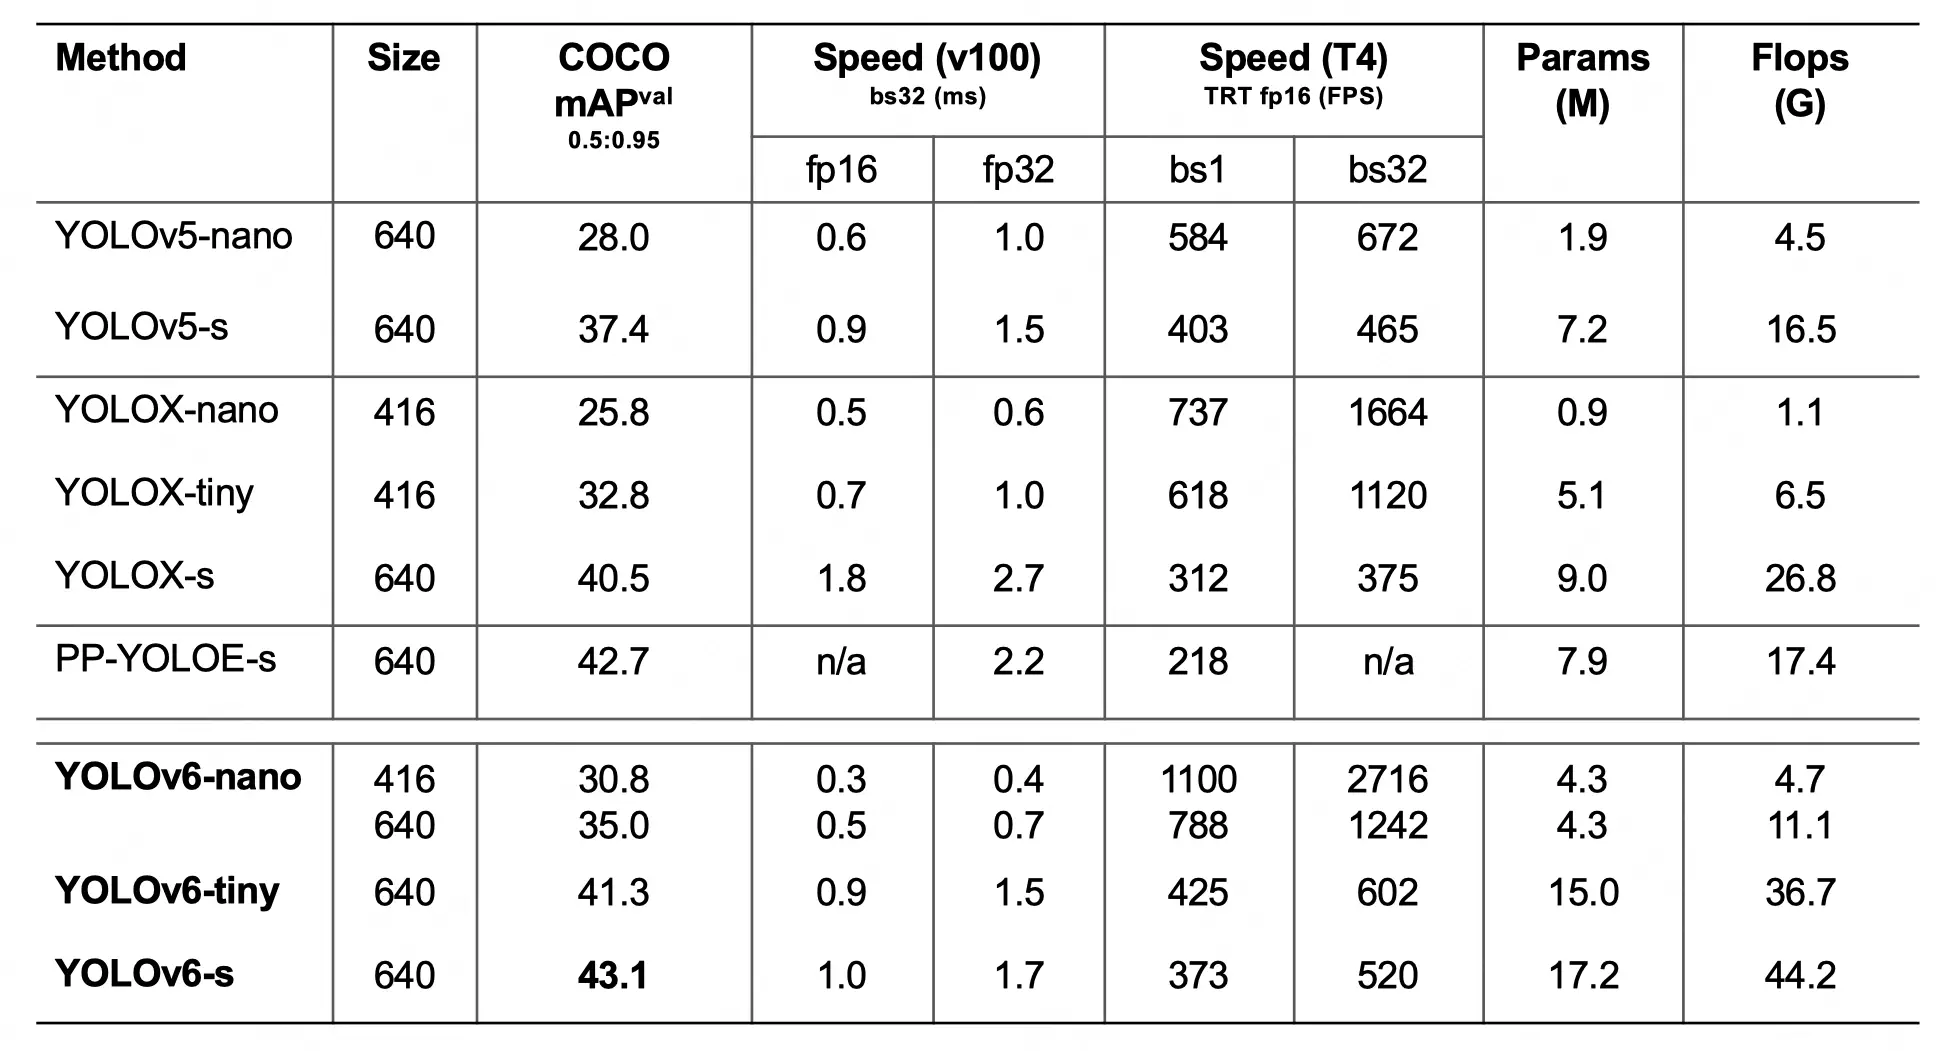
The creators of YOLOv6 have shared performance comparisons with YOLOv5 and YOLOX in their technical report.
- YOLOv6-nano obtained 35.0 percent AP accuracy on COCO val and 1242FPS performance utilizing TRT FP16 batchsize=32 for inference on T4. This represents an increase of % AP in accuracy and an increase of 85 % in speed when compared to YOLOv5-nano.
- When using TRT FP16 batchsize=32 for inference on T4, the YOLOv6-tiny achieved 41.3 percent AP accuracy on COCO val and 602FPS performance. When compared to YOLOv5-s, the accuracy is raised by 3.9% AP and the speed is increased by 29.4%.
- When utilizing TRT FP16 batchsize=32 for inference on T4, YOLOv6-s can obtain 520FPS speed, which is 2.6% AP and 38.6% faster than YOLOX-s. It also achieved 43.1 percent AP accuracy on COCO val. The accuracy has increased by 0.4% AP when compared to PP-YOLOE-s. The speed is raised by 71.3% when single-batch reasoning is performed on TRT FP16 on T4.
- Also Read – YOLOv5 Object Detection Tutorial
- Also Read – Tutorial – YOLOv5 Custom Object Detection in Colab
YOLOv6 Inference Syntax
Command
We can easily use YOLOv6 for inference by using the following command at the command prompt –
python tools/infer.py --weights <weight_name> --source <img_path>
Parameters
There are many parameters that can be used as follows many of which are optional –
- weights – Path of model for inference. The default is ‘weights/yolov6s.pt’.
- source – Path of the source image on which to perform object detection. The default is ‘data/images’.
- yaml – It is the data yaml file.
- img-size – It is the image-size(h,w) in inference size. The default is 640.
- conf-thres – It is the threshold of confidence value for inference. The default is 0.25
- iou-thres – It is the NMS IoU threshold for inference. The default is 0.45
- max-det – It is the maximal inferences per image. The default is 1000
- device – It denotes the device to run the model, i.e. 0 or 0,1,2,3 or CPU. The default is 0.
- save-txt – It is used to save results to *.txt.
- save-img – It is used to save visualized inference results.
- classes – It is used to filter by classes, e.g. –classes 0, or –classes 0 2 3.
- agnostic-nms – Signifies class-agnostic NMS.
- project – It is used to save inference results to project/name. The default is ‘runs/inference’.
- name – It is used to save inference results to project/name. The default is ‘exp’.
- hide-labels – It is used to hide labels in the inference results. The default is ‘False’.
- hide-conf – It is used to hide confidence value in the inference results. The default is ‘False’.
- half – Signifies whether to use FP16 half-precision inference.
YOLOv6 Tutorial – Step By Step in Colab
In this section, we will show step by step tutorial of YOLOv6 with the help of examples. For this, we will be using the Google Colab notebook along with its free GPU.
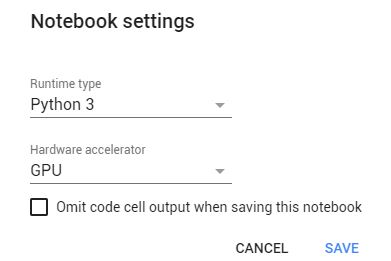
Google Colab Setup
Go to Google Colaboratory, and in its settings select the hardware accelerator as ‘GPU’ as shown in the below screenshot –
Cloning the YOLOv6 Repository
We start by cloning the YOLOv6 repository from GitHub by running the following command in the Colab notebook cell. (If you are not using Colab and running it from the command prompt please remove ! at the start.)
In [0]:
!git clone https://github.com/meituan/YOLOv6
Out[0]:
Cloning into 'YOLOv6'...
remote: Enumerating objects: 911, done.
remote: Counting objects: 100% (38/38), done.
remote: Compressing objects: 100% (29/29), done.
remote: Total 911 (delta 11), reused 23 (delta 9), pack-reused 873
Receiving objects: 100% (911/911), 1.73 MiB | 31.56 MiB/s, done.
Resolving deltas: 100% (461/461), done.
Installing Dependencies
%cd YOLOv6

!pip install -r requirements.txt
Download Weights
Now we shall download the weights for YOLOv6 Nano, Tiny and small with the below commands. Please do not that the its GitHub is still under active development so the download link of weight may change in the future.
In [2]:
# Download Nano Weight
!wget https://github.com/meituan/YOLOv6/releases/download/0.1.0/yolov6n.pt

# Download Tiny Weight
!wget https://github.com/meituan/YOLOv6/releases/download/0.1.0/yolov6t.pt

# Download Small Weight
!wget https://github.com/meituan/YOLOv6/releases/download/0.1.0/yolov6s.pt
Upload and Display Sample Image
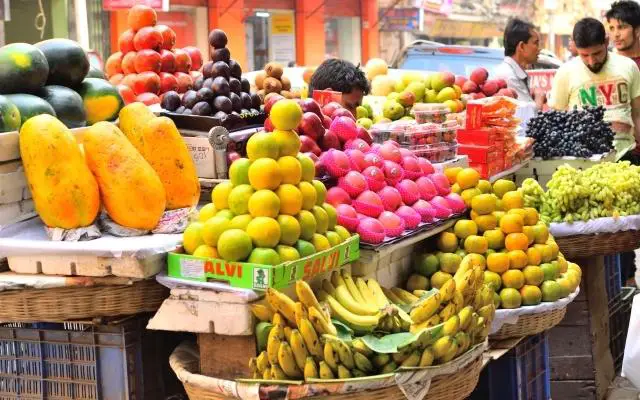
For the purpose of all the YOLOv6 examples, we shall be using the below image ‘sample.jpg’ that we upload manually into the Google Colab VM.
We can use the display function of the PIL package to view the image inside the Colab notebook.
In [3]:
from PIL import Image

img = Image.open('/content/YOLOv6/sample.jpg')
display(img)
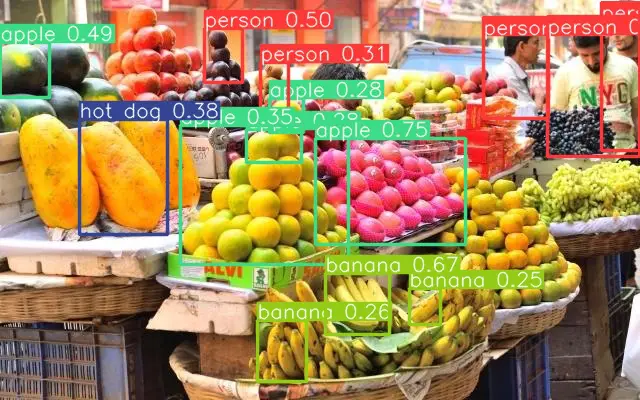
Inferencing Using yolov6n.pt
Let us first perform inferencing using the nano weights yolov6n.pt as shown below.
In [4]:
#Inferencing
!python tools/infer.py --weights yolov6n.pt --source /content/YOLOv6/sample.jpg

# Displaying Results
img = Image.open('/content/YOLOv6/runs/inference/exp/sample.jpg')
display(img)
Out[4]:
Namespace(agnostic_nms=False, classes=None, conf_thres=0.25, device='0', half=False, hide_conf=False, hide_labels=False, img_size=640, iou_thres=0.45, max_det=1000, name='exp', project='runs/inference', save_img=True, save_txt=False, source='/content/YOLOv6/sample.jpg', weights='yolov6n.pt', yaml='data/coco.yaml')
Loading checkpoint from yolov6n.pt

Fusing model...
/usr/local/lib/python3.7/dist-packages/torch/functional.py:568: UserWarning: torch.meshgrid: in an upcoming release, it will be required to pass the indexing argument. (Triggered internally at  ../aten/src/ATen/native/TensorShape.cpp:2228.)
  return _VF.meshgrid(tensors, **kwargs)  # type: ignore[attr-defined]
Switch model to deploy modality.
100% 1/1 [00:00<00:00,  7.82it/s]
Results saved to runs/inference/exp
In [5]:
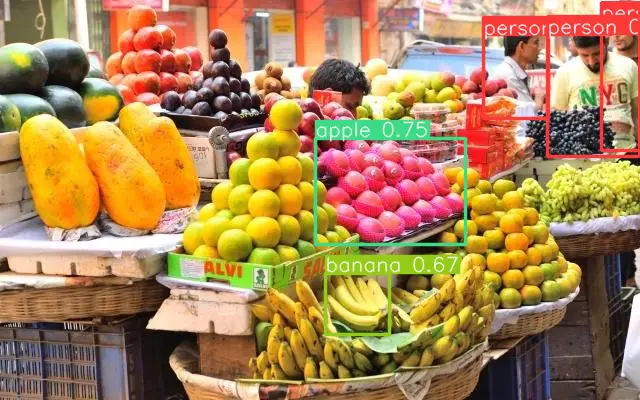
#Inferencing
!python tools/infer.py --weights yolov6n.pt --source /content/YOLOv6/sample.jpg --conf-thres 0.50

# Displaying Results
img = Image.open('/content/YOLOv6/runs/inference/exp/sample.jpg')
display(img)
Out[5]:
Namespace(agnostic_nms=False, classes=None, conf_thres=0.5, device='0', half=False, hide_conf=False, hide_labels=False, img_size=640, iou_thres=0.45, max_det=1000, name='exp', project='runs/inference', save_img=True, save_txt=False, source='/content/YOLOv6/sample.jpg', weights='yolov6n.pt', yaml='data/coco.yaml')
Save directory already existed
Loading checkpoint from yolov6n.pt

Fusing model...
/usr/local/lib/python3.7/dist-packages/torch/functional.py:568: UserWarning: torch.meshgrid: in an upcoming release, it will be required to pass the indexing argument. (Triggered internally at  ../aten/src/ATen/native/TensorShape.cpp:2228.)
  return _VF.meshgrid(tensors, **kwargs)  # type: ignore[attr-defined]
Switch model to deploy modality.
100% 1/1 [00:00<00:00, 23.49it/s]
Results saved to runs/inference/exp
Inferencing Using yolov6t.pt
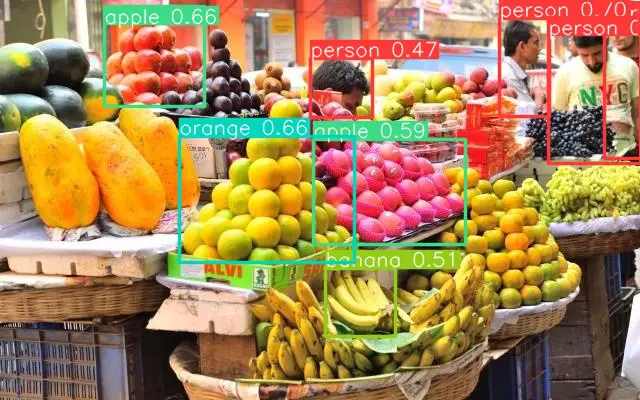
Next, we use the tiny model with yolov6t.pt along with conf-thres value of 0.35 for producing better results.
In [6]:
#Inferencing
!python tools/infer.py --weights yolov6t.pt --source /content/YOLOv6/sample.jpg --conf-thres 0.35

# Displaying Results
img = Image.open('/content/YOLOv6/runs/inference/exp/sample.jpg')
display(img)
Out[6]:
Namespace(agnostic_nms=False, classes=None, conf_thres=0.35, device='0', half=False, hide_conf=False, hide_labels=False, img_size=640, iou_thres=0.45, max_det=1000, name='exp', project='runs/inference', save_img=True, save_txt=False, source='/content/YOLOv6/sample.jpg', weights='yolov6t.pt', yaml='data/coco.yaml')
Save directory already existed
Loading checkpoint from yolov6t.pt

Fusing model...
/usr/local/lib/python3.7/dist-packages/torch/functional.py:568: UserWarning: torch.meshgrid: in an upcoming release, it will be required to pass the indexing argument. (Triggered internally at  ../aten/src/ATen/native/TensorShape.cpp:2228.)
  return _VF.meshgrid(tensors, **kwargs)  # type: ignore[attr-defined]
Switch model to deploy modality.
100% 1/1 [00:00<00:00, 22.84it/s]
Results saved to runs/inference/exp
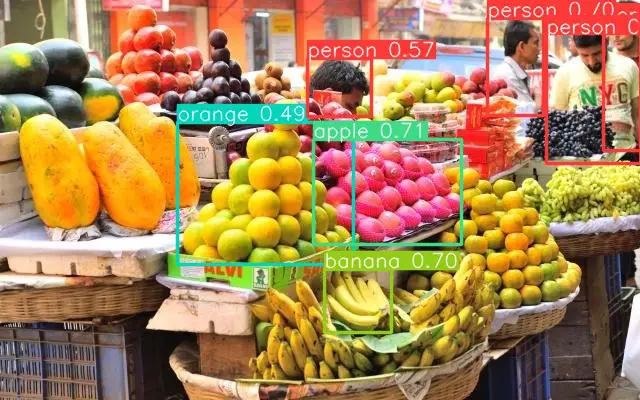
From the output, it can be seen that it has produced better results than the nano model. This time it also detected oranges and the head of the person behind the apples.
Inferencing Using yolov6s.pt
Next, we use the small model with yolov6s.pt along with conf-thres value of 0.35 for producing better results.
In [7]:
#Inferencing
!python tools/infer.py --weights yolov6s.pt --source /content/YOLOv6/sample.jpg --conf-thres 0.35

# Displaying Results
img = Image.open('/content/YOLOv6/runs/inference/exp/sample.jpg')
display(img)
Out[7]:
Namespace(agnostic_nms=False, classes=None, conf_thres=0.35, device='0', half=False, hide_conf=False, hide_labels=False, img_size=640, iou_thres=0.45, max_det=1000, name='exp', project='runs/inference', save_img=True, save_txt=False, source='/content/YOLOv6/sample.jpg', weights='yolov6s.pt', yaml='data/coco.yaml')
Save directory already existed
Loading checkpoint from yolov6s.pt

Fusing model...
/usr/local/lib/python3.7/dist-packages/torch/functional.py:568: UserWarning: torch.meshgrid: in an upcoming release, it will be required to pass the indexing argument. (Triggered internally at  ../aten/src/ATen/native/TensorShape.cpp:2228.)
  return _VF.meshgrid(tensors, **kwargs)  # type: ignore[attr-defined]
Switch model to deploy modality.
100% 1/1 [00:00<00:00, 22.81it/s]
Results saved to runs/inference/exp
This time the results are better than the tiny model. It can be seen that apples towards the back on the left side are also recognized.
- Also Read – YOLOv4 Object Detection Tutorial with Image and Video : A Beginners Guide
- Also Read – Train Custom YOLOv4 Model for Object Detection in Google Colab
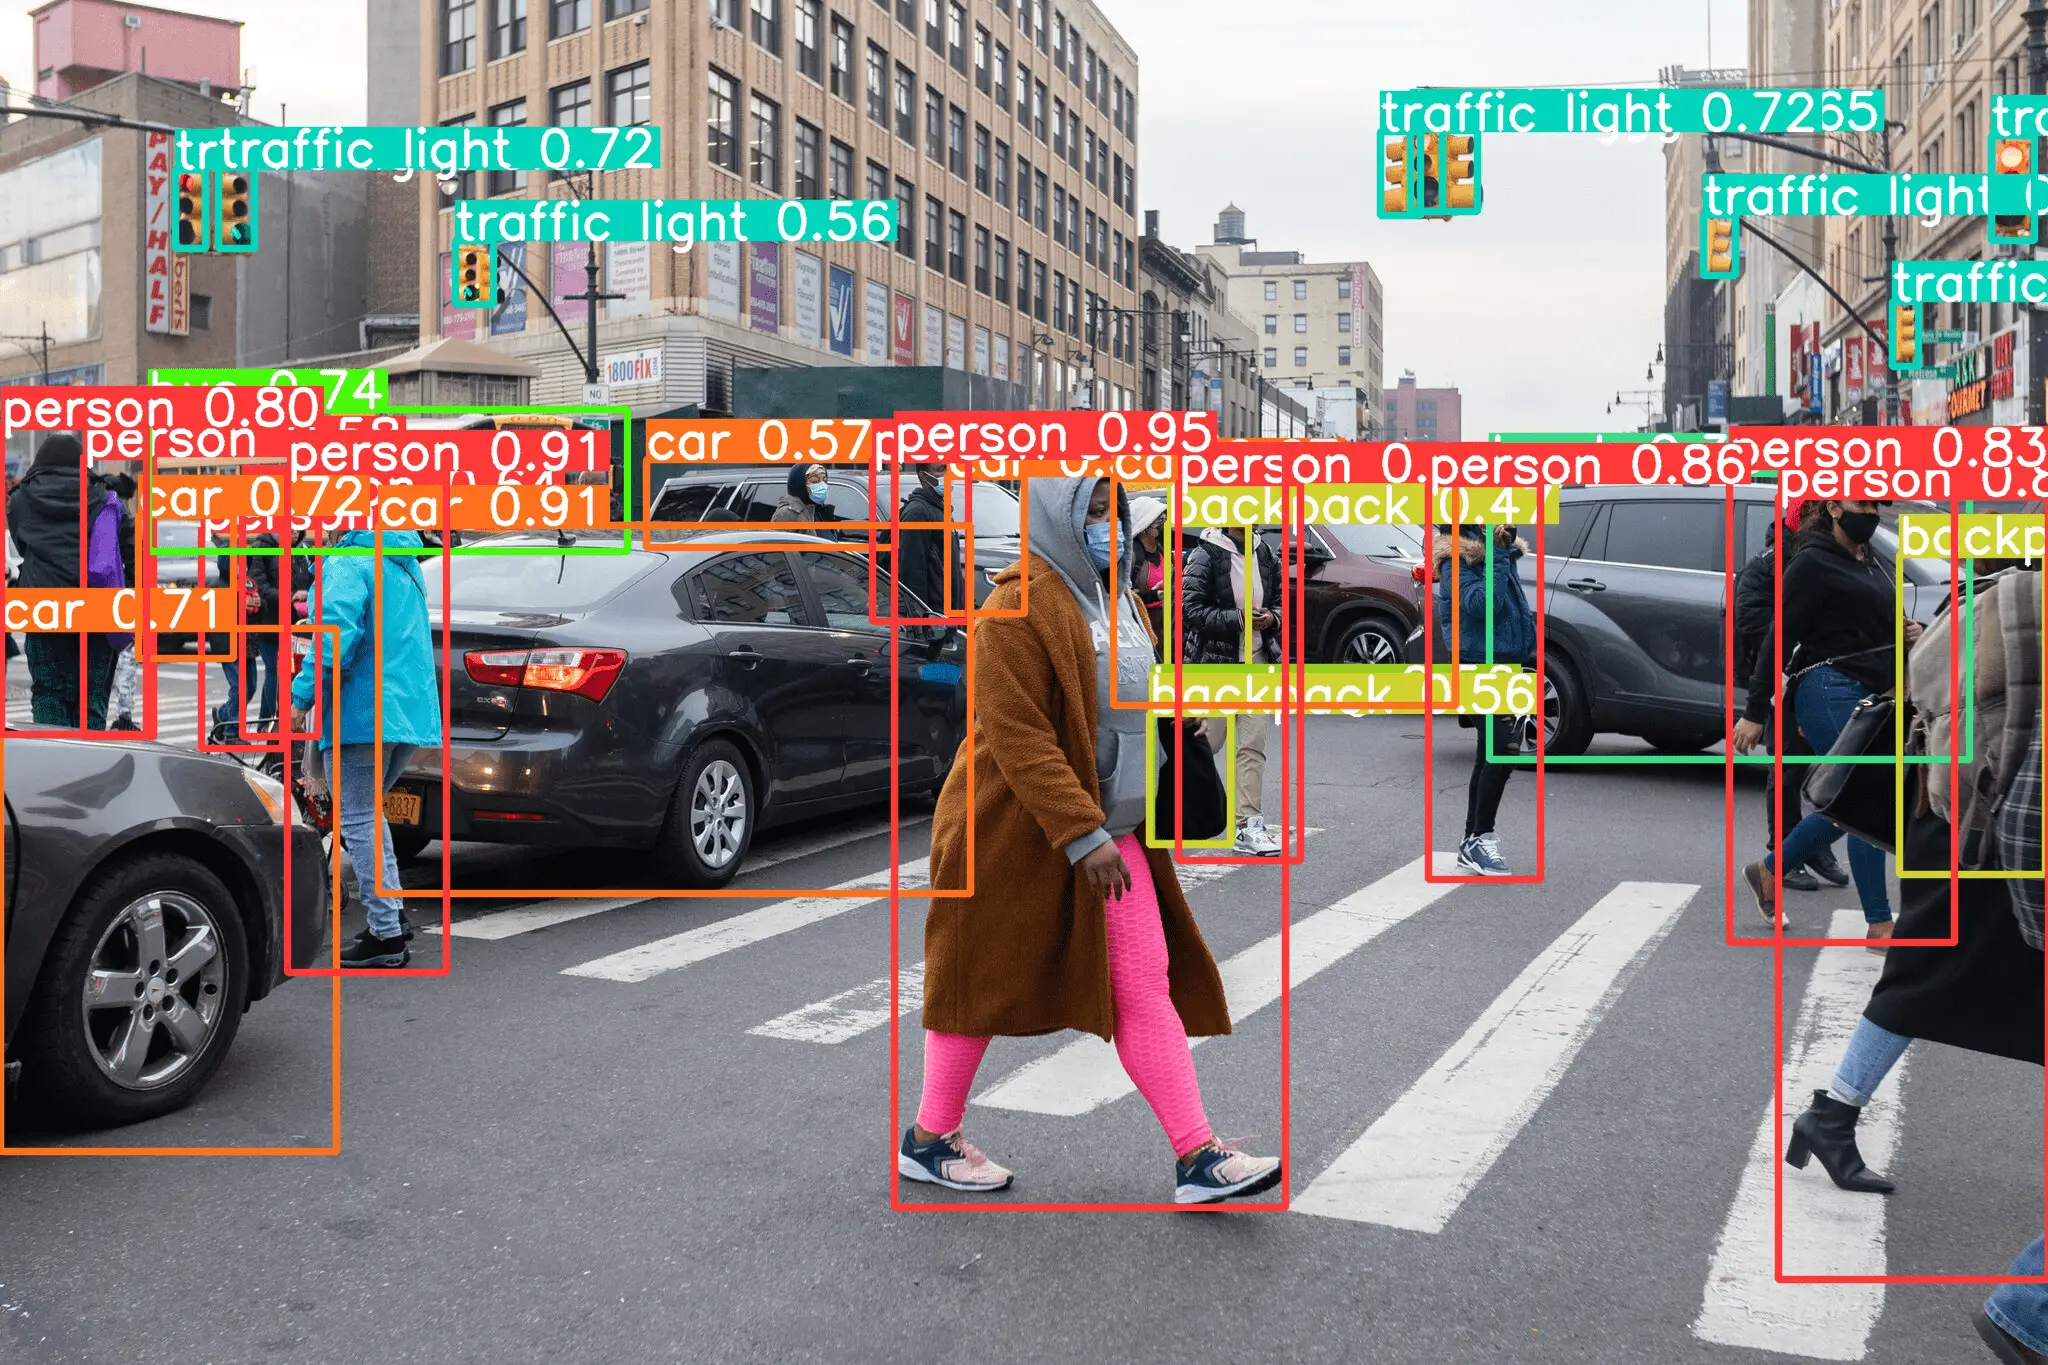
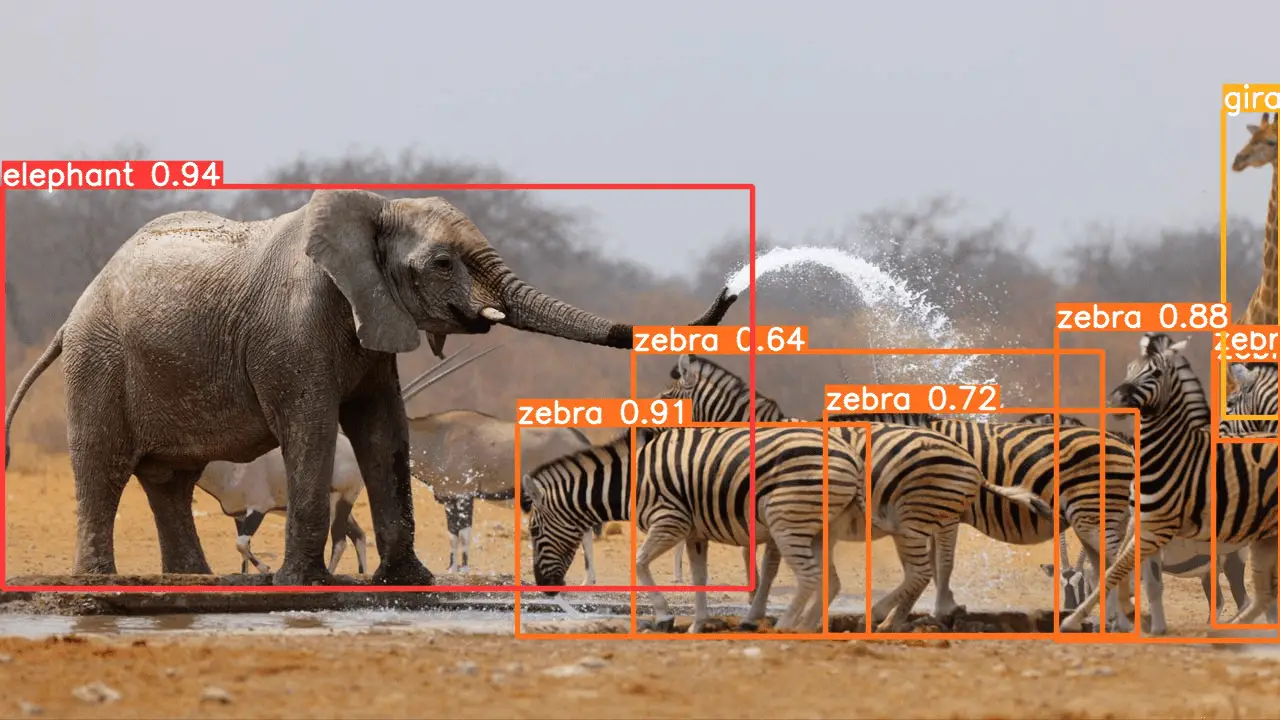
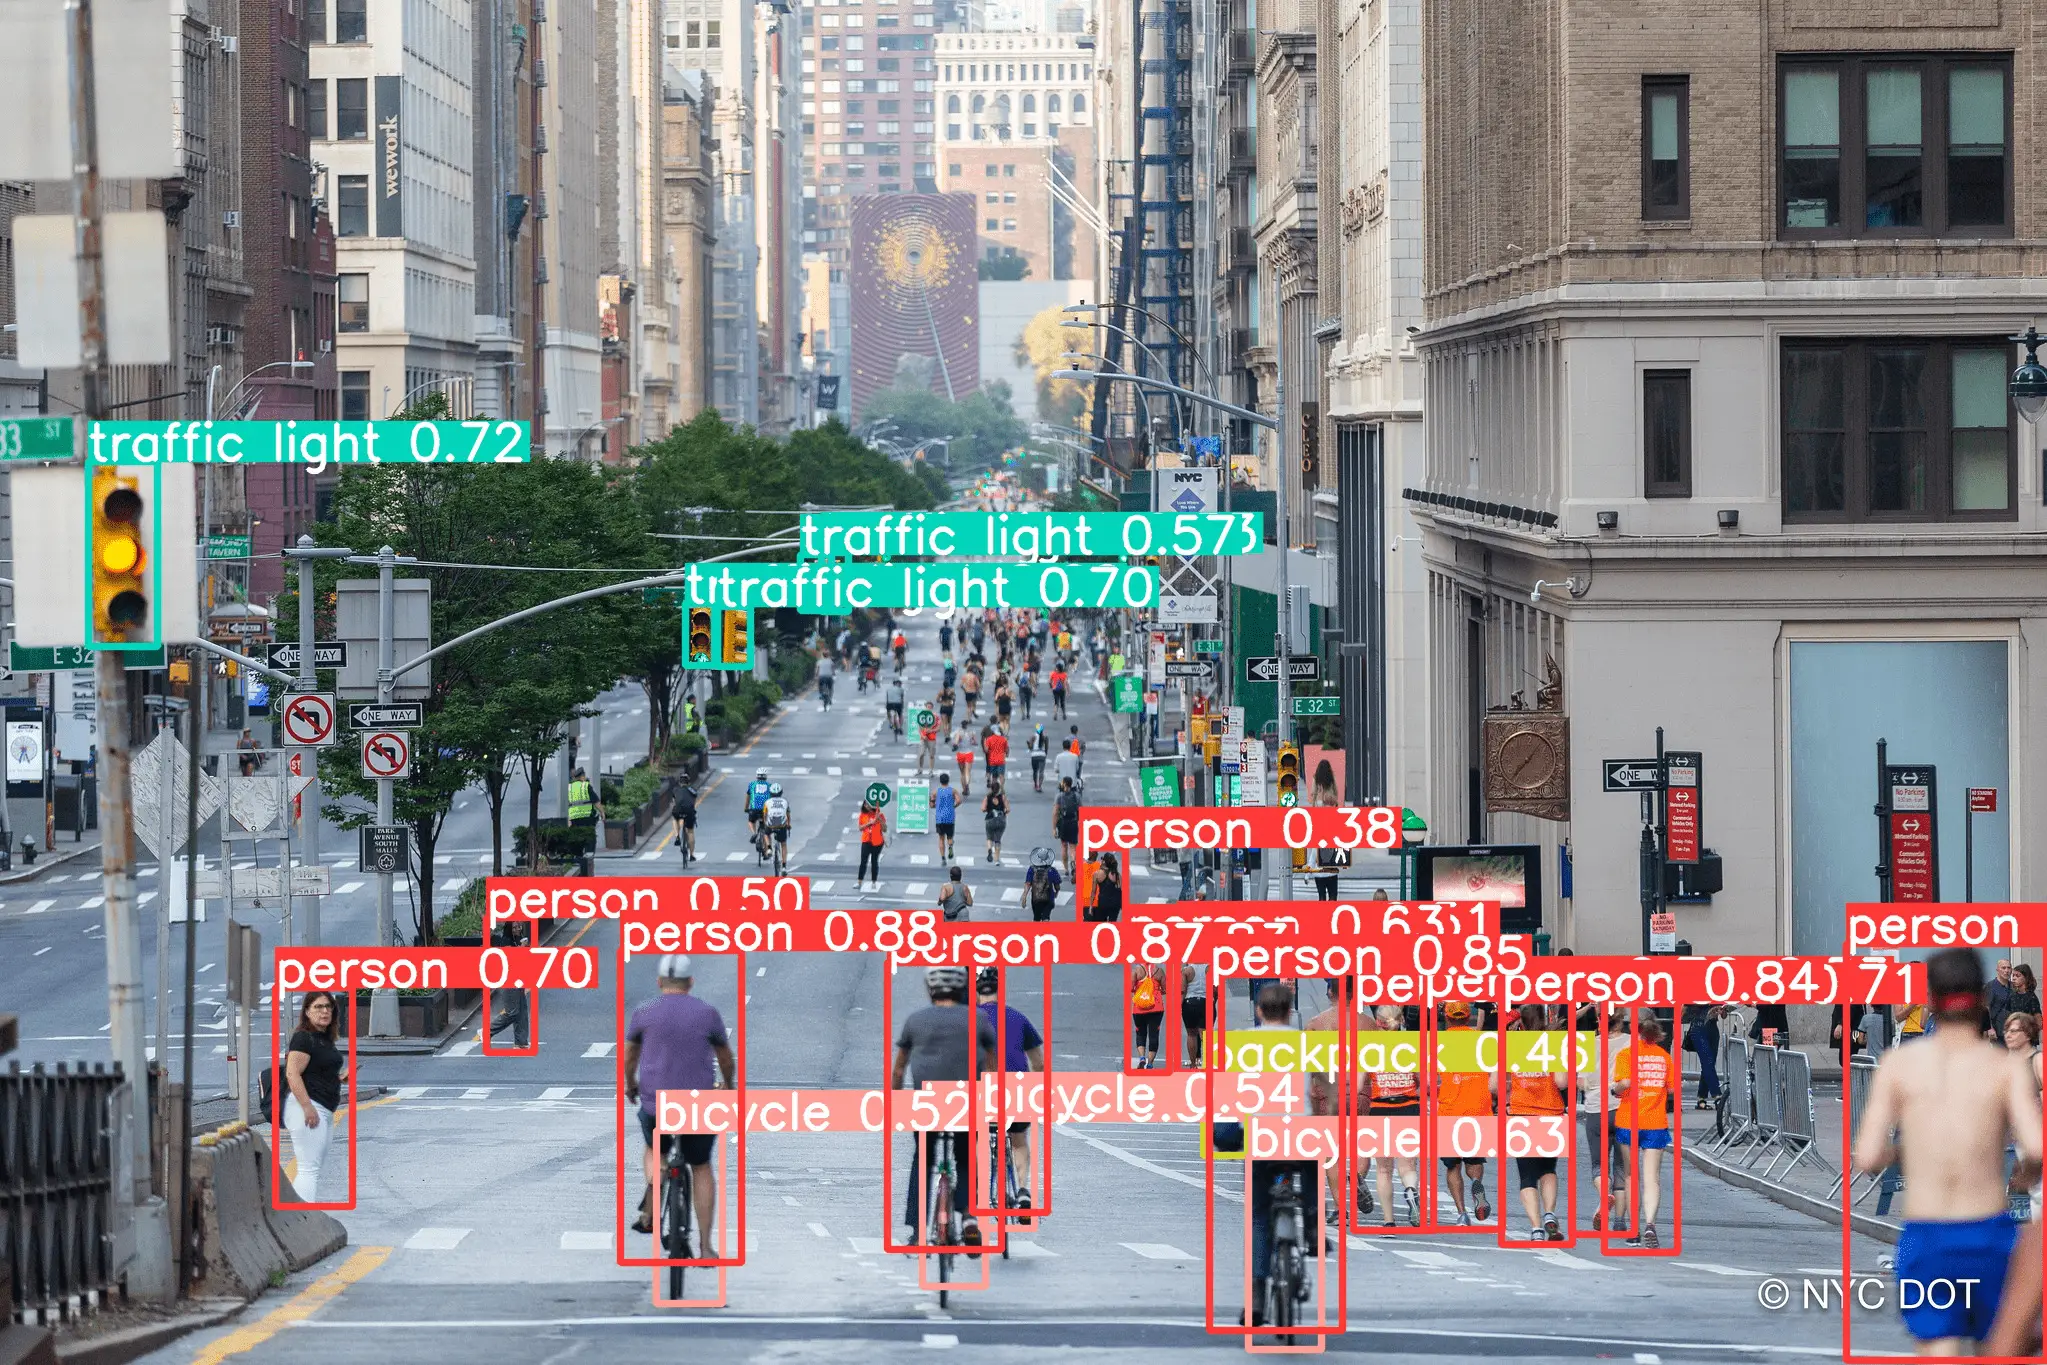
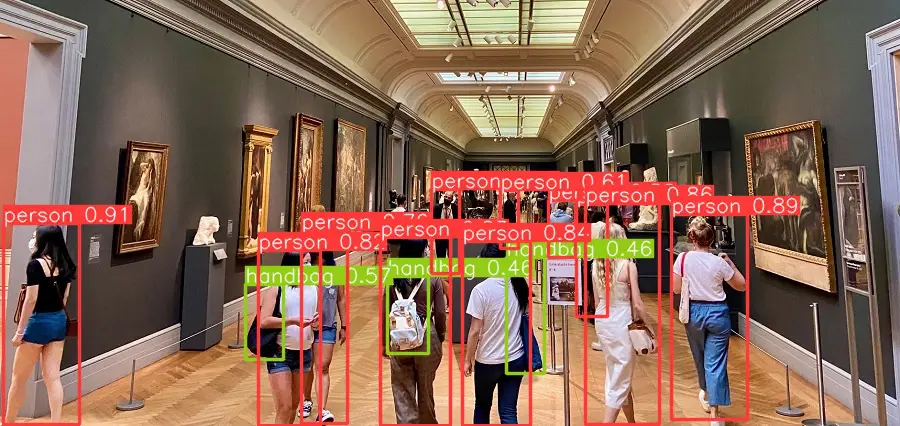
More Examples of YOLOv6 Object Detection
Hope you liked our step-by-step YOLOv6 tutorial above. Below are some more examples of object detection with YOLOv6 that shows it’s really good at detecting objects.