Introduction
EasyOCR is a Python library for Optical Character Recognition (OCR) that allows you to easily extract text from images and scanned documents. In this tutorial, we will understand the basics of using the Python EasyOCR package with examples to show how to extract text from images along with various parameter settings.
EasyOCR Python Package Overview
Reader Class
EasyOCR Python package consists of the base class called Reader that has to be instantiated for performing OCR. There are many parameters available in the documentation that can be used while instantiating the Reader class, but the important ones are as follows –
- lang_list – The list of code names of the language that has to be enabled for performing OCR.
- gpu – It denotes whether GPU has to be enabled or not. It is a boolean and by default it is True.
- download_enabled – It denotes whether to download the language model file if it cannot find it locally on your system. It is a boolean and by default it is True.
readtext Method
readtext is the main method of the Reader class that is used to carry out OCR on the image of the scanned text document. This method has plenty of parameters in its documentation for controlling low-level intricacies, however, the common important ones are listed below –
- image – This is the input image on which we have to perform OCR.
- allowlist – Restricts EasyOCR model to identify only a limited list of characters provided here.
- blocklist – This blocks the list of characters to be blocked from OCR. However, this parameter is ignored if allowlist is given.
- detail – If the value is 1 (Default), then the output is verbose with bounding box coordinates. Else if the value is 0 then the output consists of only recognized texts.
- paragraph – If the value is False (Default), the recognized texts in the output are returned in individual lists, if the value is True, the texts in the output are combined in a paragraph.
Supported Languages
The list of languages supported by EasyOCR can be found here.
Tutorial for EasyOCR Python Package
The below tutorial of EasyOCR has been done in Google Colab.
Install EasyOCR Python Library
To begin with, let us first install the EasyOCR library with the pip command as shown below. This will install the EasyOCR python package and all its dependent libraries.
In [0]:
pip install easyocr
Import Libraries
Next, we import EasyOCR and OpenCV packages into the runtime.
Note – Since we are working on Google Colab, there is a known issue with OpenCV imshow function. Hence Google Colab offers cv2_imshow module from google.colab.patches to display the image in the Colab notebook cell. However, if you are not working on Google Colab please use the regular cv2.imshow() function.
In [1]:
import easyocr
import cv2
from google.colab.patches import cv2_imshow
Input Image
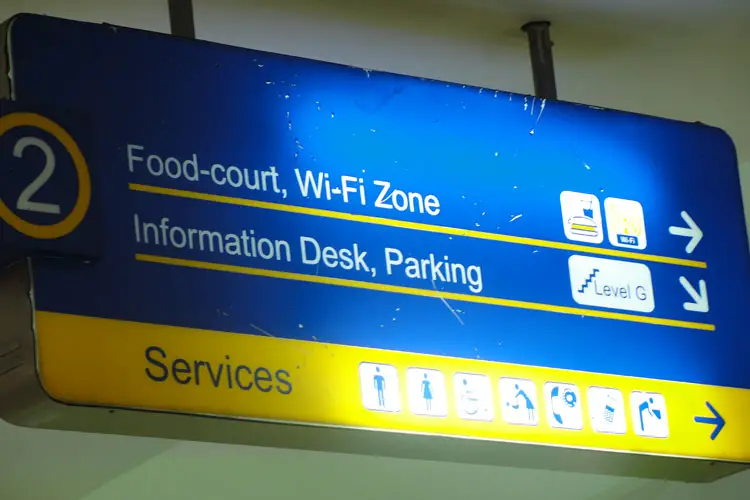
In this example, we are going to make use of the below image for OCR with EasyOCR.
(cv2_imshow is being used for Google Colab, please use cv2.imshow otherwise)
In [2]:
img = cv2.imread('sign_board.jpg')
cv2_imshow(img)

Instantiate EasyOCR Reader Object
In this step, we instantiate an object of the Reader class with the English language by passing the language code ‘en’ in the parameter. Since it does not find detection and recognition models locally, it downloads them while instantiating the object.
In [3]:
reader = easyocr.Reader(['en'])
Out[3]:
WARNING:easyocr.easyocr:Downloading detection model, please wait. This may take several minutes depending upon your network connection.

Progress: |██████████████████████████████████████████████████| 100.0% Complete
WARNING:easyocr.easyocr:Downloading recognition model, please wait. This may take several minutes depending upon your network connection.

Progress: |██████████████████████████████████████████████████| 100.0% Complete
Example 1 – Using EasyOCR Without Details
In the first example, we pass the OpenCV image object of our input image along with the detail parameter as 0 to produce a simple output. From the output, it can be seen that EasyOCR has done a decent job of identifying almost all text correctly from the image. It only misses out to interpret the text ‘Level G’, but it detected the presence of this text there in the corner of the image which is impressive.
In [4]:
result = reader.readtext(img, detail = 0)

result
Out[4]:
['2',
 'Food-court,',
 'Wi-Fi',
 'Zone',
 "Information '",
 'Desk,',
 'Parking',
 'Aevel €',
 'Services"']
Example 2 – Using EasyOCR With Paragraph Parameter
In the previous example, the output consisted of a list with each individual text as an element. While dealing with certain images or scanned documents you may like to have nearby texts in a single paragraph in the output. You can achieve this in EasyOCR by setting the paragraph parameter as True as shown in the below example.
In [5]:
result = reader.readtext(img, detail = 0, paragraph = True)

result
["2 Food-court, Wi-Fi Zone Information ' Desk, Parking",
 'Aevel €',
 'Services"']
Example 3 – Using EasyOCR With Detail Output
In the previous two examples, we had disabled the detailed output. In this example, we enable the detailed output by passing detail=1 to readtext. The output thus produced contains the coordinates of the bounding box containing the text, the text itself, and the probability of recognizing the text correctly.
In [6]:
result = reader.readtext(img, detail = 1, paragraph = False)

result
[([[10, 134], [66, 134], [66, 218], [10, 218]], '2', 0.9999995231628986),
 ([[125.35289989173408, 136.05268933957785],
   [299.99680383488715, 166.8401278466045],
   [291.64710010826593, 204.94731066042215],
   [117.00319616511284, 174.1598721533955]],
  'Food-court,',
  0.9107203816793596),
 ([[295.052175279236, 162.11391864486748],
   [374.8272817597066, 172.83728149072206],
   [367.947824720764, 210.88608135513252],
   [288.1727182402934, 199.16271850927794]],
  'Wi-Fi',
  0.9996239820129187),
 ([[373.15028142267585, 172.0912945443088],
   [449.90825268370645, 190.14820133816653],
   [440.84971857732415, 225.9087054556912],
   [364.09174731629355, 208.85179866183347]],
  'Zone',
  0.9995785355567932),
 ([[131.15046541746176, 205.07269942127826],
   [302.9877338055021, 232.64998359259636],
   [293.84953458253824, 272.9273005787217],
   [122.01226619449793, 245.35001640740364]],
  "Information '",
  0.37881402202458225),
 ([[298.98022872944, 228.10509790131198],
   [389.8569950324839, 244.81273454761504],
   [380.01977127056, 285.894902098688],
   [290.1430049675161, 269.18726545238496]],
  'Desk,',
  0.9565990674123137),
 ([[382.13600260995935, 234.07521487676843],
   [495.9331240846153, 257.1849621077592],
   [484.86399739004065, 300.9247851232316],
   [371.0668759153847, 277.8150378922408]],
  'Parking',
  0.7361866211886587),
 ([[580.0939460213589, 260.10396789184324],
   [655.9354796403996, 277.28445824720006],
   [647.9060539786411, 310.89603210815676],
   [571.0645203596004, 292.71554175279994]],
  'Aevel €',
  0.26381205049812545),
 ([[142.05939473479575, 333.0741868292132],
   [303.93442674907146, 358.11536495666013],
   [292.9406052652042, 407.9258131707868],
   [131.0655732509285, 383.88463504333987]],
  'Services"',
  0.7368551806694593)]
Example 4 – Drawing Bounding Box on Image
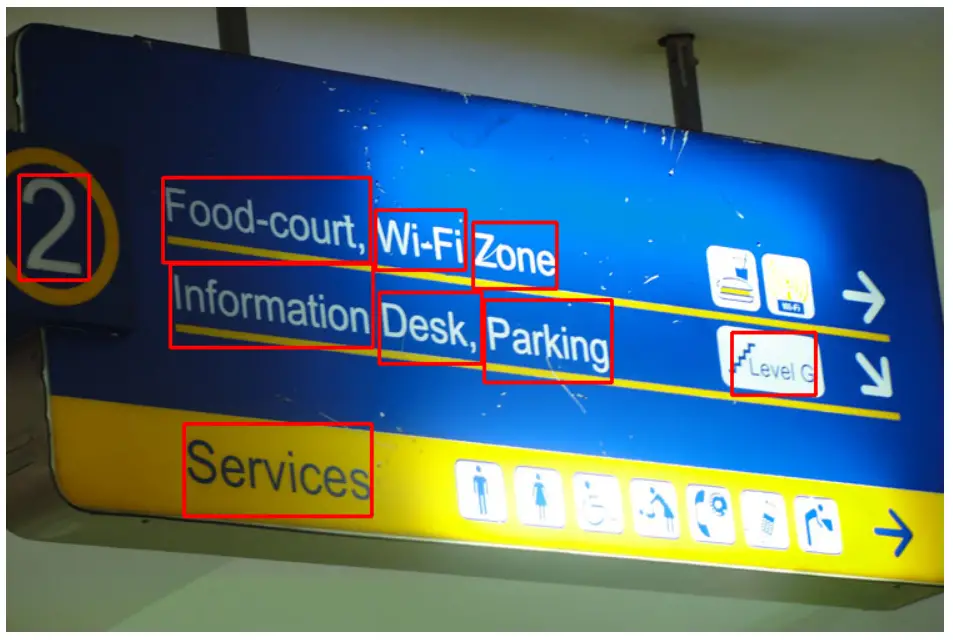
By using the bounding box coordinates we got in the previous example, let us draw the bounding box around the texts in the image. For this, we loop over each element of the result and fetch the bounding box coordinates, from which we select top-left, and bottom-right coordinates and use them with cv2.rectangle to draw the rectangle on the image.
(cv2_imshow is being used for Google Colab, please use cv2.imshow otherwise)
In [7]:
for (coord, text, prob) in result:

  (topleft, topright, bottomright, bottomleft) = coord
  tx,ty = (int(topleft[0]), int(topleft[1]))
  bx,by = (int(bottomright[0]), int(bottomright[1]))
  cv2.rectangle(img, (tx,ty), (bx,by), (0, 0, 255), 2)

cv2_imshow(img)

Reference: EasyOCR Documentation


