Introduction
Ever wondered how they remove moving objects from the video frames while giving special effects in the movies. A lot goes into giving this effect. You can however create similar effects to remove moving objects from video in OpenCV Python by using background subtraction techniques. In this article, we will show you to implement this by using the two methods – i) Running Average and ii) Median Filter with a couple of examples.
What is Background Subtraction?
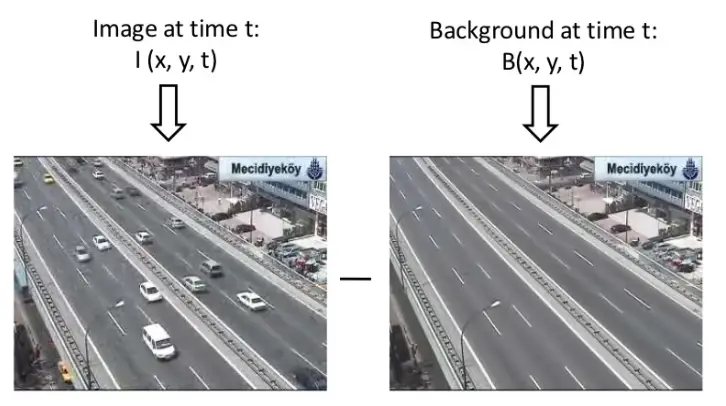
Background subtraction is the process of separating the background and foreground from a sequence of image/video frames. It is generally used for detecting or removing moving objects from the videos of static cameras. The subtraction method should:
- Take into account spatial scales of objects and should adapt to sudden and gradual changes.
- Classify pixels as background or foreground and segment them.
- Adapt to geometry, motion, illumination.
Moving Object Removal from Videos with OpenCV Python
Installing the required libraries
We will start by installing OpenCV Python and Numpy libraries if they are not already installed in your system. Run the below commands in the terminal.
pip install opencv-python
pip install numpy
Importing Required Libraries
From here on out we will start to write some code, so open up a python file in your favorite code editor and import our required libraries as shown below.
import cv2
import numpy as np
Sample Videos for Example
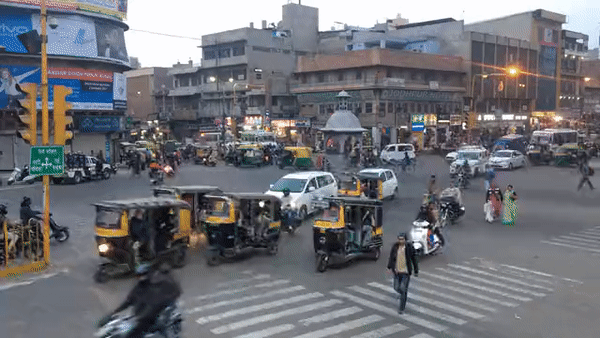
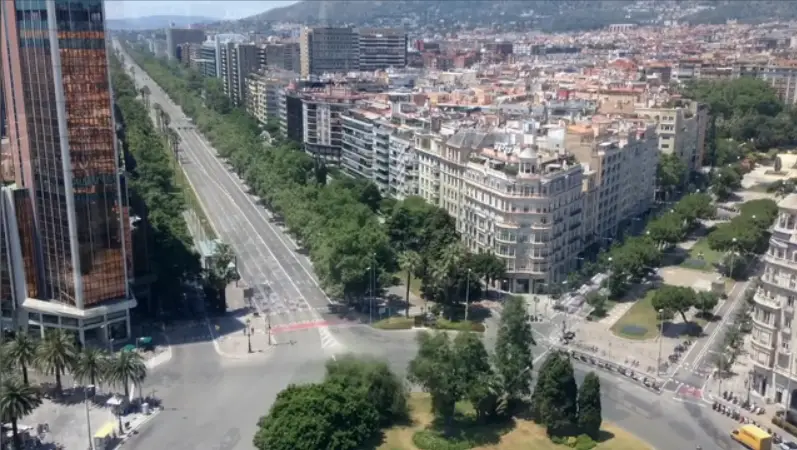
We will be applying our background extraction algorithms in OpenCV Python to remove moving objects from the video shown below. Here the moving objects are vehicles on the road.

Technique 1 – Running Average
The concept of running average is to detect active objects and remove them i.e. differentiate between pixels that seem to change over time and remove them. Here “Running” signifies the fact that the average is being computed over previous and current frames again and again until the frames are exhausted. Simply, the background is the mean of ‘n’ previous frames in the video.

Python Implementation
file_path = 'video.mp4'
cap = cv2.VideoCapture(file_path)
first_iter = True
result1 = None
while True:
    ret, frame = cap.read()
    if frame is None:
        break

    if first_iter:
       avg = np.float32(frame)
       first_iter = False

   cv2.accumulateWeighted(frame, avg, 0.005)
   result1 = cv2.convertScaleAbs(avg)
Line 1-2: Initialize a video object using the ‘cv2.VideoCapture’ method.
Line 3-4: We define some variables, 1) is the ‘first_iter'(with a ‘True’ value) it will help us fetch the first frame of the video later (so stay tuned!). 2) ‘result1’ will hold our final result so we initialize it beforehand.
Line 5: Initialize a while loop that runs indefinitely or until it has looped through all the frames of the video(line 5) and the next frame is ‘None’. (line 7-8)
Line 10-11: For the first iteration of the loop the value of ‘first_iter’ is true thus the code inside the ‘if’ statement on line 9 will be executed. The first frame of the video will be converted to a Numpy array and saved in a variable called ‘avg’ and the ‘first_iter’ will be set to false.
Line 14: We call the ‘cv2.accumulateWeighted’ function to computes the average of consecutive frames with every iteration. The first argument is the image of which the average is to be computed. The second argument is the destination image to which the computed average is to be applied. Third, the ‘alpha’ decides the speed of updating the weight of the input image. (Example: A lower value results in the running average being performed over a larger amount of previous frames and vice-versa)
Line 15: As the name suggests this function(‘cv2.convertScaleAbs’) computes the absolute for each value of the pixel. (The exact process is scaling, calculating absolute, and converting to uint8 type)
The value of ‘result’ will be updated with each iteration of the loop until all the frames are looped through.
Results
Add the following code to your python file to show the output of the code.
cv2.imshow("Running average result", result1)
cv2.waitKey(0)
cv2.imshow("Running average result", result1)
cv2.waitKey(0)

Technique 2 – Median filtering
Temporal median filtering is one of a kind background subtraction method that approximates the median of each pixel to be the background. We can make the assumption that the median pixel is background due to the fact that the background is most likely to be in the video the longest. Thus we can apply this logic to frames as well and say that the background frame is equal to the mean of the previous ‘n’ frames. However, median filtering is a computationally heavy and time-consuming process thus its applications are limited.

Python Implementation
file_path = 'video.mp4'
video = cv2.VideoCapture(file_path)

FOI = video.get(cv2.CAP_PROP_FRAME_COUNT) * np.random.uniform(size=30)

frames = []
for frameOI in FOI:
    video.set(cv2.CAP_PROP_POS_FRAMES, frameOI)
    ret, frame = video.read()
    frames.append(frame)

result2 = np.median(frames, axis=0).astype(dtype=np.uint8)
Line 1-2: Define the path to the video and load it to memory using ‘cv.VideoCapture’.
Line 4: Later we will be applying the median functions on the frames of our video. Unfortunately, that process converts our frame into a 1-dimensional array instead of maintaining three(width, height, channels) dimensions. Thus we need to augment our frames with random values and in this step, we achieve that by multiplying the no of frames in the video(cv2.CAP_PROP_POS_FRAMES fetches the no. of frames) by an array of size (30,1) filled with random values.
Line 6: Define an empty array(‘frames’) that will hold the video frames that were created in the previous step after we loop through them.
Line 7-8: Initialize a ‘for’ loop to loop through the modified frames that were created on line 4. Inside the for loop, we access our original video’s current frame(cv2.CAP_PROP_POS_FRAMES refers to the 0 based index of the frame to be decoded/captured next) property using the ‘set()’ function (which is called on a ‘VideoCapture’ object) and change it to the corresponding modified frame (i.e. ‘frameOI’). Then fetch the frame and append it to our ‘frames’ array.
Line 12: Call the numpy ‘median’ function to calculate the median across the frames array. Since we will be computing the median it will be like the function is returning a single image(because of the ‘uint8’ type) that lies exactly in the middle of the array. (pixel-wise middle)
Results
In order to see the computed background image add the following code to the end of the code.
cv2.imshow("Median filtering result",result2)
cv2.waitKey(0)


- Also Read – YOLOv5 Object Detection with Tutorial
- Also Read – YOLOv4 Object Detection Tutorial with Image and Video : A Beginners Guide
Conclusion
Our tutorial showed how we can use OpenCV Python to remove moving objects in video using background subtraction. But as you may see the results are not very good always with these techniques. There are breakthroughs in deep learning that is helping researchers to achieve object removal with far more accuracy than ever before. That will be a topic for a different article, however.