Introduction
In this article, we show you how to do image classification in tensorflow.js that will leverage the power of the pre-trained MobileNet. We will in fact make a web app where users can upload the image and submit it for image classification bases on the labels available in the MoblieNet model of Tensorflow.js.
The MobileNet Model

MobileNet models are a family of highly optimized and ready-to-use models based on CNN architectures. MobileNet model has 28 layers is trained on the ImageNet dataset and employs depthwise and pointwise convolutional techniques. It is highly accurate and light-weighted with a 16Mb weight file and hence they are an excellent choice for any classification task. Due to the small size and less computing power they can also be used on edge devices and smaller devices like mobile with efficiency.
1. Frontend HTML Part
i) Create Starter HTML File
In order to follow along with this tutorial, you need to create two files: an HTML file named ‘index.html’ (starter content for which can be found below) and a javascript file called ‘script.js’ in which we will work in the subsequent sections.
Let us create write the below starter HTML code in our index.html file.
<!DOCTYPE html>
<html>
<head>
 <meta charset="utf-8">
 <title>TensorFlow.js Tutorial</title>
</head>
<body> </body>
</html>
ii) Importing Tensorflow.js
As we know tensorflow.js is a zero-install framework thus all we need to do is to add the below script tag to the header of our HTML file.
<script src="https://cdn.jsdelivr.net/npm/@tensorflow/tfjs/dist/tf.min.js"> </script>
iii) Importing the MobileNet Model
The advantage of Tenorflow.js is that pre-trained models are not required to be downloaded. The Mobilenet model can be simply imported using the tensorflow.js using the script tag in the indes.html file.
<script src="https://cdn.jsdelivr.net/npm/@tensorflow-models/mobilenet"></script>
iv) Importing Bootstrap Library
We will be using the frontend framework Bootstrap to make our web app look more appealing with minimal coding. Again we can import it by adding the below script tag to the header tag of your HTML.
<link rel="stylesheet" href="https://stackpath.bootstrapcdn.com/bootstrap/4.1.1/css/bootstrap.min.css" integrity="sha384-WskhaSGFgHYWDcbwN70/dfYBj47jz9qbsMId/iRN3ewGhXQFZCSftd1LZCfmhktB" crossorigin="anonymous">
v) Importing Jquery
Jquery is a very useful javascript library with an abundance of easy-to-use in-buit functions and utilities. We will be using jquery specifically to change the state of HTML elements and fetching images from the user’s machine.
<script src="https://code.jquery.com/jquery-3.3.1.min.js"></script>
vi) Importing the script.js File
Later in this tutorial, we will be creating a ‘script.js’ file which will contain functions for making, getting, and representing predictions from the MobileNet model. For now, we shall make the file, leave it empty and import it.
<script src="index.js"></script>
v) Body of the HTML file
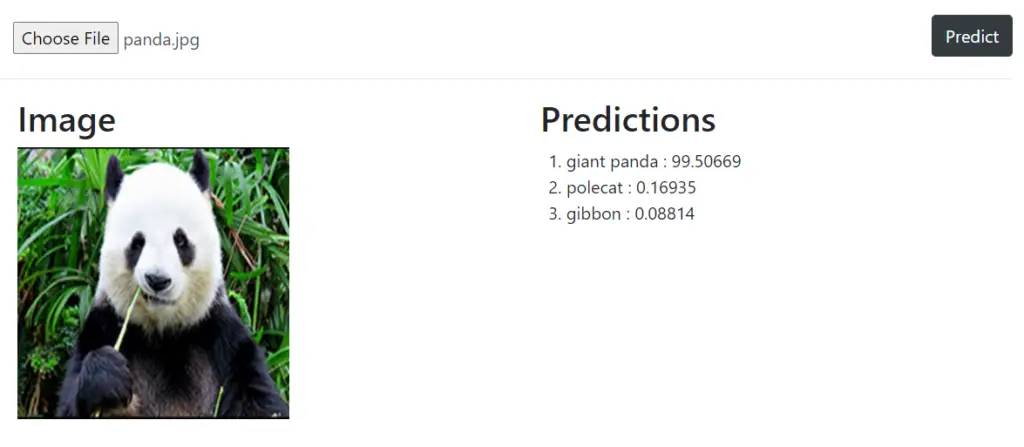
We will now write the code for the body part in our HTML file. This should produce a frontend like the below.
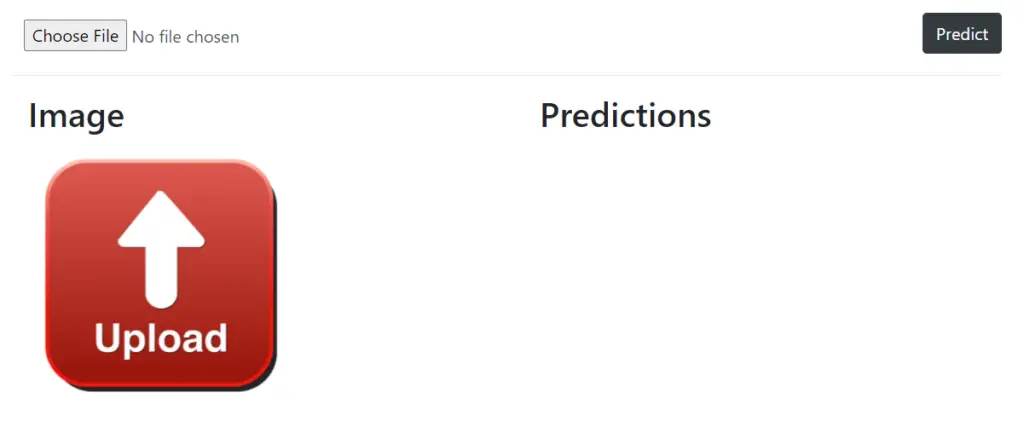
The Architecture
The HTML body is divided into 4 HTML elements:
- File input element: This element lets the user select an image from their device which is to be sent for classification
- Preview image element: HTML image element shows the image that was selected by the user.
- Prediction button: The button element, when clicked initializes our model, fetches the image selected, and gets the model’s prediction on it.
- Prediction list: An HTML element that represents the classified classes and their respective probabilities predicted by the MobileNet model.
Below is the HTML code –
<body>
   <main>
        <div class="container mt-5">
            <div class="row">
                <div class="col-6">
                    <input id="image-selector" class="form-control border-0" type="file" onchange="PreviewImage();"/>
                </div>
                <div class="col-6">
                   <button id="predict-button" class="btn btn-dark float-right" onclick="getPred()">Predict</button>
                </div>
            </div>
            <hr>
            <div class="row">
                <div class="col-6">
                    <h2 class="ml-3">Image</h2>
                    <img id="selected-image" style="width: 250px; height: 250px;" class="ml-3" src="https://networkprogramming.files.wordpress.com/2019/02/content.jpg" />
                </div>
                <div class="col-6">
                    <h2 class="ml-3">Predictions</h2>
                    <ol id="prediction-list"></ol>
                </div>
            </div>
        </div>
    </main>
</body>
2. Javascript Part
i) Testing if ModelNet Model works (optional)
Before moving further let us first test image classification using Tensorflow.js ModelNet model. However, this step is completely optional for our web app but good it’s good to test once.
In order to check whether the model is being successfully loaded into the browser and can classify images, we can do the following steps –
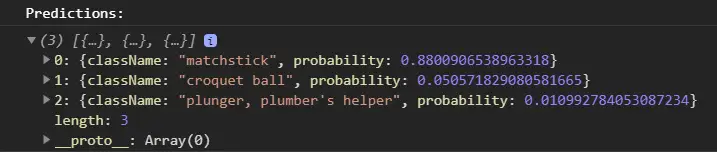
a) Defining the Image
const img = new Image()
img.src='https://image.shutterstock.com/image-vector/vector-illustration-unused-match-stick-260nw-1662505090.jpg';
img.crossOrigin = "anonymous";
First, we define the image object with an ‘src’ value of a link to a random image of a match stick.
Then we set the ‘crossOrigin’ value which allows us to make and receive API requests from the same device (in this case our PC) i.e. we are making ‘fetch’ and ‘get’ requests to a remote server from one device and this attribute lets us do just that.
b) Initializing ModelNet Model
mobilenet.load().then(model => {
     // Classify the image.
     model.classify(img).then(predictions => {
       console.log('Predictions: ');
       console.log(predictions);
     });
 });
Next, we load the model using the load() function then used the classify() function and pass the image in order to get predictions. After that, we use the console.log() to log the predictions and see if the classification process works or not.
As we can see, it prints the class name with certain probability for the random images that we have passed to the model.
ii) Reading Image
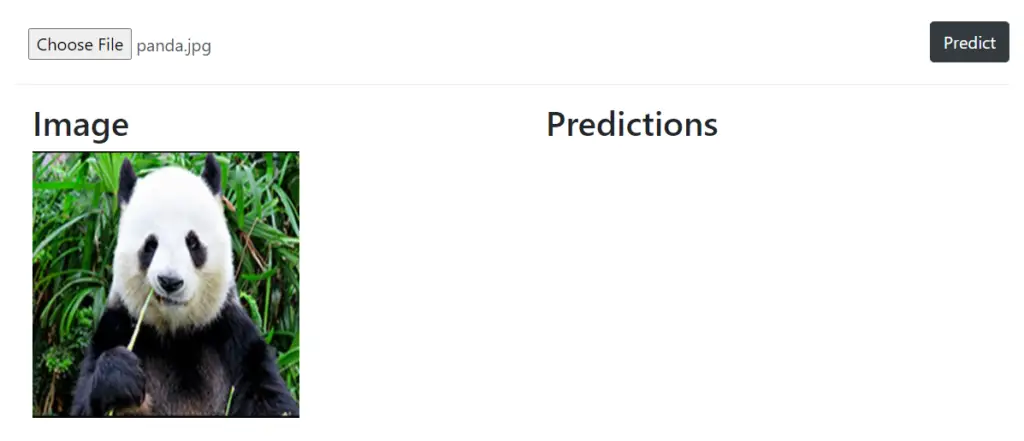
For fetching the image from the users’ system and display the preview of the image on the HTML, we will define a custom PreviewImage() function.
function PreviewImage() {
     // Code goes here
};
a) Initializing the File Reader Object
var oFReader = new FileReader();
oFReader.readAsDataURL(document.getElementById("image-selector").files[0]);
Inside PreviewImage() we first initialize a file reader object which lets the user access his/her machine and select an image and access the HTML element with an ID ‘image-selector’. Next, we pass the image through the ‘readAsDataURL’ function so that it can be passed as a link through different HTML elements.
b) Fetching Image and displaying it on the HTML
oFReader.onload = function (oFREvent) {
        document.getElementById("selected-image").src = oFREvent.target.result;
        $("#prediction-list").empty();
    };
We now add an event listener to the file reader button which when loaded with an image, changes the src attribute of the element with the ‘selected-image’ ID to the link of the image that has been selected by the user.
Additionally, we use the jquery function ’empty()’ which dynamically empties/resets the ‘prediction-list’ element in our HTML.
iii) Doing Image Classification
Now to carry out our image classification in Tensorflow.js we define a function called getPred().
async function getPred(){
     // Code goes here
}
a) Initializing the model
const model = await mobilenet.load();
In order to initialize the model we use the ‘load()’ function with the ‘await’ keyword so that execution is halted for the promise.
b) Getting Predictions
let image = $("#selected-image").get(0);
const predictions = await model.classify(image);
We use the jquery get() function to fetch the image that resides in the HTML element with ID selected-image.
Next, in order to pass it to our model to get the predictions, we use the ‘classify()’ function with the ‘await’ keyword again.
c) Displaying the Classification on the HTML
predictions.forEach(function (p){
        const className = p.className.split(',')[0];
        const probability = (p.probability*100).toFixed(5);
        $('#prediction-list').append('<li>'+className+' : '+probability+'</li>')
    });
The final part of our project is to implement a for-each loop on the ‘predictions’ list and display the classification on the HTML page.
We first get the classification label and store it inside the ‘className’ and the probability/confidence score of our prediction in ‘probability’. Further, we use the jquery function append() that appends a list element to the HTML element with ID ‘prediction-list’.
- Also Read – What is TensorFlow.js ? – Introduction for Beginners
- Also Read – Tensorflow.js Tutorial with MNIST Handwritten Digit Dataset Example
Conclusion
Hope you found this cool project useful where we showed you how to do build a web app for performing image classification in tensorflow.js using the pre-trained MobileNet. The best thing about this project was everything was done in the browser including the image classification part.
Pastebin files
- Javascript file: index.js
- HTML file: index.html
Reference: Tensorflow.js Documentation