Introduction
In this tutorial, we will show you how to use the pre-trained model BlazeFace of tensorflow.js for real-time face recognition and face landmark detection with JavaScript. We will be using the live webcam to capture the video feed in the browser for real-time detection. So let us start our cool tutorial.
BlazeFace – Pretrained TensorFlow.js Model
BlazeFace is a face recognition pre-trained model that is available with Tensorflow.js out of the box. It is lightweight and can be used easily for computer vision applications involving Javascript.
Blazemeter was trained on 66K images using the single shot multibox detector(SSD) technique and was evaluated on a geographically diverse dataset of 2000 images. It has an impressive accuracy of 98.61% for frontal camera face detection.
1. Frontend HTML Part
i) Create Starter HTML File
To begin with we make an HTML file and name it ‘index.html’. This will contain our starter code for importing all the libraries, module files, and stylesheets.
<!DOCTYPE html>
<html>
<head>
  <meta charset="utf-8">
  <title>TensorFlow.js Tutorial</title>
</head>
<body>
</body>
</html>
ii) Importing Tensorflow.js
Remember that tensorflow.js is a no-install machine learning framework. So all you need to do is to define a script tag in the head tag of the above HTML index.html file.
<script src="https://cdn.jsdelivr.net/npm/@tensorflow/tfjs"></script>
iii) Importing the BlazeFace Model
Yet another advantage of tensorflow.js is that pre-trained models don’t need to be downloaded they can just be included in a simple script tag. You can import the BlazeFace model using the below script tag inside the header tag.
<script src="https://cdn.jsdelivr.net/npm/@tensorflow-models/blazeface"></script>
iv) Importing the script.js File
Later in this tutorial, we will be making a ‘script.js’ file which will encompass functions for making, getting, and representing predictions from the BlazeFace model. For now, we can create the file, leave it empty and import it.
<script src="script.js" type="module"></script>
v) Importing the Styling CSS File
We will make a ‘main.css’ file that will handle all the styling properties of the HTML elements in our projects. ( The elements mentioned in the CSS file are yet to be made so make sure to go through our tutorial till the end.)
#container {
    margin: 0px auto;
    border: 10px #333 solid;
}
#videoElement {
    width: 500px;
    height: 375px;
    background-color: #666;
}
#canvas {
    width: 500px;
    height: 375px;
    background-color: #666;
}
#videoContainer {
    margin: 0px auto;
    width: 500px;
    height: 375px;
    border: 10px #333 solid;
}
Import this file as such:
<link rel="stylesheet" href="main.css">
vi) Body of the HTML File
<body>
<div id="container">
    <h1>Face detection in tensorflow.js</h1>
    <h2>By MLK</h2>
</div>

<div id="videoContainer">
    <video autoplay="true" id="videoElement" style="display:none"></video>
    <canvas id="canvas" width="640" height="480"></canvas>
</div>
</body>
Inside the ‘div’ with id – ‘videoContainer’, we see two elements – a) video tag and b) canvas element. The video tag fetches the frames from the webcam in real-time and sends them for detection to our ‘script.js’ file which we will be building later.
Next, the canvas element is used for core frontend visualization. It takes the video frames and draws them on our HTML page.
2. Javascript Part
We will make a function in script.js that is automatically called on HTML dom initialization. We shall put code inside it in the subsequent sections.
(function() {
   // We will put our code here
})();
i) Initializing the HTML Canvas
We will be using an HTML canvas element to render our webcam feed and then further illustrate the predictions onto the feed. Further, we will be fetching our video element inside a variable called ‘video’.
var canvas = document.getElementById('canvas');
var context = canvas.getContext('2d');
var video = document.getElementById('videoElement');
ii) Webcam implementation
a) Initializing the Video
In order to use the webcam on our device, we will be using the ‘navigator’ HTML element object which contains data about the browser. Using the ‘mediaDevices’ class which provides access to devices such as cameras, mics, and speakers, we use the ‘getUserMedia’ function to allow video feed and reject the audio feed. After this, we set the srcObject (sets or returns the object which serves as the source of the media) to the video stream.
if (navigator.getUserMedia || navigator.webkitGetUserMedia || navigator.mozGetUserMedia || navigator.msGetUserMedia) {
              navigator.mediaDevices.getUserMedia({ video: true,audio:false })
                .then(function (stream) {
                  video.srcObject = stream;
                })
                .catch(function (err) {
                  console.log("Something went wrong!");
                });}
All the above code is encompassed inside an if statement at the top in order to ensure that we get permission to use the webcam with different browsers(Google Chrome, Mozilla Firefox, Microsoft Edge, etc)
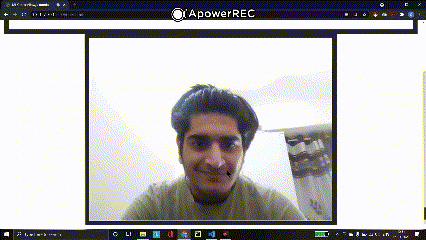
Output of Webcam Initialization:

b) Adding the Video to the page HTML
To trigger the first initialization of the ‘draw()’ function, (a function that puts prediction on the screen) we will use an event listener which calls the draw function on the ‘videoElement’ itself, every time the webcam is initialized or frames are changed hence the event ‘play’.
video.addEventListener('play',function(){draw(this, context,640,480);},false);
3. Face Detection
i) Define draw() function
Now we define an async function draw() inside the script.js file which takes the four parameter as video frames, a canvas element, width, and height of the canvas to be created and continuously draws it on the HTML page. (All the upcoming code will be inside this function)
async function draw(video,context, width, height){
  // The code goes here
}
ii) Initializing BlazeFace model
We first initialize the model using the await keyword to cease execution until the model is returned. Then we pass the video frames to the model function ‘estimateFaces’ to find probable faces in the video stream.
context.drawImage(video,0,0,width,height);
const model = await blazeface.load();
const predictions = await model.estimateFaces(video, false);
Implement a ‘drawImage’ function to put the video stream on the HTML of the page.
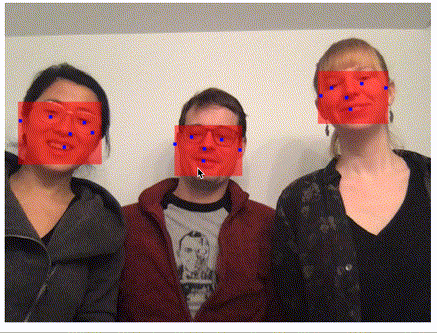
Note: Function ‘estimateFaces’ returns a dictionary with keys such as topLeft (top-left coordinate of the detected face), bottomRight (bottom-right coordinate of the detected face), probability (probability of detected face), landmarks (an array of coordinates of face landmarks such as eyes, lips, and ears, etc).
Example of estimateFaces dictionary:
[
      {
        topLeft: [232.28, 145.26],
        bottomRight: [449.75, 308.36],
        probability: [0.998],
        landmarks: [
          [295.13, 177.64], // right eye
          [382.32, 175.56], // left eye
          [341.18, 205.03], // nose
          [345.12, 250.61], // mouth
          [252.76, 211.37], // right ear
          [431.20, 204.93] // left ear
        ]
      }
    ]
iii) Representing the Prediction
The representation code is surrounded by an ‘if’ statement so that it is only executed if there is a minimum of one face detected first. After that, we loop through the predictions and represent them using the upcoming code
if (predictions.length > 0){
           console.log(predictions);
           for (let i = 0; i < predictions.length; i++) {
       //Code goes here
}}
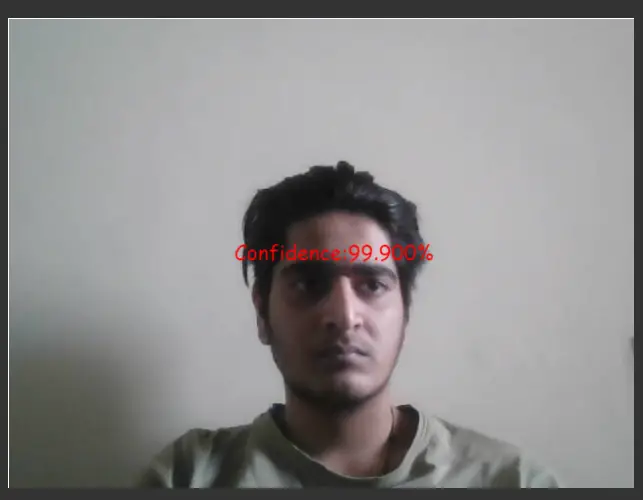
a) Face Detection Confidence Score
We use the predictions array to access the ‘probability’ key and fetch its value to represent on the screen. We then define the font and its size with the color and format it to an understandable form.
var probability = predictions[i].probability;
var prob = (probability[0]*100).toPrecision(5).toString();
var text = "Confidence:"+prob+"%";
context.font = "16pt Comic Sans MS";
context.fillStyle = "#FF0000";
context.fillText(text,425,20);
We finally use the ‘canvas.fillText()’ to display the confidence probability of the faces detected.
Output:
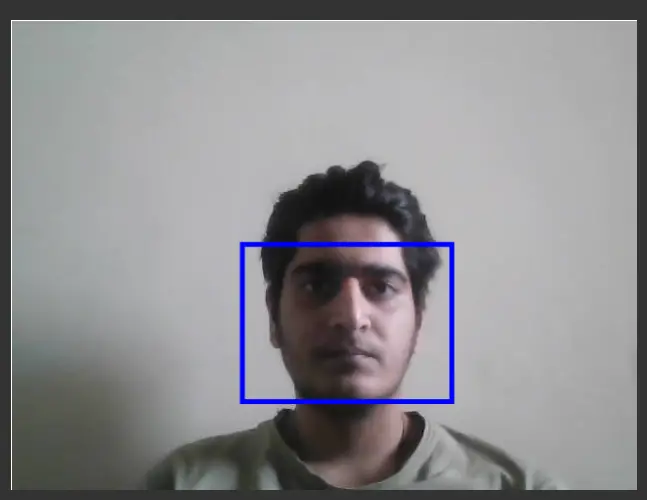
b) Face Coordinates
To plot the bounding boxes, we access the top-left and bottom-right coordinates of the detected faces. We first set the line width to 5 units and the color to blue, we then construct a size array that contains the sizes of the faces detected.
const start = predictions[i].topLeft;
const end = predictions[i].bottomRight;
var probability = predictions[i].probability;
const size = [end[0] - start[0], end[1] - start[1]];
context.beginPath();
context.lineWidth = "5";
context.strokeStyle="blue";
context.rect(start[0], start[1],size[0], size[1]);
Finally, we plot the bounding box using the ‘canvas.rect()’ with parameters as ‘start’ and ‘end’ points.
Output:
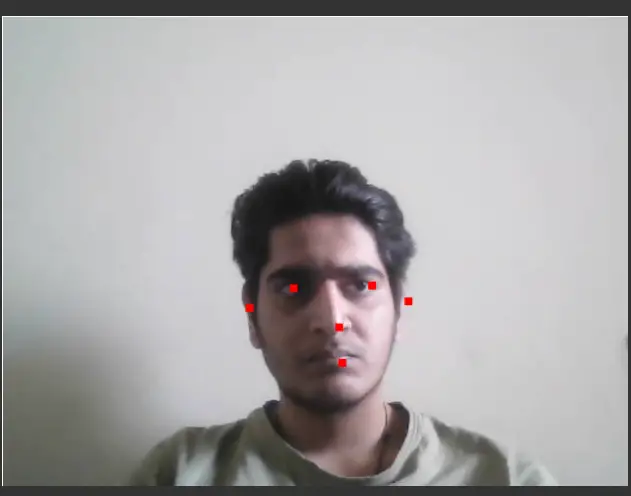
c) Face landmark coordinates
The ‘estimateFaces()’ function returns an array that provides a subarray called ‘landmarks’ which in turn provides the position of landmarks on the detected faces i.e. position of eyes, nose, mouth, and ears. Next in order to put them on screen, we will be using the ‘canvas.fillRect()’ function and plot a small rectangle.
const landmarks = predictions[i].landmarks;
const right_eye = landmarks[0];
context.fillRect(right_eye[0],right_eye[1],8,8);
const left_eye = landmarks[1];
context.fillRect(left_eye[0],left_eye[1],8,8);
const nose = landmarks[2];
context.fillRect(nose[0],nose[1],8,8);
const mouth = landmarks[3];
context.fillRect(mouth[0],mouth[1],8,8);
const right_ear = landmarks[4];
context.fillRect(right_ear[0],right_ear[1],8,8);
const left_ear = landmarks[5];
context.fillRect(left_ear[0],left_ear[1],8,8);
context.stroke();
Output:
Relaying Live Video feed
In order to fetch and show video frames, we need to call the ‘draw()’ function continuously so that it can give real-time feedback. For that function, we will be using the ‘setTimeout’ which will call this function repeatedly every 250 milliseconds.
setTimeout(draw,250,video,context,width,height);
- Also Read – What is TensorFlow.js ? – Introduction for Beginners
- Also Read – Tensorflow.js Tutorial with MNIST Handwritten Digit Dataset Example
Conclusion
Hope you liked this cool tutorial where we explained real-time face recognition and face landmark detection with the tensorflow.js library. We used the pre-trained tensorflow.js model BlazeFace for this purpose. You can get the source code below-
Source Code Files:
- You can access the index.html file here
- The styling file, main.css
- The script.js file with all the function here