Introduction
In this article, we will be taking a thorough look into the HAAR cascade family of classifiers. It is quite popular in the computer vision community for being excellent object detectors and classifiers due to the fact that they are lightweight, easy to use, and have a very high inference speed. We will explain to you how HAAR Cascade works and then show you how to perform face detection with HAAR Cascade in OpenCV.
What is HAAR Cascade?
HAAR cascade is a feature-based algorithm for object detection that was proposed in 2001 by Paul Viola and Michael Jones in their paper, “Rapid Object Detection using a Boosted Cascade of Simple Features”.
The original implementation is used to detect the frontal face and its features like Eyes, Nose, and Mouth. However, there pre-trained HAAR cascade available in their GitHub for other objects as well like for full body, upper body, lower body, smile, and many more.
How HAAR Cascade Works?
In their paper, the author presented a new and faster method of processing images and detecting faces using rectangular features as shown below. The rectangular features which are similar to the kernel are used to detect different features of the face like eyes and notes as shown in the illustration.
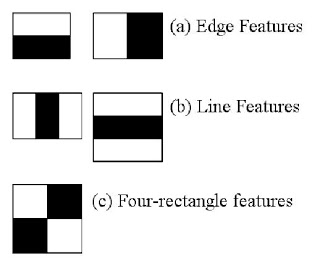
The rectangular features are slid across the image and the sum of the pixel that lies in the white part is subtracted from the sum of the pixels falling in the black part.
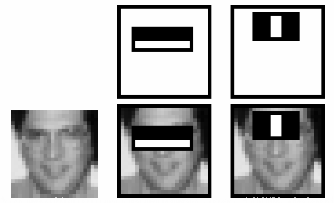
In the below illustration, the first rectangular feature is calculating the difference in intensity between the eye regions and cheeks regions of the face. And the second rectangular feature is measuring the difference in intensity between the two eye regions and the nose bridge.
So using these rectangular features over an image we can produce thousands of feature points for the image.
However, calculating the sum of pixels in white and black regions throughout the images can be a costly operation especially for large images, so the authors also proposed a method known as an integral image that can achieve the same calculation by performing the operations on just four pixels. A great hack isn’t it?
We can use thousands of labeled images convert them into the HAAR cascade feature map and train it using a machine learning model for creating a face detection classifier. We however need to make sure that have a good mix of images with faces and images without faces to train the classifier in a robust manner. In the paper, the author makes use of Ada Boost as it gives the best results.
Face Detection using HAAR Cascade Step by Step
In order to understand how the face detection works using HAAR Cascade classifier which is already trained, let us understand the below steps and illustration –

- Step 1: The image (that has been sent to the classifier) is divided into small parts (or subwindows as shown in the illustration)
- Step 2: We put N no of detectors in a cascading manner where each learns a combination of different types of features from images (e.g. line, edge, circle, square) that are passed through. Supposedly when the feature extraction is done each sub-part is assigned a confidence value.
- Step 3: Images (or sub-images) with the highest confidence are detected as face and are sent to the accumulator while the rest are rejected. Thus the cascade fetches the next frame/image if remaining and starts the process again.
HAAR Cascade vs CNN
Both the CNN and HAAR Cascade classifiers are state-of-the-art computer vision techniques but how are they different? Lets us see the comparison of HAAR Cascade vs CNN –
- Training Data – HAAR Cascade requires comparatively fewer data in order to train whereas CNN requires thousands of images per class to achieve respectable accuracy.
- Training and Inference times – The CNN has an upper hand when it comes to processing, training, and inference times. Since cascades are bulkier models they take more time to train and provide an inference.
- SIFT – Scale-invariant feature transform technique is applicable in the case of cascade classifiers but not in CNN. It lets the classify perform well in cases of different scenarios where the object could be present.
- Accuracy – Both CNN and HAAR Cascade classifiers show reasonably good accuracies. But due to revolutionary ongoing research in deep learning, the accuracy of CNN models is almost tending towards 100% now.
- Hyperparameter – There is no experimentation of hyperparametric tuning is required in the case of HAAR cascades. Whereas in the case of CNN it is a painstaking process of tuning hyperparameters that will perform well with your data.
- Also Read – 7 Popular Image Classification Models in ImageNet Challenge (ILSVRC) Competition History
HAAR Cascade File Download
One can visit the official Github repository and clone it to find the XML files for multiple classifiers that have been trained before. For example pre-trained classifiers for cats, number plates, faces, eyes, and many more.
If you are interested in one classifier or don’t want to clone the entire repository you can simply open the XML file in raw form in another tab and then right-click and save it on your device.
All the cascade classifiers that are provided by the official OpenCV site are present in their repository.
You can also create your own custom HAAR cascade classifier according to your own needs and wants very easily. Unfortunately, that part is out of the scope of this article.
HAAR Cascade Using OpenCV Python
i) Installing dependencies
We first need to install OpenCV since it provides the implementation of HAAR cascade classifier files in XML form using cv2.CascadeClassifier() function.
pip install opencv-python
ii) Importing dependencies
import cv2
iii) Applying HAAR Cascades
face_cascade = cv2.CascadeClassifier('haarcascade_frontalface_default.xml')
eye_cascade = cv2.CascadeClassifier('haarcascade_eye.xml')
smile_cascade = cv2.CascadeClassifier('haarcascade_smile.xml')
cap = cv2.VideoCapture(0)
while 1:
ret, img = cap.read()
gray = cv2.cvtColor(img, cv2.COLOR_BGR2GRAY)
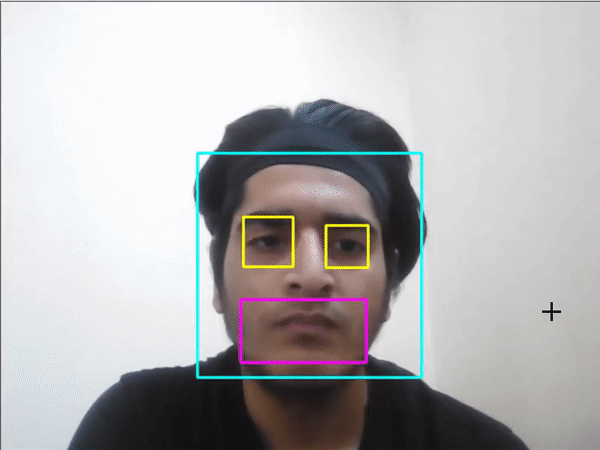
faces = face_cascade.detectMultiScale(gray, 1.3, 5)
for (x, y, w, h) in faces:
cv2.rectangle(img, (x, y), (x + w, y + h), (255, 255, 0), 2)
roi_gray = gray[y:y + h, x:x + w]
roi_color = img[y:y + h, x:x + w]
eyes = eye_cascade.detectMultiScale(roi_gray)
smile = smile_cascade.detectMultiScale(roi_gray)
for (ex, ey, ew, eh) in eyes:
cv2.rectangle(roi_color, (ex, ey), (ex + ew, ey + eh), (0, 255, 255), 2)
for (sx,sy,sw,sh) in smile:
cv2.rectangle(roi_color, (sx, sy), (sx + sw, sy + sh), (255, 0, 255), 2)
cv2.imshow('img', img)
if cv2.waitKey(1) & 0xFF == 27:
break
cap.release()
cv2.destroyAllWindows()
Line 1-3: Initialize the cascades for detecting faces, eyes, and smile using the OpenCV CascadeClassifier() function by passing the XML file as an argument.
Line 4: Initialize the webcam feed.
Line 6: Next, initialize a while loop that runs indefinitely or until all the frames are iterated through. The code enclosed inside is executed for each frame that comes from the webcam. Loop can also be broken if the user presses the ‘escape’ key (Line 23-25).
Line 7-9: Use the ‘read()’ function to fetch consecutive frames from the webcam feed. This is preprocessed by converting it to grayscale (using cv2.cvtColor) and then sent to our face classifier object for classification using the ‘detectMultiScale’ function which returns the coordinates(x,y,w,h) of faces that are detected by the classifier.
Line 11: Begin a for loop that loops through all the detected faces (and use the ‘cv2rectangle’ function to put a bounding box around it). For the convenience of detection of eyes and smiles (both smaller in size), we define a sub-area in the grayscale-video frame(which is the area that was returned to us by the face cascade). This can be done only because eyes or a smile will only be detected inside a face. (Line 13-14)
Line 16-21: Pass the sub-area defined in the previous step to the ‘eye’ and ‘smile’ cascades so that an array of coordinates of detected eyes and smiles is returned back. Next, initialize ‘for’ loops for each of these arrays (Line 18 & 20) and put bounding boxes around each of the detected objects (Line 21).
Line 27: Finally, release the webcam video feed loaded into memory.
Line 28: Close all windows (If any are left open and running).
iv) Results
Conclusion
Hope you found our tutorial quite useful to understand how HAAR Cascade works and its comparison with CNN. We also showed you how to use HAAR Cascade in OpenCV Python for face detection with the pre-trained model.
Reference – HAAR Cascade Paper