
Introduction
In this tutorial, we will discuss what is Aruco Marker, how to create them, and how they work. Then we shall explain the difference between Aruco Marker vs QR code and finally show you a project on Aruco Marker detection with Python OpenCV for augmented reality.
What is Aruco Marker
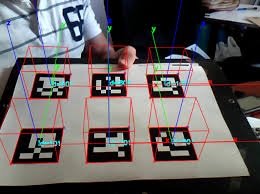
Aruco Marker is a fiducial square marker used for camera pose estimation. When Aruco Marker comes is detected in the viewpoint of the camera, we can carry out some interesting operations like superimpose an image for augmented reality.
It consists of an internal binary matrix structure enclosed within an outside black color border. The internal matrix structure has unique encoding based on the black and white position and acts as an identifier.
Aruco Marker vs QR Code
For a layman person, this may sound like using a QR code but with a different name, but actually, it is not the case.

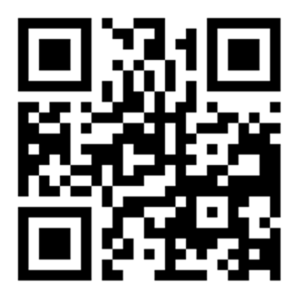
There is a difference in which the information is encoded in QR code and Aruco Marker which is quite evident from the above images.
Aruco Marker helps the camera to understand the angle, height, depth, and other parameters and finds its use case in cool computer vision and augmented reality tasks. On the other hand, QR Code encodes text data and has different purposes of use such as store passwords, access ids, websites, booking tickets, user names, etc.
How to Create Aruco Marker
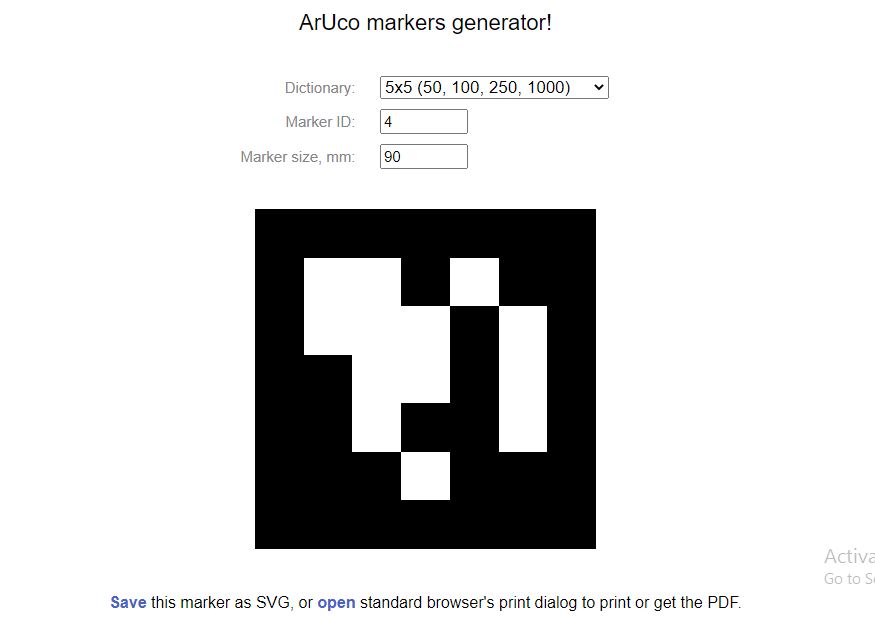
We can create Aruco Marker either by coding ourselves or we can make use of external tools. In this tutorial since our focus is on the detection of Aruco Marker, we will use the following tool website for the creation of Aruco Marker.
The steps to generate Aruco Marker on this website is quite easy, and is as follows –
- Choose the Aruco Marker Dictionary
- Give the Marker ID
- Give the desired size of the marker
The Aruco Marker is generated instantaneously while you give inputs in the above steps and can be saved in SVG format or PDF format.
How Aruco Markers Works
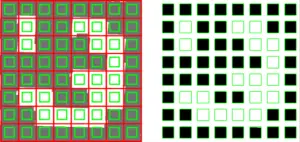
An Aruco Marker consists of black and white parts where black denotes 1 and white denotes 0 creating the matrix of binary form 0 and 1. In the above 6×6 marker (ignoring the boundary) first, third and fifth columns represent parity bits, and the second, fourth and 6th columns represent data bits. This scheme can be used to encode unique data in the marker such as height, depth, and angle for creating virtual 3D images in the process.
Aruco Marker Detection with Python OpenCV
1. Installing Libraries
First, you have to download all the required libraries which are as follows –
i) OpenCV python (Contrib Version)
Here, we will not install the regular opencv-python library, instead, we will install another community-contributed Python OpenCV library which is the opencv-contrib python library. This is because the contrib library contains support for Aruco Marker which is not present in the regular one.
“pip install opencv-contrib-python” - command line to install the library which is used for arUco
ii) Numpy
Numpy library is an extremely important one as we are dealing with numbers encoded in Aruco Marker in matrix form. Numpy library provides various linear algebra functions for matrix operations.
NOTE: All the codes further are complete code in their own self and sequence programs are updated codes of the previous one. The bold codes will help to understand the add-on in the code
2. Importing libraries
Let us now import the required libraries and modules.
Import cv2
Import cv2.aruco as aruco
Import numpy as np
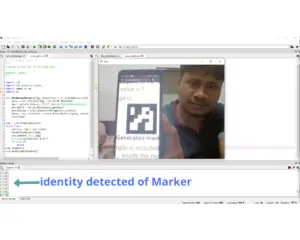
3. Detection of the ArUco Marker ID
Now we will create a user define function findArucoMarkers(), which will help us to detect Aruco Marker Id. In this function, we pass image, marker size, and total markers as parameters.
Here we first change our color image to a grayscale image for ease of working and then prepare a key by using the information from the input parameters. Then we utilize OpenCV’s Aruco module function detectMarkers() function to get marker id and coordinates of the aruco marker.
Finally, we pass the webcam image continuously to this function findArucoMarkers() in an infinite while loop till we break out from the program.
import cv2
import cv2.aruco as aruco
import numpy as np
import os

def findArucoMarkers(img, markerSize = 6, totalMarkers=250, draw=True):
    gray = cv2.cvtColor(img, cv2.COLOR_BGR2GRAY)
    key = getattr(aruco, f'DICT_{markerSize}X{markerSize}_{totalMarkers}')
    arucoDict = aruco.Dictionary_get(key)
    arucoParam = aruco.DetectorParameters_create()
    bboxs, ids, rejected = aruco.detectMarkers(gray, arucoDict, parameters = arucoParam)
    print(ids)

cap = cv2.VideoCapture(0)
while True:
    success, img = cap.read()
    findArucoMarkers(img)
    cv2.imshow('img',img)
    k = cv2.waitKey(30) & 0xff
    if k == 27:
        break
cap.release()
cv2.destroyAllWindows()
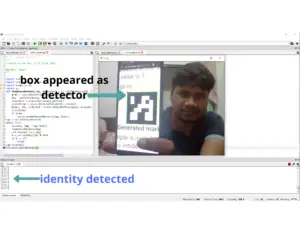
4. Creating Border Around Aruco Marker
Now we will add code to create the boundary around the Aruco Marker by using the coordinates values we got in the above section. We pass these coordinates (bboxs) and the image (img) to aruco.drawDetectedMarkers().
We can see in the output that the green bounding box has appeared around the aruco marker.
import cv2
import cv2.aruco as aruco
import numpy as np
import os
def findArucoMarkers(img, markerSize = 6, totalMarkers=250, draw=True):
    gray = cv2.cvtColor(img, cv2.COLOR_BGR2GRAY)
    key = getattr(aruco, f'DICT_{markerSize}X{markerSize}_{totalMarkers}')
    arucoDict = aruco.Dictionary_get(key)
    arucoParam = aruco.DetectorParameters_create()
    bboxs, ids, rejected = aruco.detectMarkers(gray, arucoDict, parameters = arucoParam)
    print(ids)
    if draw:
        aruco.drawDetectedMarkers(img, bboxs)
cap = cv2.VideoCapture(0)
while True:
    success, img = cap.read()
    findArucoMarkers(img)
    cv2.imshow('img',img)
    k = cv2.waitKey(30) & 0xff
    if k == 27:
        break
cap.release()
cv2.destroyAllWindows()
( Aruco marker in the above program was coded for the 6X6 matrix and it’s hard to show using by phone. Also if you are detecting aruco of any other dimensions you have to modify code accordingly )
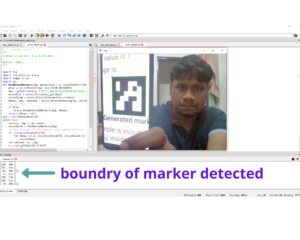
5. Detection of Multiple Aruco Markers
We are required not only to detect a marker but its boundary as well for augmenting the image on the marker. We are making a code that can work for multiple aruco markers and to achieve this we loop through all the markers and augment each marker.
We have added the loop in the below code, and are printing coordinates of the marker as a placeholder where we will write more code in the next section. Also note, we have modified our findArucoMarkers() to return coordinates and ids of the marker.
import cv2
import cv2.aruco as aruco
import numpy as np
import os
def findArucoMarkers(img, markerSize = 6, totalMarkers=250, draw=True):
    gray = cv2.cvtColor(img, cv2.COLOR_BGR2GRAY)
    key = getattr(aruco, f'DICT_{markerSize}X{markerSize}_{totalMarkers}')
    arucoDict = aruco.Dictionary_get(key)
    arucoParam = aruco.DetectorParameters_create()
    bboxs, ids, rejected = aruco.detectMarkers(gray, arucoDict, parameters = arucoParam)
    # print(ids)
    if draw:
        aruco.drawDetectedMarkers(img, bboxs)
    return [bboxs, ids]
cap = cv2.VideoCapture(0)
while True:
    success, img = cap.read()
    arucofound = findArucoMarkers(img)
     # loop through all the markers and augment each one
    if  len(arucofound[0])!=0:
        for bbox, id in zip(arucofound[0], arucofound[1]):
            print(bbox)
    cv2.imshow('img',img)
    k = cv2.waitKey(30) & 0xff
    if k == 27:
        break
cap.release()
cv2.destroyAllWindows()
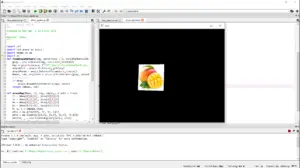
6. Augmenting the Image on the Marker
Augmenting an image on the marker is just like replacing the detected Aruco Marker with an image instead. In our code, we have used just one image that will replace any number of Aruco Marker detected by the camera.
We create another custom function arucoAug() to augment the image in which we first define four corner points i.e, tl top left, bl bottom left, br bottom right, tr top right. Then we get the image height, width, and channel and then warp our image on the marker by finding the homography, which will give us a matrix. This matrix will help us to transform from one image to another image and give us the ability to overlay our image into destination images.
We will call this function arucoAug() in the for loop that we had discussed in the above section.
import cv2
import cv2.aruco as aruco
import numpy as np
import os
def findArucoMarkers(img, markerSize = 6, totalMarkers=250, draw=True):
    gray = cv2.cvtColor(img, cv2.COLOR_BGR2GRAY)
    key = getattr(aruco, f'DICT_{markerSize}X{markerSize}_{totalMarkers}')
    arucoDict = aruco.Dictionary_get(key)
    arucoParam = aruco.DetectorParameters_create()
    bboxs, ids, rejected = aruco.detectMarkers(gray, arucoDict, parameters = arucoParam)
    # print(ids)
    if draw:
        aruco.drawDetectedMarkers(img, bboxs)
    return [bboxs, ids]

def arucoAug(bbox, id, img, imgAug, drawId = True):
    tl = bbox[0][0][0], bbox[0][0][1]
    tr = bbox[0][1][0], bbox[0][1][1]
    br = bbox[0][2][0], bbox[0][2][1]
    bl = bbox[0][3][0], bbox[0][3][1]
    h, w, c = imgAug.shape
    pts1 = np.array([tl, tr, br, bl])
    pts2 = np.float32([[0,0], [w,0], [w,h], [0,h]])
    matrix, _ = cv2.findHomography(pts2, pts1)
    imgout = cv2.warpPerspective(imgAug, matrix, (img.shape[1], img.shape[0]))
    return imgout
cap = cv2.VideoCapture(0)
imgAug = cv2.imread(r"C:\Users\Admin\Desktop\mango.jpg")
while True:
    success, img = cap.read()
    arucofound = findArucoMarkers(img)
     # loop through all the markers and augment each one
    if  len(arucofound[0])!=0:
        for bbox, id in zip(arucofound[0], arucofound[1]):
            img = arucoAug(bbox, id, img, imgAug)
    cv2.imshow('img',img)
    k = cv2.waitKey(30) & 0xff
    if k == 27:
        break
cap.release()
cv2.destroyAllWindows()
7. Augmenting Image with Real Background
The output till now was about showing an image on the marker but we got a black background, which is not the desired output. Hence we will now put the actual background back in this section.
For this, we first use the Convex poly method we can reverse it i.e, showing background but not image and marker though it will detect it but by excluding the part. Now we have two different outputs so let’s merge them by a simple method and our final output will be displayed.
import cv2
import cv2.aruco as aruco
import numpy as np
import os
def findArucoMarkers(img, markerSize = 6, totalMarkers=250, draw=True):                            gray = cv2.cvtColor(img, cv2.COLOR_BGR2GRAY)
    key = getattr(aruco, f'DICT_{markerSize}X{markerSize}_{totalMarkers}')
    arucoDict = aruco.Dictionary_get(key)
    arucoParam = aruco.DetectorParameters_create()
    bboxs, ids, rejected = aruco.detectMarkers(gray, arucoDict, parameters = arucoParam)
    # print(ids)
    if draw:
        aruco.drawDetectedMarkers(img, bboxs)
    return [bboxs, ids]

def arucoAug(bbox, id, img, imgAug, drawId = True):
    tl = bbox[0][0][0], bbox[0][0][1]
    tr = bbox[0][1][0], bbox[0][1][1]
    br = bbox[0][2][0], bbox[0][2][1]
    bl = bbox[0][3][0], bbox[0][3][1]
    h, w, c = imgAug.shape
    pts1 = np.array([tl, tr, br, bl])
    pts2 = np.float32([[0,0], [w,0], [w,h], [0,h]])
    matrix, _ = cv2.findHomography(pts2, pts1)
    imgout = cv2.warpPerspective(imgAug, matrix, (img.shape[1], img.shape[0]))
    cv2.fillConvexPoly(img, pts1.astype(int), (0, 0, 0))
    imgout = img + imgout
    return imgout
cap = cv2.VideoCapture(0)
imgAug = cv2.imread(r"C:\Users\Admin\Desktop\aRUCO fiLES\ARimage\mango.jpg")
while True:
    success, img = cap.read()
    arucofound = findArucoMarkers(img)
    # loop through all the markers and augment each one
    if len(arucofound[0])!=0:
        for bbox, id in zip(arucofound[0], arucofound[1]):
            img = arucoAug(bbox, id, img, imgAug)
    cv2.imshow('img',img)
    k = cv2.waitKey(30) & 0xff
    if k == 27:
        break
cap.release()
cv2.destroyAllWindows()
Conclusion
Hope you liked our project on Aruco Marker detection with Python OpenCV for augmented reality. We also explained what is Aruco Marker, how to create them, and the difference between Aruco Marker vs QR code.
Reference: OpenCV Documentation


One Response
Great tutorial Saurabh. Just what i was looking for to help get a handle on CV with Aruco using python