
Introduction
In this article, we will learn how to scrape data from Spotify which is a popular music streaming and podcast platform. This scraping will be done by using a Web API of Spotify, known as Spotipy. Our aim through this hands-on experience of web scraping is to fetch the information of all the tracks in Spotify playlists. We can obtain the information of tracks of any playlist, we only need to have URI (Uniform Resource Identifier) of a playlist.
For using Spotipy API, the user requires two credential keys, which are credential_id and credential_secret. These two keys are unique for each user and help Spotify in identifying the users of their Web API. In the following part of this article, I will walk through the steps on how to create these two unique keys through Spotify developers account with the help of screenshots.
Generating Authorizing Keys for Spotipy
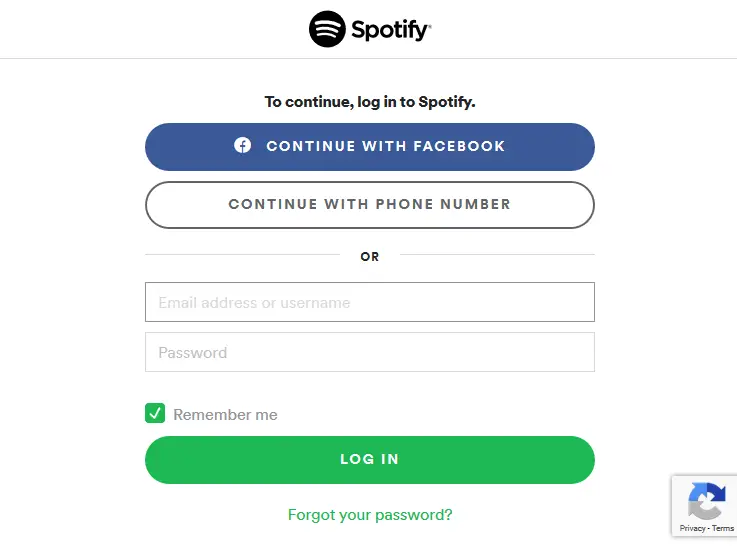
Step 1: Creating Spotify Developers Account
For creating an account on Spotify developers website, you can either use your existing Spotify account which you use for listening to music, otherwise, you can sign up using your Facebook account or through your mail-id.

Step 2: Creating a New App
After creating the account and logging in, you will find a screen as shown below.
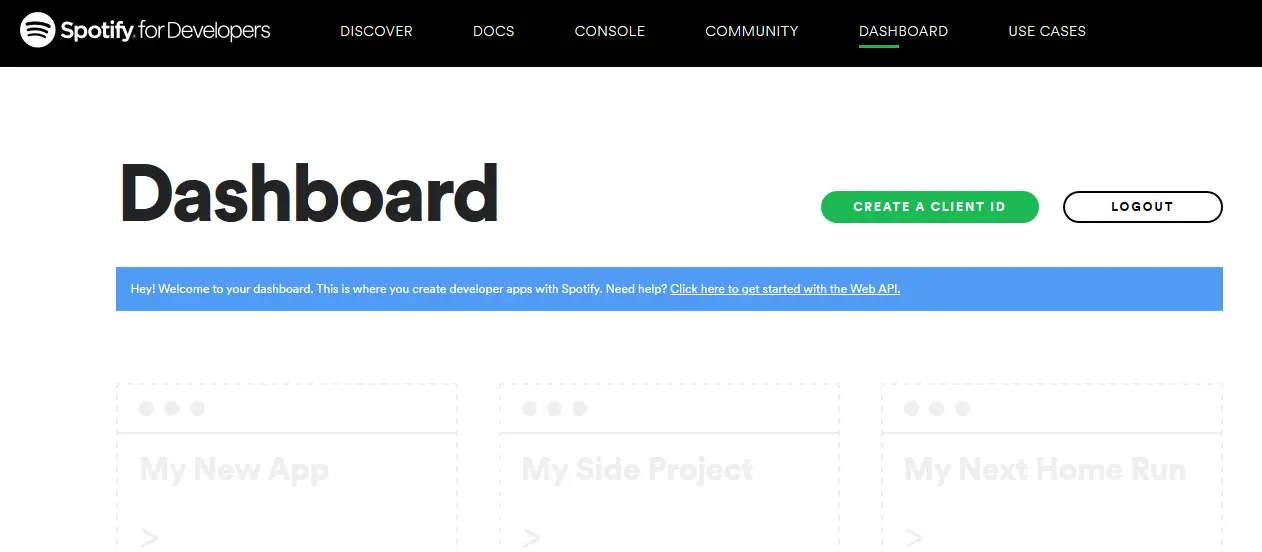
The next thing which we have to do is to create a new app by either clicking on create client id button or by clicking on create new app button.
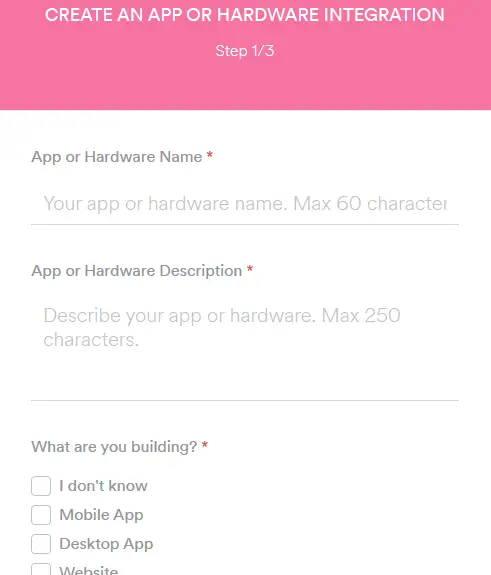
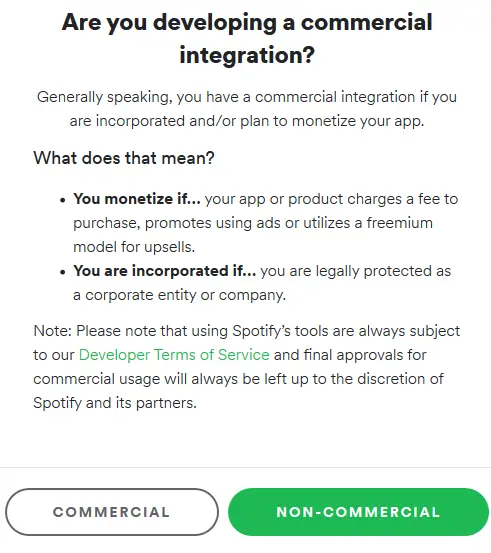
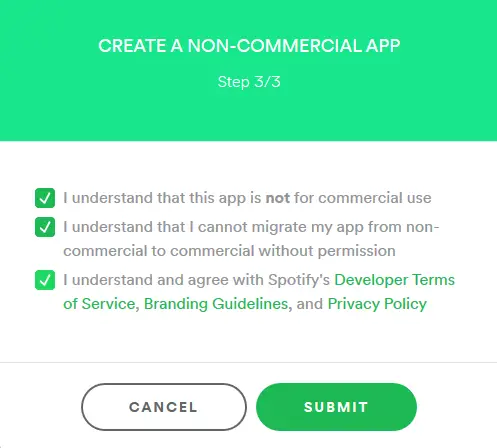
After this, Spotify asks some basic questions regarding our new app. After this, you have to tell Spotify whether you will use the app for any monetary advantages i.e. whether the app is commercial or not. It is advised to choose the non-commercial option. Lastly, we need to agree to some permissions and agreements
Step 3: Obtaining Client Id and Client Secret Keys
Once the app is created, we will be able to see a dashboard along with the name of our app and description, below the description we will find 32 characters long alphanumeric Client Id and below this will get the 32 characters long alphanumeric Client Secret. So this was the aim of the walkthrough, we have obtained the two keys required for authorizing the usage of Spotify Web API.
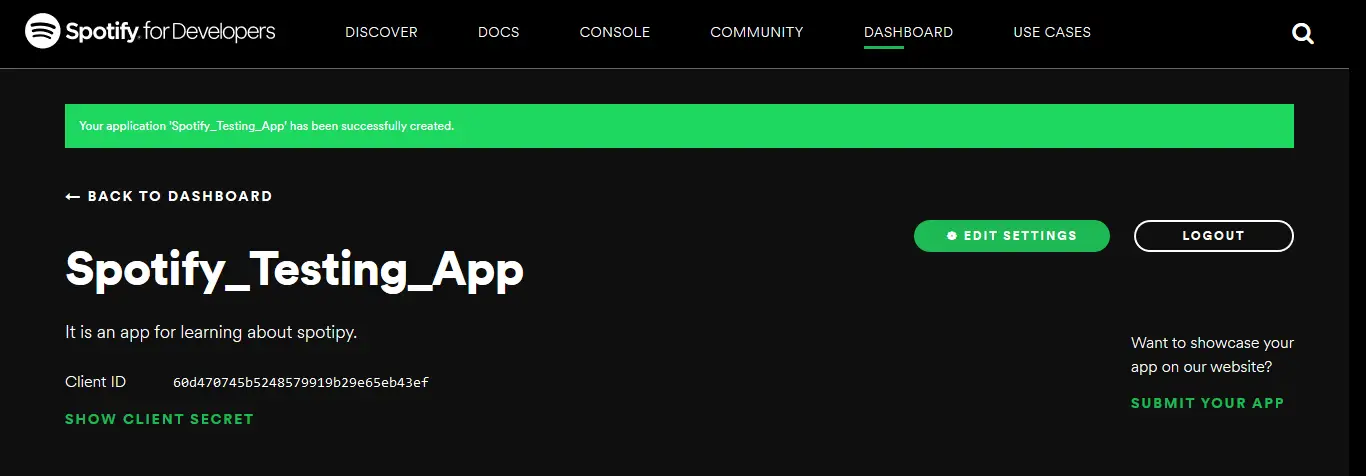
NOTE – Remember not to use the keys visible in the above image, as mentioned earlier these are unique keys and thus you’ll be required to create them for your app, otherwise you may encounter an error.
Now it’s time to start our hands-on practical example where we will fetch the playlists data and track information using spotipy.
Importing Spotipy library and authorization credentials
Initially, we need to load the necessary libraries and credential files.
import spotipy
from spotipy.oauth2 import SpotifyClientCredentials
import json
For better access to credential keys, We will load these authorization keys in a .json file, simplifying the process of fetching.
The below code shows how you can add the two keys in the authorization.json file.
Contents of Authorization.json
Remember the below keys are for representing purpose, you are required to create your own client id and client secret on the Spotify developers account.
{"client_id": "5e9a80618b284145b54bb1f7df94bb6c",
"client_secret": "0cdef7160e4143118e48abdd939668e8"}
In another playlists_like_dislike.json file, We have mentioned the URI (Uniform Resource Identifier) of the playlists. This file will help in managing the URI of multiple playlists. As informed earlier, URI helps in identifying different playlists on Spotify.
One of the features of playlists_like_dislike.json file is the like attribute which takes a boolean value. Using this boolean value, we can tell which playlists songs a user likes or dislikes. If true, the user likes all the songs of the playlist and if false, the user dislikes all the songs of the playlist.
We can see below how the playlists URI should be mentioned along with the like parameter.
NOTE – You can fetch data of up to 99 songs in a single connection session. Now, these 99 songs can be divided into different playlists or can be present in a single playlist. If you will try to fetch information of more than 99 songs in a single connection session, then you will encounter an error and you will not be able to fetch the data, as per Spotify’s policy.
Contents of Playlists_like_dislike.json
[
{“uri”: “spotify:user:Test_1:playlist:27rVIOLKlIKAg63whXrAzz”,
“like”: true},
{“uri”: “spotify:user:Test_2:playlist:6WjtPvXBC2iSO24VsfBpnc”,
“like”: false}
]
How to get the URI from Spotify Playlist
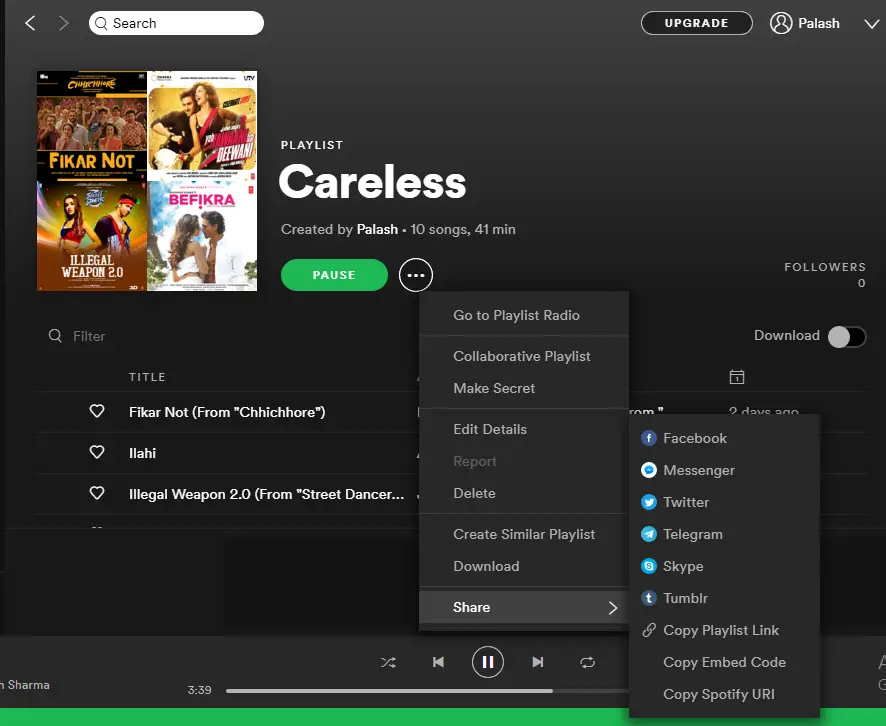
In the above image, you can see the location from where you can obtain the URI of a particular playlist, in the case of the Spotify desktop app. You have to click at these three dots and then you can copy the URI of the desired playlist. Here playlist link and Spotify URI contain the same link. So you can copy any of these. The URI is 20 characters long alphanumeric code which is present at the end of the link.
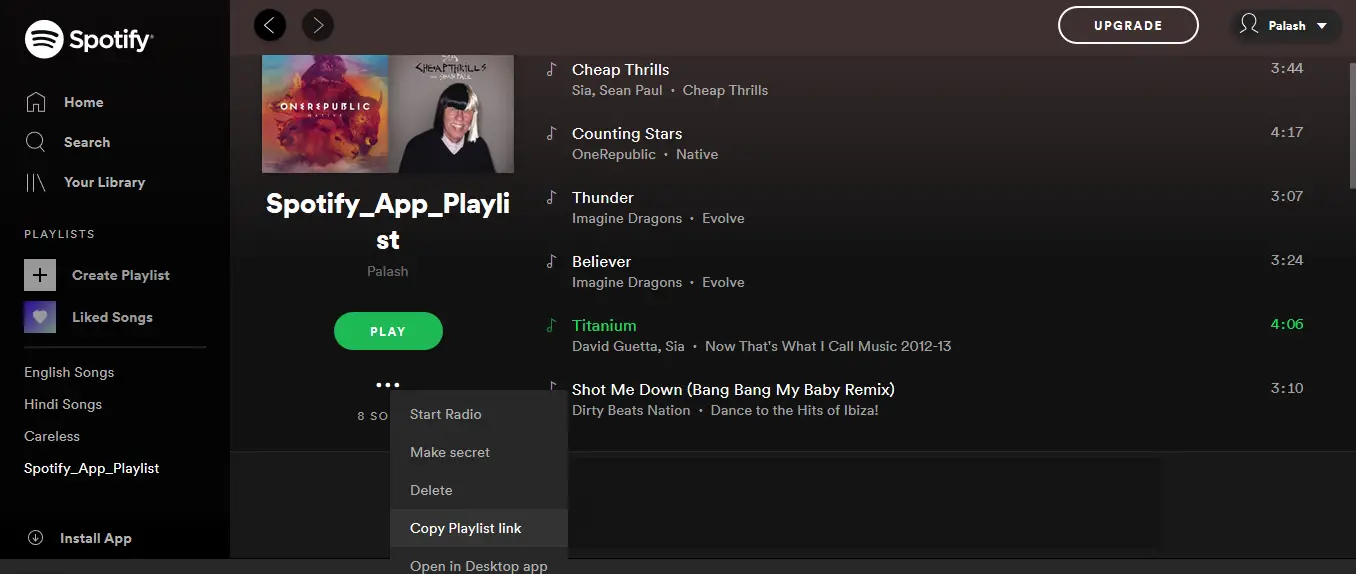
The below image is an example of the web app of Spotify, so if you are using the web app, then you will see something as shown below.
This URI will help while communicating with Spotify API and also in fetching the correct information of the songs present in the playlists.
Along with this, there can be multiple playlists in a single .json file, so to access each playlist, indexing is used and here, 0th index playlist is accessed using below code.
credentials = json.load(open('authorization.json'))
client_id = credentials['client_id']
client_secret = credentials['client_secret']

playlist_index = 0

playlists = json.load(open('playlists_like_dislike.json'))
playlist_uri = playlists[playlist_index]['uri']
like = playlists[playlist_index]['like']
client_credentials_manager = SpotifyClientCredentials(client_id=client_id,client_secret=client_secret)

sp = spotipy.Spotify(client_credentials_manager=client_credentials_manager)
Getting Information of tracks in Spotify playlist
For obtaining the username and playlist_id, we are using the : as an identifier. These unique id’s help in getting the tracks of each playlist.
uri = playlist_uri    # the URI is split by ':' to get the username and playlist ID
username = uri.split(':')[2]
playlist_id = uri.split(':')[4]
results = sp.user_playlist(username, playlist_id, 'tracks')
Fetching details of the track like ID’s, Titles and Artists
Here data for each playlist is collected in the form of a dictionary. The keys of this dictionary contain track information. We will use list datatype for adding data like IDs, Titles and Artists.
Artists mentioned are the primary artists in each track.
In the below mentioned for loop, we are going over each track of a playlist and adding the track Id, name and artist information to the dataframe of tracks.
playlist_tracks_data = results['tracks']
playlist_tracks_id = []
playlist_tracks_titles = []
playlist_tracks_artists = []
playlist_tracks_first_artists = []

for track in playlist_tracks_data['items']:
    playlist_tracks_id.append(track['track']['id'])
    playlist_tracks_titles.append(track['track']['name'])
    # adds a list of all artists involved in the song to the list of artists for the playlist
    artist_list = []
    for artist in track['track']['artists']:
        artist_list.append(artist['name'])
    playlist_tracks_artists.append(artist_list)
    playlist_tracks_first_artists.append(artist_list[0])
Extracting Audio Features of each track
Spotify has a unique attribute of providing information about the features of song available on their platform. There are various features like danceability, energy, tempo, and many more. You can have a look at them here. After fetching these audio features, they will be stored in a dataframe.
features = sp.audio_features(playlist_tracks_id)
import numpy as np
import pandas as pd
features_df = pd.DataFrame(data=features, columns=features[0].keys())
Merging Dataframes for getting audio features and track information
Now the dataframe of audio features must be merged with title and artist information. We will also reorder the dataframe for better accessibility.
features_df['title'] = playlist_tracks_titles
features_df['first_artist'] = playlist_tracks_first_artists
features_df['all_artists'] = playlist_tracks_artists
#features_df = features_df.set_index('id')
features_df = features_df[['id', 'title', 'first_artist', 'all_artists',
                           'danceability', 'energy', 'key', 'loudness',
                           'mode', 'acousticness', 'instrumentalness',
                           'liveness', 'valence', 'tempo',
                           'duration_ms', 'time_signature']]
features_df.tail()
Data Exploration
To understand the scraped data in a better way, we will perform data exploration with the help of visualization.
import matplotlib.pyplot as plt
import seaborn as sns
%matplotlib inline
The following count plot will tell which artists have most number of songs in the playlist.
plt.figure(figsize=(20,30))
sns.countplot(features_df['first_artist'])
plt.xticks(rotation=90)

#features_df = features_df.drop(['first_artist', 'all_artists'], axis=1)
Spotify Audio Analysis
Spotify provides the feature where a song can be analyzed on the basis of bars, beats, sections, tatum and segments in the song. You can learn more about these attributes from here.Since beats and tatums represent the same information in scaled form depicted by bars, we will only consider bars, sections and segments.
NOTE – These attributes of each audio track provide in-depth technical information and thus it takes time in processing and fetching. So some time will be spent here in fetching all the information. The output retrying … is the default message displayed by Spotipy for informing the user.
num_bars = []
num_sections = []
num_segments = []

for i in range(0,len(features_df['id'])):
    analysis = sp.audio_analysis(features_df.iloc[i]['id'])
    num_bars.append(len(analysis['bars'])) # beats/time_signature
    num_sections.append(len(analysis['sections']))
    num_segments.append(len(analysis['segments']))
Visualizing the audio options to learn more about them.
plt.figure(figsize=(16,4))
plt.subplot(1,3,1)
plt.hist(num_bars, bins=20)
plt.xlabel('num_bars')
plt.subplot(1,3,2)
plt.hist(num_sections, bins=20)
plt.xlabel('num_sections')
plt.subplot(1,3,3)
plt.hist(num_segments, bins=20)
plt.xlabel('num_segments')

Now we will add these audio features to our existing dataframe which will enhance our dataset.
features_df['num_bars'] = num_bars
features_df['num_sections'] = num_sections
features_df['num_segments'] = num_segments
features_df.head()
The following code helps in generating .csv file for a playlist. This .csv file which contains the above dataframe information will be stored in the same folder where this jupyter notebook is stored. Remember to add the .csv extension to each file.
Creating Large Dataset
The below csv file will consist of the information of only a single playlist whose index was provided initially, to execute it for multiple playlists, you can use a for loop and can run over each playlist and thus creating a large dataset.
So for all the URI’s provided in the playlists.like_dislike.json file, you will be having a new .csv file with the information of the particular playlist in it. In this way you can build a large dataset of .csv files.
features_df.to_csv("playlist_" + str(playlist_index) + ".csv", encoding='utf-8',index="false")
Conclusion
So we have reached the endpoint of this interactive article on Web Scraping. In this article, we learned how to scrape playlist information of different users with the help of Spotify Web API, known as Spotipy. We fetched each and every audio feature available for the tracks. This article also covered how we can create a dataset of playlists and its tracks information. For exploring more and understanding the deeper details of Spotipy, you can refer to the below-mentioned links.

