
Introduction
In this Keras tutorial, we will talk about the Image Data Generator class of Keras i.e. ImageDataGenerator which is used for generating images using Image Augmentation techniques dynamically during training. We will understand what is image data generator in Keras, see different image augmentation techniques, and finally see various examples for easy understanding for beginners.
What is Image Data Generator (ImageDataGenerator) in Keras?
The ImageDataGenerator class in Keras is used for implementing image augmentation. The major advantage of the Keras ImageDataGenerator class is its ability to produce real-time image augmentation. This simply means it can generate augmented images dynamically during the training of the model making the overall mode more robust and accurate.
To appreciate this Keras capability of image data generator we need to imagine if this class was not present. Then in that case we would have to manually generate the augmented image as a preprocessing step and include them in our training dataset. But here ImageDataGenerator takes care of this automatically during the training phase. And it does all this with better memory management so that you can train a huge dataset efficiently with lesser memory consumption. Is it not wonderful?
There are mainly five different techniques for applying image augmentation, we will discuss these techniques in the coming section.
What is Image Augmentation?
Image Augmentation is a way of applying different types of transformation techniques on actual images, thus producing copies of the same image with alterations. This helps to train deep learning models on more image variations than what is present in the actual dataset.
This is especially useful when we do not have enough images to train the model on, hence we can use augmented images to enlarge the training set and provide more images to the model.
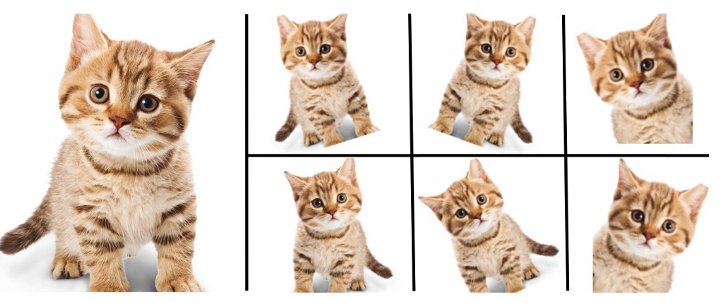
Image Augmentation Approaches
- Data generation with expanding dataset (less common)
- In-place or On-the-fly data generation (used by Keras ImageDataGenerator)
- Hybrid Method – Dataset Generation and In-place data augmentation.
Types of Data Augmentation with Keras ImageDataGenerator
In this part, we’ll go over different techniques that are used for image augmentation.
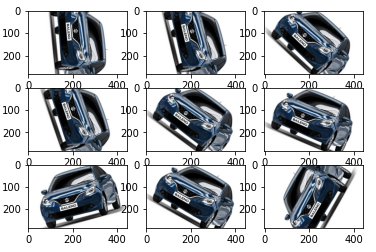
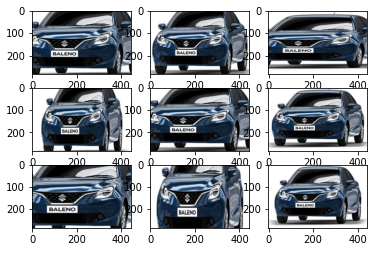
1. Random Rotations
The image rotation technique enables the model by generating images of different orientations.
The ImageDataGenerator class in Keras uses this technique to generate randomly rotated images in which the angle can range from 0 degrees to 360 degrees. Our example goes like this –
- The first step is to import the necessary libraries and load the image.
- The next step is to convert the image to an array for processing. Next, we perform expansion of the array by inserting a new axis.
- Then we call the ImageDataGenerator function and pass the rotation_range argument in this function.
- Now, an iterator is constructed for data augmentation
- Lastly, we are plotting the samples and images for the displaying output.
# Importing the required libraries
from numpy import expand_dims
from keras.preprocessing.image import load_img
from keras.preprocessing.image import img_to_array
from keras.preprocessing.image import ImageDataGenerator
from matplotlib import pyplot

# Loading desired images
img = load_img('Car.jpg')

# For processing, we are converting the image(s) to an array
data = img_to_array(img)

# Expanding dimension to one sample
samples = expand_dims(data, 0)

# Calling ImageDataGenerator for creating data augmentation generator.
datagen = ImageDataGenerator(rotation_range=90)

# Creating an iterator for data augmentation
it = datagen.flow(samples, batch_size=1)

# Preparing the Samples and Plot for displaying output
for i in range(9):
	# preparing the subplot
	pyplot.subplot(330 + 1 + i)
	# generating images in batches
	batch = it.next()
	# Remember to convert these images to unsigned integers for viewing
	image = batch[0].astype('uint8')
	# Plotting the data
	pyplot.imshow(image)
# Displaying the figure
pyplot.show()
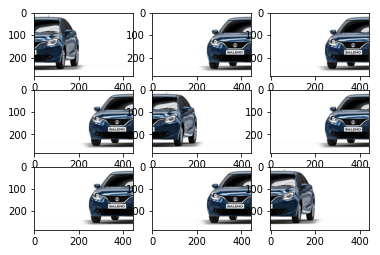
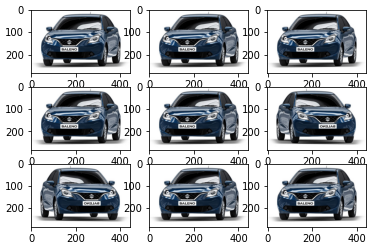
2. Random Shifts
The random shifts technique helps in improving those images that are not properly positioned. There can be a scenario where they are not in the center of actual orientation.
Keras ImageDataGenerator uses parameters height_shift_range for vertical shifts in an image and for horizontal shifts in an image, we can use width_shift_range. The values specified are either specified in the form of percentage or integer.
Going forward the code for loading libraries and sample image will be the same as in the first example, with only the differing data augmentation part.
Horizontal Shift Example
For horizontal shift, we are using width_shift_range argument.
# For processing, we are converting the image(s) to an array
data = img_to_array(img)

# Expanding dimension to one sample
samples = expand_dims(data, 0)

# Calling ImageDataGenerator for creating data augmentation generator.
datagen = ImageDataGenerator(width_shift_range=[-200,200])

# Creating an iterator for data augmentation
it = datagen.flow(samples, batch_size=1)

# Preparing the Samples and Plot for displaying output
for i in range(9):
	# preparing the subplot
	pyplot.subplot(330 + 1 + i)
	# generating images in batches
	batch = it.next()
	# Remember to convert these images to unsigned integers for viewing
	image = batch[0].astype('uint8')
	# Plotting the data
	pyplot.imshow(image)
# Displaying the figure
pyplot.show()
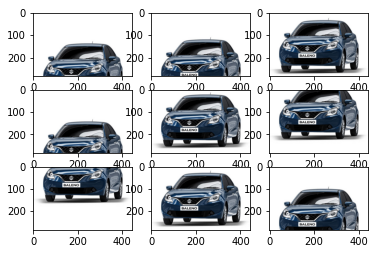
Vertical Shift Example
For the vertical shift data augmentation technique, we are using height_shift_range argument.
# For processing, we are converting the image(s) to an array
data = img_to_array(img)

# Expanding dimension to one sample
samples = expand_dims(data, 0)

# Calling ImageDataGenerator for creating data augmentation generator.
datagen = ImageDataGenerator(height_shift_range=0.5)

# Creating an iterator for data augmentation
it = datagen.flow(samples, batch_size=1)

# Preparing the Samples and Plot for displaying output
for i in range(9):
	# preparing the subplot
	pyplot.subplot(330 + 1 + i)
	# generating images in batches
	batch = it.next()
	# Remember to convert these images to unsigned integers for viewing
	image = batch[0].astype('uint8')
	# Plotting the data
	pyplot.imshow(image)
# Displaying the figure
pyplot.show()
3. Random Flips
Another beneficial technique for performing augmentation is the flipping of images. ImageDataGenerator helps in flipping the images, it can either flip horizontally or vertically.
The below example shows how we can randomly flip the images.
For horizontal flip operation, we are using horizontal_flip argument.
# For processing, we are converting the image(s) to an array
data = img_to_array(img)

# Expanding dimension to one sample
samples = expand_dims(data, 0)

# Calling ImageDataGenerator for creating data augmentation generator.
datagen = ImageDataGenerator(horizontal_flip=True)

# Creating an iterator for data augmentation
it = datagen.flow(samples, batch_size=1)

# Preparing the Samples and Plot for displaying output
for i in range(9):
	# preparing the subplot
	pyplot.subplot(330 + 1 + i)
	# generating images in batches
	batch = it.next()
	# Remember to convert these images to unsigned integers for viewing
	image = batch[0].astype('uint8')
	# Plotting the data
	pyplot.imshow(image)
# Displaying the figure
pyplot.show()
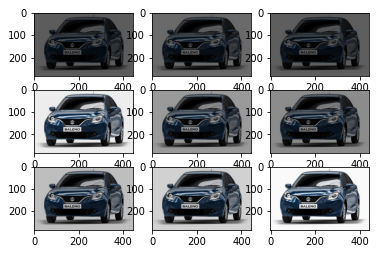
4. Random Brightness
The fourth kind of augmentation technique is altering the brightness of images. This is the most useful technique as in most cases we have images with low or almost no lighting. Thus, we can train our model on the images generated using these images.
For controlling the brightness in the images through ImageDataGenerator, we have an argument called brightness_range. For this parameter, the negative values will result in the darkening of images whereas positive values will produce bright images.
The brightness is controlled using brightness_range argument.
# For processing, we are converting the image(s) to an array
data = img_to_array(img)

# Expanding dimension to one sample
samples = expand_dims(data, 0)

# Calling ImageDataGenerator for creating data augmentation generator.
datagen = ImageDataGenerator(brightness_range=[0.2,1.0])

# Creating an iterator for data augmentation
it = datagen.flow(samples, batch_size=1)

# Preparing the Samples and Plot for displaying output
for i in range(9):
	# preparing the subplot
	pyplot.subplot(330 + 1 + i)
	# generating images in batches
	batch = it.next()
	# Remember to convert these images to unsigned integers for viewing
	image = batch[0].astype('uint8')
	# Plotting the data
	pyplot.imshow(image)
# Displaying the figure
pyplot.show()
5. Random Zoom
The last technique is zooming in or zooming out on any image. ImageDataGenerator class is passed e a float value for the zoom_range parameter that takes a lower limit and an upper limit. Once specified, a zoom operation will be applied to an image.
For zooming in, values lesser than 1 should be used. On the other hand, for zooming out, we have to use values greater than 1.
The example for zoom in and zoom out operation can be seen below.
This zooming in and zooming out operation is implemented using zoom_range argument.
# For processing, we are converting the image(s) to an array
data = img_to_array(img)

# Expanding dimension to one sample
samples = expand_dims(data, 0)

# Calling ImageDataGenerator for creating data augmentation generator.
datagen = ImageDataGenerator(zoom_range=[0.5,1.0])

# Creating an iterator for data augmentation
it = datagen.flow(samples, batch_size=1)

# Preparing the Samples and Plot for displaying output
for i in range(9):
	# preparing the subplot
	pyplot.subplot(330 + 1 + i)
	# generating images in batches
	batch = it.next()
	# Remember to convert these images to unsigned integers for viewing
	image = batch[0].astype('uint8')
	# Plotting the data
	pyplot.imshow(image)
# Displaying the figure
pyplot.show()
- Also Read – Different Types of Keras Layers Explained for Beginners
- Also Read – Keras Dropout Layer Explained for Beginners
- Also Read – Keras Dense Layer Explained for Beginners
- Also Read – Keras Convolution Layer – A Beginner’s Guide
- Also Read – Beginners’s Guide to Keras Models API
- Also Read – Types of Keras Loss Functions Explained for Beginners
Conclusion
We have reached the end of another Keras tutorial where we learned about the Image Data Generator class of Keras i.e. ImageDataGenerator. We looked at different types of methods used for implementing image augmentation along with various examples.
Reference Keras Documentation

