
Introduction
Keras layers are the building blocks of the Keras library that can be stacked together just like legos for creating neural network models. This ease of creating neural networks is what makes Keras the preferred deep learning framework by many. There are different types of Keras layers available for different purposes while designing your neural network architecture. In this tutorial, these different types of Keras layers will be explained that should be helpful, especially for beginners for their deep learning projects.
Types of Keras Layers Explained
At a high-level Keras gives you two choices to create layers by using Keras Layers API and Keras Custom Layers. Let us understand them.
1) Kera Layers API
Keras provides plenty of pre-built layers for different neural network architectures and purposes via its Keras Layers API. These available layers are normally sufficient for creating most of the deep learning models with considerable flexibility, hence they are quite useful for beginners.
Below are some of the popular Keras layers –
-
- Dense Layer
- Flattened Layer
- Dropout Layer
- Reshape Layer
- Permute Layer
- RepeatVector Layer
- Lambda Layer
- Pooling Layer
- Locally Connected Layer
2) Custom Keras Layers
Although Keras Layer API covers a wide range of possibilities it does not cover all types of use-cases. This is why Keras also provides flexibility to create your own custom layer to tailor-make it as per your needs. We will cover this in more detail with examples in the later sections.
Important Keras Layers API Functions Explained
Let us understand some of the important Keras API functions along with examples for a better understanding.
1. Dense Layer
Dense Layer is a widely used Keras layer for creating a deeply connected layer in the neural network where each of the neurons of the dense layers receives input from all neurons of the previous layer. At its core, it performs dot product of all the input values along with the weights for obtaining the output.
Example –
from keras.models import Sequential
from keras.layers import Activation, Dense

model = Sequential()
layer_1 = Dense(16, input_shape = (8,))
model.add(layer_1)
layer_1.input_shape
layer_1.output_shape
2. Flatten Layer
As its name suggests, Flatten Layers is used for flattening of the input. For example, if we have an input shape as (batch_size, 3,3), after applying the flatten layer, the output shape is changed to (batch_size,9).
Flatten function has one argument as follows –
data_format – An optional argument, it mainly helps in preserving weight ordering when data formats are switched.
The following cell shows the syntax of flatten function
keras.layers.Flatten(data_format = None)
Example –
Here the second layer has a shape as (None, 8,16) and we are flattening it to get (None, 128)
from keras.layers import Flatten
model = Sequential()
layer_1 = Dense(8, input_shape=(8,8))
model.add(layer_1)
layer_2 = Flatten()
model.add(layer_2)
layer_2.input_shape
layer_2.output_shape
3. Dropout Layer
The dropout layer is an important layer for reducing over-fitting in neural network models.
Intuitively, the main purpose of dropout layer is to remove the noise that may be present in the input of neurons. This consequently prevents over-fitting of model.
Dropout has three arguments and they are as follows-
- rate − This parameter tells the layer how much of the input data has to be dropped. The range of the value is from 0 to 1.
- noise_shape – This parameter will specify the dimension of shape for applying dropout layer.
- seed − The seed parameter helps in providing random seed i.e. value to the layer.
Example –
Here in the example, “0.5” specifies the amount of input to be removed from the available input data.
import keras

keras.layers.Dropout(0.5, noise_shape = None, seed = None)
4. Reshape Layers
This layer has the responsibility of changing the shape of the input.
For example – If a reshape layer has an argument (4,5) and it is applied to a layer having input shape as (batch_size,5,4), then the output shape of the layer changes to (batch_size,4,5).
The Reshape() function has the following syntax –
keras.layers.v(target_shape)
Example –
Here (16, 8) is set as the target shape in the example.
from keras.models import Sequential
from keras.layers import Activation, Dense, Reshape

model = Sequential()
layer_1 = Dense(16, input_shape = (8,8))
model.add(layer_1)
layer_2 = Reshape((16, 8))
model.add(layer_2)
As we can see that the input shape and output shape of the layers have been changed, this is because reshape layer was used, thus resulting in an output different from its input.
layer_2.input_shape
layer_2.output_shape
5. Permute Layers
Permute layer uses a pattern to alter the shape of the input.
Permute function takes only one argument as follows −
- The dims or dimensions parameter is used for taking the dimension of the pattern.
keras.layers.Permute(dims)
Example –
Here (2, 1) is set as pattern.
from keras.models import Sequential
from keras.layers import Activation, Dense, Permute

model = Sequential()
layer_1 = Dense(16, input_shape =(8, 8))
model.add(layer_1)
layer_2 = Permute((2, 1))
model.add(layer_2)
layer_2.input_shape
layer_2.output_shape
6. RepeatVector Layers
As its name suggests, RepeatVector repeats the input for a fixed number of times.
For example – RepeatVector with argument 9 can be applied to a layer that has an input shape as (batch_size,18), then the output shape of the layer is changed to (batch_size,9,18).
In the following cell, we can see the syntax of RepeatVector function.
keras.layers.RepeatVector(n)
Example –
Here 16 is set as repeat times.
from keras.models import Sequential
from keras.layers import Activation, Dense, RepeatVector

model = Sequential()
layer_1 = Dense(16, input_shape=(8,))
model.add(layer_1)
layer_2 = RepeatVector(16)
model.add(layer_2)
layer_2.input_shape
As we can see in the output layer shape, we are getting the input layer repeated.
layer_2.output_shape
7. Lambda Layers
Lambda Layer is used for transforming the input data with the help of an expression or function.
Lambda layer function has four arguments, they are mentioned below –
- function represents the lambda function.
- output_shape represents the shape of the transformed input.
- mask represents the mask to be applied, if any.
- arguments represents the optional argument for the lamda function as dictionary.
8. Pooling Layer
The pooling layer is used for applying max pooling operations on temporal data.
The syntax of the pooling layer function is shown below –
- The pool_size refers the max pooling windows.
- strides refer the factors for downscale.
Example –
keras.layers.MaxPooling1D (
   pool_size = 2,
   strides = None,
   padding = 'valid',
   data_format = 'channels_last'
)
Apart from MaxPooling1D, MaxPooling2D and MaxPooling3D are used for applying operations on spatial data.
9. Locally Connected Layer
Locally Connected Layers possess similar functionality to Conv1D layer, the difference arises from the usage of weights. In Conv1D layers, weights are shared whereas in case of locally connected layer weights aren’t shared.
The following cell shows the syntax of locally connected layer.
- keras.layers.LocallyConnected1D(n)
Example-
from keras.models import Sequential
from keras.layers import Activation, Dense,LocallyConnected1D

model = Sequential()
Here weight-convolution of 1-D of length 3 is added that consists 10 timesteps and 16 output filters.
model.add(LocallyConnected1D(16, 3, input_shape = (10, 8)))
Here another new 1-D convolutional layer is added.
model.add(LocallyConnected1D(8, 3))
Creating a model with Keras Layer API – Example
Let us see a full example of how we can create a model using Keras Layer API.
First we’ll import the modules that are mandatory for building this layer.
from keras.models import Sequential
from keras.layers import Activation, Dense
from keras import initializers
from keras import regularizers
from keras import constraints
Now we are creating a new model with the help of Sequential Model API, available in Keras.
model = Sequential()
Now a dense layer is created for this model by passing number of neurons/units as a parameter.
The other parameters of the function are conveying the following information –
- First parameter represents the number of units (neurons).
- input_shape represents the shape of input data.
- kernel_initializer represents initializer to be used. he_uniform function is set as value.
- kernel_regularizer represents regularizer to be used. None is set as value.
- kernel_constraint represents constraint to be used. MaxNorm function is set as value.
- activation represents activation to be used. relu function is set as value.
model.add(Dense(32, input_shape=(16,), kernel_initializer = 'he_uniform',
   kernel_regularizer = None, kernel_constraint = 'MaxNorm', activation = 'relu'))
print(model)
With the help of add function, dense layer is added to the model with 16 units and relu is used as activation function.
model.add(Dense(16, activation = 'relu'))
The final layer is again a dense layer consisting of 8 units.
model.add(Dense(8))
print(model)
Output:
We have now created a model that can now be trained with training data. (Not shown here)
Creating a Model with Keras Custom Layer – Example
After learning about how to build a neural network model with Keras API, we will now look at how to create a model using Keras custom layers. For this, we will import the Layer function and then define our custom layer in the class MyCustomLayer
from keras import backend as K
from keras.layers import Layer
class MyCustomLayer(Layer):
    def __init__(self, output_dim, **kwargs):
        self.output_dim = output_dim
        super(MyCustomLayer, self).__init__(**kwargs)
    def build(self, input_shape):
        self.kernel = self.add_weight(name = 'kernel',
                                      shape = (input_shape[1], self.output_dim),
                                      initializer = 'normal', trainable = True)
        super(MyCustomLayer, self).build(input_shape)
def call(self, input_data): return K.dot(input_data, self.kernel)

def compute_output_shape(self, input_shape): return (input_shape[0], self.output_dim)
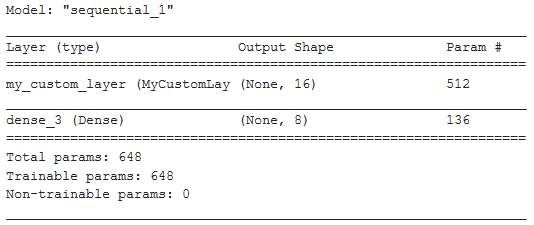
Now we will use this custom layer in creating the model.
from keras.models import Sequential
from keras.layers import Dense
model = Sequential()
model.add(MyCustomLayer(32, input_shape = (16,)))
model.add(Dense(8, activation = 'softmax'))
model.summary()
Conclusion
This tutorial explained different types of Keras layers that can be used in deep learning networks. We saw the difference between custom layers and Keras Layer API and understood them with different examples for better understanding.
Reference – Keras Documentation

