
Introduction
In this article, we will learn about different types of Keras model API that can be used to build neural network models. Keras provides three APIs for this purpose – 1) Sequential Model 2) Functional API and 3) Model Subclassing. Using these APIs it is possible to build neural networks with all types of simple to complex architecture with ease. We will understand each of these Keras model API in detail and give you a comparative analysis of which API should be used in which case.
Types of Keras Models API
1. Keras Sequential Model
The first way of creating neural networks is with the help of the Keras Sequential Model. The basic idea behind this API is to just arrange the Keras layers in sequential order, this is the reason why this API is called Sequential Model. Even in most of the simple artificial neural networks, layers are put in sequential order, the flow of data takes place between layers in one direction.
Keras sequential model API is useful to create simple neural network architectures without much hassle. The only disadvantage of using the Sequential API is that it doesn’t allow us to build Keras models with multiple inputs or outputs. Instead, it is limited to just 1 input tensor and 1 output tensor.
This flow chart shown below depicts the functioning of Sequential API.

Keras Sequential Model Example for usage
An artificial neural network model can be created by simply calling Sequential() API as specified below −
The Keras models class is called to import Sequential API.
from keras.models import Sequential
model = Sequential()
For adding layers to a sequential model, we can create different types of layers first and then use the add() function for adding them.
In the below Keras code snippet, it is shown how an input layer is created along with one hidden layer and one output layer.
from keras.models import Sequential

model = Sequential()
input_layer = Dense(32, input_shape=(8,))
model.add(input_layer)
hidden_layer = Dense(64, activation='relu');
model.add(hidden_layer)
output_layer = Dense(8)
model.add(output_layer)
[adrotate banner=”3″]
2. Keras Functional API
Keras Functional API is the second type of method that allows us to build neural network models with multiple inputs/outputs that also possess shared layers.
With Keras Functional API user gets more flexibility for building complicated models that do not have a sequential type of layering scheme that we discussed above. This kind of complex architecture design can learn deep hidden patterns and rules.
The below image shows the architecture of Functional API.
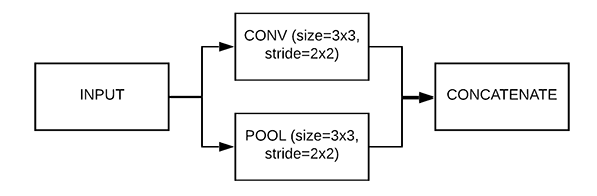
Functional API is a kind of data structure that can be saved easily in a single file. This file can be used for creating a replica of the model without the original code.
Keras Functional API Example for usage
Import an input layer using the below module −
For providing the input, Input layer is imported from the Keras layers class.
from keras.layers import Input
Using the imported Input function, we define the shape of the input layer. The code for this is shown in the cell below-
data = Input(shape=(2,3))
Now we have to add the Dense layer, for this, we import the layers module and then load Dense Layer.
Define layer for the input using the below module −
from keras.layers import Dense
The Keras code shown below will help in adding two dense layers to the input layer.
layer = Dense(2)(data)
print(layer)
Tensor("dense_1/add:0", shape =(?, 2, 2), dtype = float32)
At last, models package is called for importing Model function which will help in creating the final model.
from keras.models import Model
The model() function is passed two parameters i.e. inputs and outputs.
model = Model(inputs = data, outputs = layer)
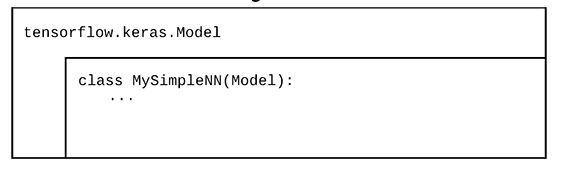
3. Keras Model SubClassing
Both the sequential model and functional API of Keras are useful for building models that are straightforward but they cannot be customized beyond one extent. To overcome this shortcoming Keras provides a more flexible option of Model SubClassing to build fully-customizable models. This is useful when you are researching new types of architecture from scratch.
The below diagram shows how Model Class is imported from Keras library and then called for implementation.
Keras Model SubClassing Example for usage
To create a model we first have to import the required layers. The model subclassing gives us the flexibility of adding layers like Dense and Dropout as we want. We also use batch normalization for better results. As you can see there are two main functions, first is used for initialization of variables and another function is for calling those variables.
from keras.layers import Dense,Dropout,BatchNormalization

Class Subclass(keras.Model):

    def __init__(self, use_bn=False, use_dp=False, num_classes=10):
        super(Subclass, self).__init__(name='mlp')
        self.use_bn = use_bn
        self.use_dp = use_dp
        self.num_classes = num_classes

        self.dense_1 = Dense(32, activation='relu')
        self.dense_2 = Dense(num_classes, activation='softmax')
        if self.use_dp:
            self.dp = Dropout(0.5)
        if self.use_bn:
            self.bn = BatchNormalization(axis=-1)

    def call(self, inputs):
        x = self.dense_1(inputs)
        if self.use_dp:
            x = self.dp(x)
        if self.use_bn:
            x = self.bn(x)
        return self.dense2(x)

model = Subclass()
Keras Sequential Model vs Functional API vs Model Subclassing
Let us have a quick summary of how the three APIs differ from each other.
- Keras Sequential Model is useful if you are creating a simple neural network with linear architecture. It is useful for beginners for simple use but you cannot create advanced architectures. With this restriction, you may not be able to create models with high accuracy for complex problems.
- Keras Functional API addresses the above shortcomings by giving you the flexibility to design complex topologies of neural network which includes shared layers, branching, and multiple input and output. This allows you to design advanced neural networks for complex problems but will require some learning curve as well.
- Model Subclassing is useful in those scenarios when you are researching and would like to create all aspects of the neural network from scratch. You have complete control and flexibility but beware you need to be really good at it and should be used by advanced users only.
Keras Sequential Model Example
Let us create a complete end to end neural network model using Keras Sequential Model in this example.
i) Import Dataset
For this purpose, we’ll be using an in-built dataset of Keras i.e. MNIST dataset of handwritten digits. There are 60,000 images of 28×28 dimensions of grayscale type. There is also a test set of 10,000 images.
First, MNIST dataset is imported, and then it is loaded in the form of training and testing sets.
from keras.datasets import mnist

(x_train_full, y_train_full), (x_test, y_test) = mnist.load_data()
As the dataset is not having a validation set, we need to split a part of the dataset as a validation set. For this we’ll be dividing it by 255, this will also convert the values to 255.
X_valid, X_train = x_train_full[:5000] / 255.0, x_train_full[5000:] / 255.0
y_valid, y_train = y_train_full[:5000], y_train_full[5000:]
ii) Creating Model with Sequential Model API
Now Sequential Model API is imported from the Keras models class.
from tensorflow import keras
from keras.models import Sequential
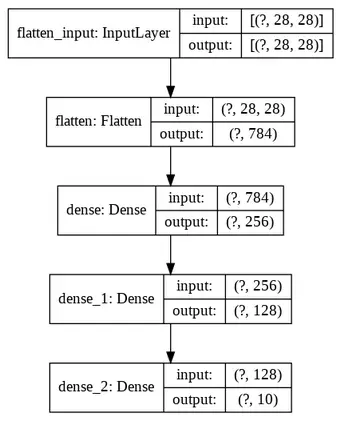
We’ll start by building the Sequential Model, then we add layers like Flatten and Dense to it. The first hidden layer is the dense layer with 256 neurons, next, we have another dense layer with 128 neurons, both these layers are using ReLu activation function and lastly, the third hidden layer contains 10 neurons with softmax activation.
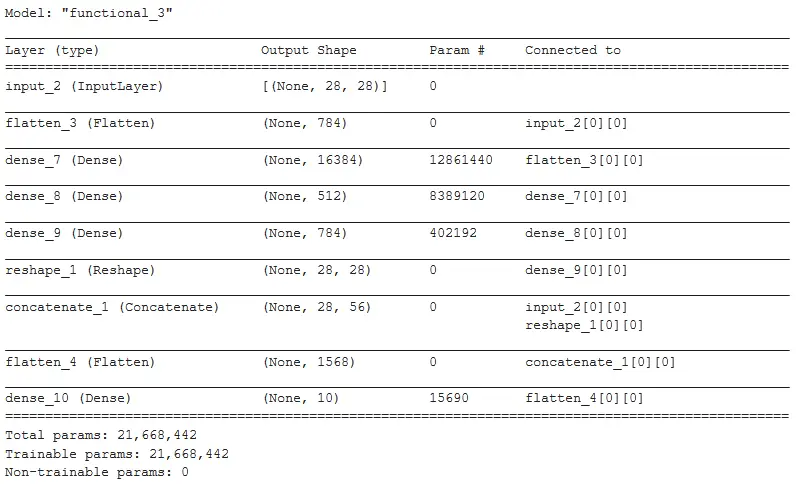
The model’s summary() function will display the details about model layers, the name of each layer, the output shape of layers, and the number of parameters in each layer. The summary also displays the total number of parameters, number of trainable parameters, and non-trainable parameters.
model = keras.models.Sequential()

model.add(keras.layers.Flatten(input_shape=[28, 28]))
model.add(keras.layers.Dense(256, activation="relu"))
model.add(keras.layers.Dense(128, activation="relu"))
model.add(keras.layers.Dense(10, activation="softmax"))
model.summary()
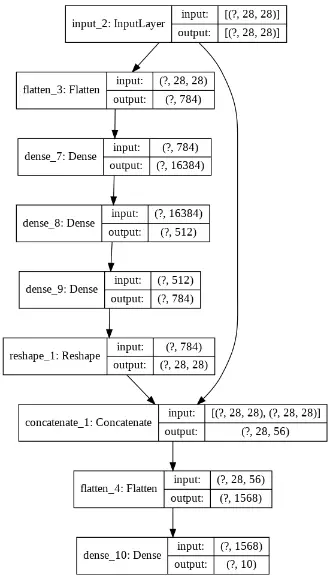
iii) Visualizing the Keras Model with plot_model()
Now in this section, we’ll visualize the model built using sequential API. This will be possible with the help of plot_model() function.
This will help in visualizing all the layers of the model along with the input and output neurons.
from tensorflow.keras.utils import plot_model

plot_model(model, to_file='model_plot.png', show_shapes=True, show_layer_names=True)
iv) Compilation and Training of the Model
model.compile(loss="sparse_categorical_crossentropy", optimizer="sgd",
              metrics=["accuracy"])
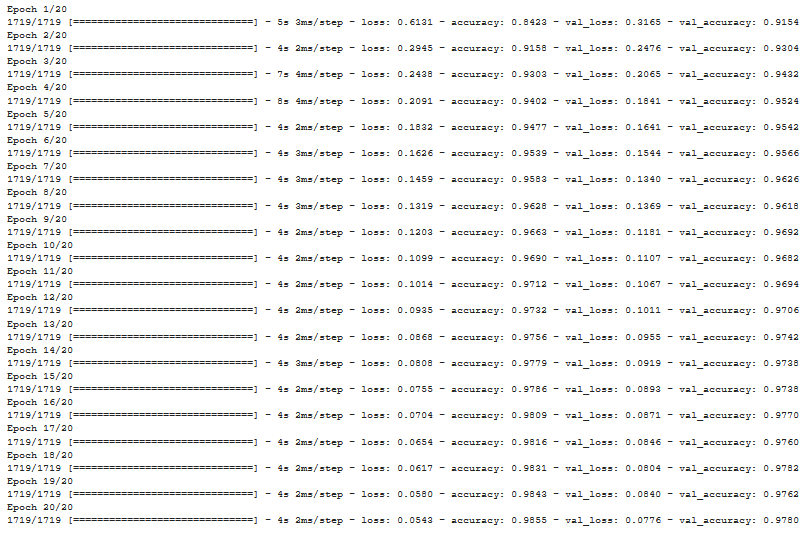
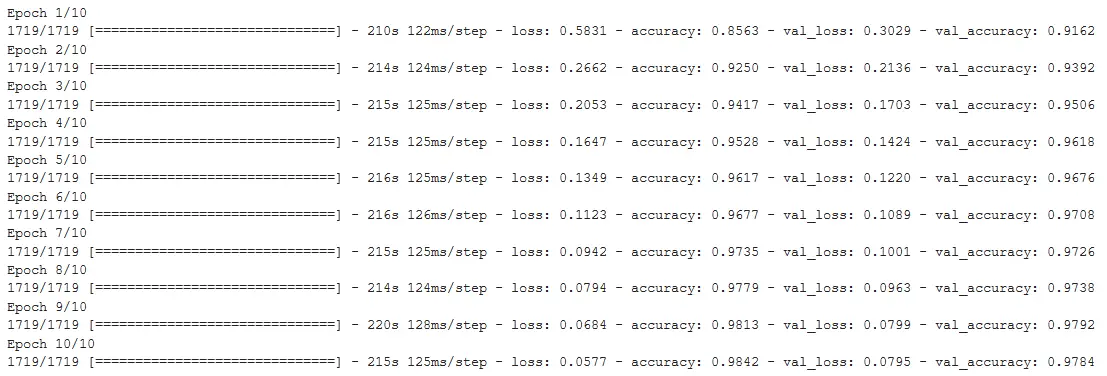
After compilation, we put the model into training by using the fit() function. Here we have specified 20 epochs for the model to fit over the data and reduce the error.
history = model.fit(X_train, y_train, epochs=20, validation_data=(X_valid, y_valid))
v) Visualizing the Learning Curve of the Model
At last, we will look at the learning curve followed by the model. As it can be seen, loss and validation loss variables have lower values (A good sign) and accuracy along with validation accuracy are higher (another good sign) for our model.
import pandas as pd
import matplotlib.pyplot as plt

pd.DataFrame(history.history).plot(figsize=(8, 5))
plt.grid(True)
plt.gca().set_ylim(0, 1)
plt.show()
Keras Functional API Example
i) Import Dataset
We are going to use the same MNIST dataset that we imported and split into training, validation, and testing set for the Keras Sequential Model example above. You may refer to the above section for the details.
ii) Creating Model with Keras Functional API
We start here by creating an input object, then a flatten layer is added along with three Dense Layers that consist of ReLu activation function.
After this, we reshape the hidden layer which concatenates it with the input layer.
The output layer contains a flattened concatenated layer consisting of 10 neurons and a softmax activation function.
input_ = keras.layers.Input(shape=[28, 28])
flatten = keras.layers.Flatten(input_shape=[28, 28])(input_)
hidden1 = keras.layers.Dense(2**14, activation="relu")(flatten)
hidden2 = keras.layers.Dense(512, activation='relu')(hidden1)
hidden3 = keras.layers.Dense(28*28, activation='relu')(hidden2)
reshap = keras.layers.Reshape((28, 28))(hidden3)
concat_ = keras.layers.Concatenate()([input_, reshap])
flatten2 = keras.layers.Flatten(input_shape=[28, 28])(concat_)
output = keras.layers.Dense(10, activation='softmax')(flatten2)
model_func = keras.Model(inputs=[input_], outputs=[output] )
Here again, we follow the same process as of Sequential API Model, we look at the summary of this model.
model_func.summary()
iii) Visualizing the Keras Model with plot_model()
Here we’ll be able to understand how the functional API of Keras can handle complicated non-linear architecture compared to sequential API. As you can see, the input layer has a connection with the final flattened concatenated layer which is connected to the output layer.
plot_model(model_func, to_file='model_plot.png', show_shapes=True, show_layer_names=True)
iv) Compilation and Training of the Model
In this step, we will perform a compilation of the model and train the model with 10 epochs.
model_func.compile(loss="sparse_categorical_crossentropy", optimizer="sgd",
              metrics=["accuracy"])
h = model_func.fit(X_train, y_train, epochs=10, validation_data=(X_valid, y_valid))
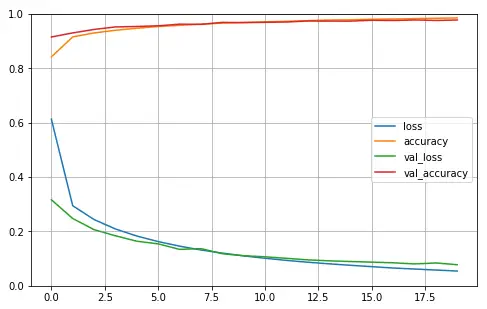
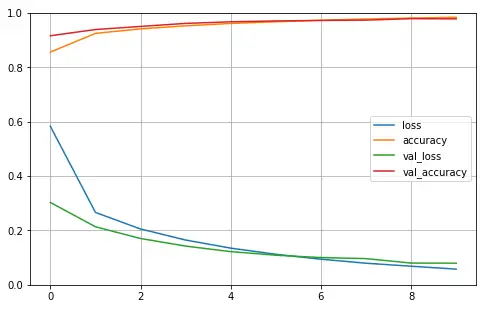
v) Visualizing the Learning Curve of the Model
Here the line graph shows us the progress of loss and accuracy. We can see that functional API was able to produce almost similar results to sequential API with lesser epochs. Even the validation accuracy is higher in the case of the functional API model. Moreover, functional API will give more flexibility as compared to sequential API.
pd.DataFrame(h.history).plot(figsize=(8, 5))
plt.grid(True)
plt.gca().set_ylim(0, 1)
plt.show()
- Also Read – Different Types of Keras Layers Explained for Beginners
- Also Read – Keras Dropout Layer Explained for Beginners
- Also Read – Keras Dense Layer Explained for Beginners
- Also Read – Keras vs Tensorflow vs Pytorch – No More Confusion !!
- Also Read – Keras Convolution Layer – A Beginner’s Guide
Conclusion
We have reached the end of this Keras tutorial that was all about different types of APIs in Keras for building models. The explained Keras sequential model API, functional API model, and model subclassing method along with examples. We also did a comparison between Keras Sequential Model vs Functional API vs Model Subclassing for better clarity.
Reference Keras Documentation

