Introduction
In this article, we will go through the tutorial for foreground extraction using the Grabcut algorithm in Python OpenCV. We will first discuss what is foreground extraction in computer vision and then understand briefly how the Grabcut algorithm implements it. Finally, we will see an example of Grabcut implementation in Python OpenCV.
What is Foreground Extraction?

Foreground extraction refers to the process of employing image segmentation techniques and algorithms to extract the foreground (desired) and discard the background (undesired) part of an image or video feed.
A common example is group images, it is a common occurrence that unwanted people are included in our precious memories. One solution is to use photo-editing apps, these apps employ image segmentation techniques to remove or edit certain parts of your images.
What is the GrabCut algorithm?
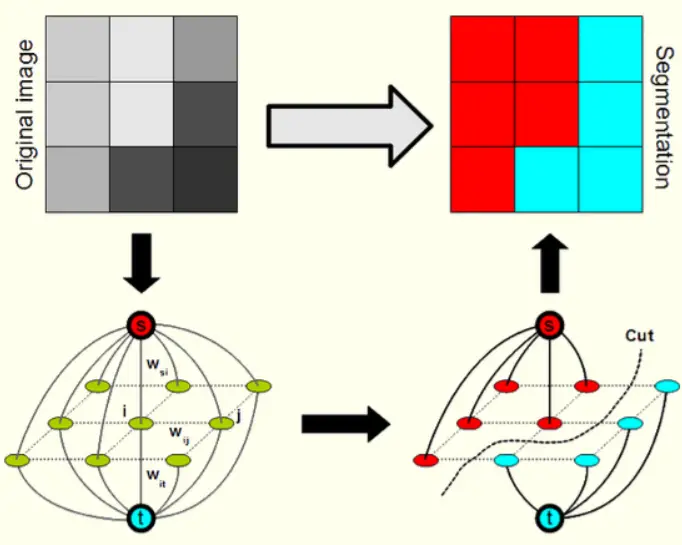
Grabcut is a robust computer vision algorithm for foreground extraction. The algorithm can be summarized as below –
- Coordinates of a rectangle enclosing the region of interest are defined (area lying outside these coordinates are automatically defined as part of the background).
- The parts that are classified as ‘background’ in the above step are used as a reference to classify the pixels inside the user-defined-ROI. The Gaussian mixture model is used to label pixels as probable background/foreground.
- Each pixel is connected to its surrounding pixels and each edge is assigned a probability of being foreground or background.
Thus the image is segmented into two parts foreground and background.
OpenCV Grabcut Function : cv2.grabCut()
Foreground extraction in OpenCV Python can be done by using the cv2.grabCut() function quite easily. Let us understand its syntax in more detail.
Syntax
cv2.grabCut(image, mask, rectangle, background_mask, foreground_mask, integer, cv2.GC_INIT_WITH_RECT)
Parameters
- Image: The image on which the grabcut algorithm is to be applied.
- Mask: An array populated with zeros of the same size as the image.
- Rectangle: A list of coordinates of the region of interest. Syntax:(starting x-coordinate,starting y-coordinate,width,height).
- Background_mask: Zero array supposed to act as a placeholder for the background mask.
- Foreground_mask: Zero array supposed to act as a placeholder for the foreground mask.
- Integer: Represents the no. of times the algorithm will be applied to the image.
- The last parameter is the area type we will be passing to the algorithm to segment. Generally its a rectangle(cv2.GC_INIT_WITH_RECT).
Example of Foreground Extraction with grabCut()
Let us now see an example of how we can do foreground extraction by using grabCut() function of Python OpenCV.
i) Installing Libraries
Before we start our example we will have to install the required libraries as shown below.
a) Installing OpenCV
OpenCV is an open-source computer vision library built to provide high-level libraries for computer vision. You can install it using pip like so:
pip install opencv-python
b) Installing numpy
In order to perform optimized mathematical & algebraic functions in python, we will use the numpy library. It is frequently used in data science where computation speed and power are important. You can install it like so:
pip install numpy
ii) Importing the Libraries
We will now import our OpenCV and Numpy libraries.
import cv2
import numpy as np
iii) Defining Some Variables
Here we will define some variables first that will be helpful for us subsequently.
- ‘drawn’ variable will act as a flag variable that informs if the ROI is successfully selected.
- ‘start’ x and y are the coordinates of the mouse pointer.
- ‘rectangle’ variable represents the coordinates of the ROI.
P.S. – These are initialized with random values at first.
drawn = False
startx, starty = -1, -1
rectangle = (0, 0, 0, 0)
iv) Image Loading and Preprocessing Function
Before we start the foreground extraction process we will be loading the image to memory and resizing it to an appropriate size.
def load_and_resize(path):
   image = cv2.imread(path)
   new_size = (700, 700)
   resized_image = cv2.resize(image, new_size, interpolation=cv2.INTER_AREA)
   return resized_image
- line 1-3: Use the ‘cv2’, ‘imread’, and ‘resize’ function to load and resize the image respectively.
- line 4: Return the processed image.
v) Region Selection Function
In order for us to select the region to be extracted, we design a function called ‘select_roi’. It is responsible for handling the mouse callback events i.e. clicking the mouse or keyboard. It takes in as parameters the event(handles mouse events), x & y coordinates of the mouse.
P.S. – Every event handling function in python takes in (flags, params) by default.
def select_roi(event, newx, newy, flags, params):
    global startx, starty, drawn, rectangle
    if event == cv2.EVENT_LBUTTONDOWN:
        startx, starty = newx, newy
        cv2.circle(image, (startx, starty), 4, (255, 255, 120), -1)

    elif event == cv2.EVENT_LBUTTONUP:
        drawn = True
        rectangle = (startx, starty, newx - startx, newy - starty)
        print("\nROI Selected Successfully")
- line 1: Handles the mouse down event. Sets the value of start x and y coordinate variables to the positions where the mouse was clicked. Further, puts a circle at that position to represent it properly
- line 7: Handles the mouse up event. When the user leaves the mouse button it refers to the event that he/she has successfully completed the process of selecting the ROI. Thus we will set the ‘drawn’ variable to ‘True’ and the ‘rectangle’ variable to the coordinates of the ROI selected i.e. (startx, starty, width(newx-startx), height(newy-starty)).
vi) Background Subtraction Function
Next, we define a function extract_foreground() function which is responsible for performing the background subtraction and display the resulting foreground image. It is supposed to take an image as input, perform the segmentation process in the image itself and display it.
def extract_foreground(image):
   global drawn

   cv2.namedWindow(winname='BG Subractor')
   cv2.setMouseCallback('BG Subractor', select_roi)

   print("\nSelect ROI from mouse pointer.")

   black_mask = np.zeros(image.shape[:2], np.uint8)
   background = np.zeros((1, 65), np.float64)
   foreground = np.zeros((1, 65), np.float64)
   while True:
      if drawn:
          print("\nPerforming Background Subtraction")

          cv2.grabCut(image, black_mask, rectangle,background, foreground,5, cv2.GC_INIT_WITH_RECT)

          mask2 = np.where((black_mask == 2) | (black_mask == 0), 0, 1).astype('uint8')

          image = image * mask2[:, :, np.newaxis]

          drawn = False
          print("\nExtraction complete")

      cv2.imshow('BG Subractor', image)
      if cv2.waitKey(1) & 0xFF == 27:
            break
   cv2.destroyAllWindows()
- line 2-5: First we see if the ROI is selected or not(‘drawn’ variable). Next, we use the ‘namedWindow’ function so that we can reference this window later. Then, we use the ‘setMouseCallback’ function to connect our event listener function to the window named ‘BG Subtractor’.
- line 9-11: Basic masks used with grab cut algorithm(They can be hardcoded). They are basically numpy arrays initialized with zeros one for each ‘background’ and ‘foreground’.
- line 12-13: Next we initialize the while loop that runs indefinitely until the user presses the ‘escape’ key (line 24-26). Inside the loop, we use an ‘if’ statement that ensures that the ROI has been selected by the user.
- line 16-22: We call the ‘grabcut’ function with our image, black_mask, FG & BG masks. The function converts our ‘black_mask’ values to a range between 0 and 3, inclusive(0 and 2 are classified as obvious and probable background pixel values respectively)(1 and 3 are classified as obvious and probable foreground pixel values respectively) and stored in ‘mask2’. This ‘mask2’ is multiplied by the image so that the background values are multiplied by 0(and converted to black) and the foreground is multiplied by one leaving it unchanged.
- line 28: Destroys all windows.
vii) Running Our App
First, we will define the path to the image you want to apply the foreground extraction process to and apply the preprocessing function to it (‘load_and_resize()’).
Finally, we call the ‘extract_foreground’ function to begin the foreground extraction process using the grabcut algorithm.
path = 'photo.jpeg'
image = load_and_resize(path)
extract_foreground(image)
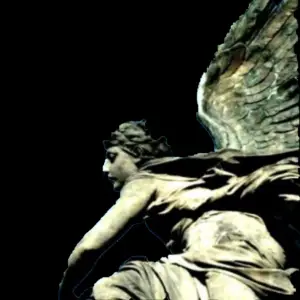
Results of Foreground Extraction
This is the result of the foreground extraction of one of the sample images that we gave to our code and we can see that the grabcut algorithm has really done its job quite well!

Conclusion
Hope you liked our article and learned how to do foreground extraction using Grabcut algorithm in Python OpenCV. Below is the source code that we explained to you in the example.
Source code files:
You can find the source code here: FILE
- Also Read – Python OpenCV – Image Smoothing using Averaging, Gaussian Blur, and Median Filter
- Also Read – Bilateral Filtering in Python OpenCV with cv2.bilateralFilter()