
Introduction
Morphological Operations
Morphological operation is a set of non-linear operations that process images based on shapes morphology of features in an image. It applies structuring element to an input image and generate an output image.
The structuring element is a small binary image, i.e. a small matrix of pixels, each with a value of zero or one:
- The matrix dimensions specify the size of the structuring element.
- The pattern of ones and zeros specifies the shape of the structuring element.
- An origin of the structuring element is usually one of its pixels, although generally, the origin can be outside the structuring element.
A common practice is to have odd dimensions of the structuring matrix and the origin defined as the center of the matrix. Structuring elements are similar to convolution kernels in linear image filtering.
The applications of these operations are –
- Removing noise.
- Isolation of individual elements and joining disparate elements in an image.
- Finding of intensity bumps or holes in an image.
Erosion
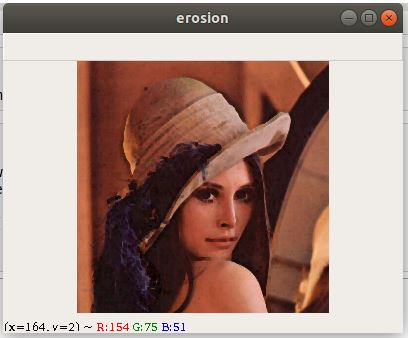
It erodes away the boundaries of the foreground object and removes small-scale details from an image but simultaneously reduces the size of regions of interest.
In this operation, a convolution kernel of any shape of odd size is convolved across the image and if all the pixels under the kernel are 1 then the pixel in the original image (either 1 or 0) will be considered 1, otherwise, it is eroded i.e made to zero.
So what happens is that all the pixels near the boundary will be discarded depending upon the size of kernel. So the thickness or size of the foreground object decreases or simply white region decreases in the image.
It is useful for removing small white noises and detach two connected objects.
Basically it computes a local minimum over the area of given kernel.So the thickness or size of the foreground object decreases or in other words white region decreases in the image.
OpenCV has a specific function erode() for this operation. Let us see that in more detail.
OpenCV Erosion : cv2.erode()
Syntax
cv2.erode(src, kernel, dst,anchor,iterations,borderType,borderValue)
src: It is the image which is to be eroded.
kernel: A structuring element used for erosion. If element = Mat(), a 3 x 3 rectangular structuring element is used. Kernel can be created using getStructuringElement.
dst: It is the output image of the same size and type as src.
anchor: It is a variable of type integer representing anchor point and it’s default value Point is (-1, -1) which means that the anchor is at the kernel center.
borderType: It depicts what kind of border to be added. It is defined by flags like cv2.BORDER_CONSTANT, cv2.BORDER_REFLECT, etc.
iterations: It is number of times erosion is applied.
borderValue: It is border value in case of a constant border.
Return Value: It returns an image.
Example1: Erosion with cv2.erode()
import cv2
import numpy as np
In [2]:
#reading sample image
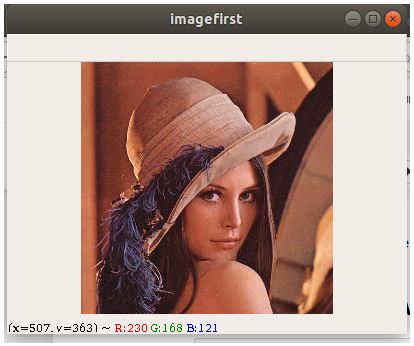
img=cv2.imread("lena.png")
#Display image
window_name='imagefirst'
cv2.namedWindow(window_name, cv2.WINDOW_NORMAL)
cv2.imshow(window_name,img)
cv2.waitKey(0)
cv2.destroyAllWindows()
Sample Image
#5x5 kernel with full of ones
kernel = np.ones((5,5),np.uint8)
erosion = cv2.erode(img,kernel,iterations = 1)
#Display image
window_name='erosion'
cv2.namedWindow(window_name, cv2.WINDOW_NORMAL)
cv2.imshow(window_name,erosion)
cv2.waitKey(0)
cv2.destroyAllWindows()
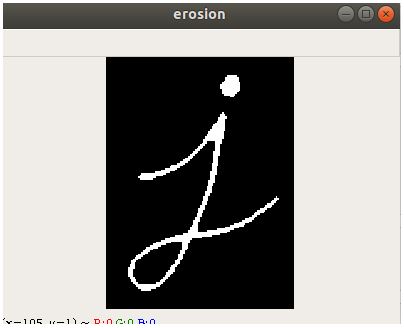
Example2: Erosion with cv2.erode()
In this example, you are able to see the thickness or size of the foreground object decreases.
#reading an image
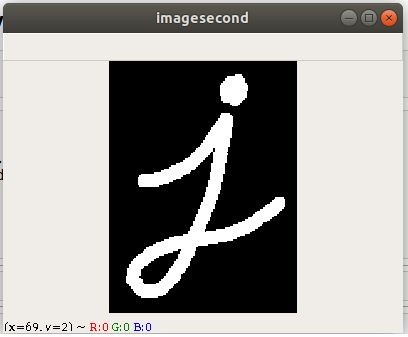
img_second=cv2.imread("j.png")
#Display image
window_name='imagesecond'
cv2.namedWindow(window_name, cv2.WINDOW_NORMAL)
cv2.imshow(window_name,img_second)
cv2.waitKey(0)
cv2.destroyAllWindows()
Sample Image
#5x5 kernel with full of ones.
kernel = np.ones((5,5),np.uint8)
erosion_1 = cv2.erode(img_second,kernel,iterations = 1)
#Display image
window_name='erosion'
cv2.namedWindow(window_name, cv2.WINDOW_NORMAL)
cv2.imshow(window_name,erosion_1)
cv2.waitKey(0)
cv2.destroyAllWindows()
Output
Dilation
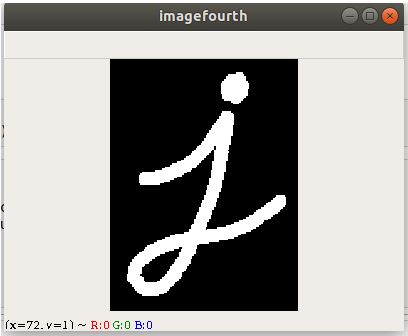
In this operation, a convolution kernel of any shape of odd size is convolved across the image and a pixel element is ‘1’ if at least one pixel under the kernel is ‘1’.
So it increases the white region in the image or size of the foreground object increases.
For noise removal, erosion is followed by dilation. Because, erosion removes white noises, but it also shrinks our object. So we dilate it. Since noise is gone, they won’t come back, but our object area increases.
It is also useful in joining broken parts of an object.
OpenCV Dilation: cv2.dilate()
Syntax
cv2.dilate(src, kernel, dst,anchor,iterations,borderType,borderValue)
src: It is the image which is to be eroded.
kernel: A structuring element used for erosion. If element = Mat(), a 3 x 3 rectangular structuring element is used. Kernel can be created using getStructuringElement.
dst: It is the output image of the same size and type as src.
anchor: It is a variable of type integer representing anchor point and it’s default value Point is (-1, -1) which means that the anchor is at the kernel center.
borderType: It depicts what kind of border to be added. It is defined by flags like cv2.BORDER_CONSTANT, cv2.BORDER_REFLECT, etc.
iterations: It is number of times erosion is applied.
borderValue: It is border value in case of a constant border.
Return Value: It returns an image.
[adrotate banner=”3″]
Example1: Dilation with cv2.dilate()
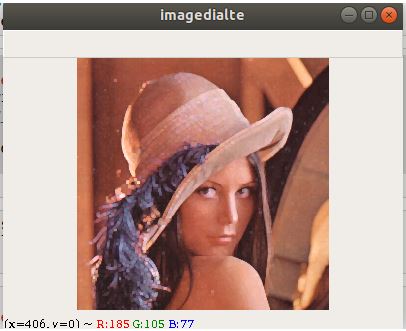
#reading an image
img_third=cv2.imread("lena.png")
#Display image
window_name='imagethird'
cv2.namedWindow(window_name, cv2.WINDOW_NORMAL)
cv2.imshow(window_name,img_third)
cv2.waitKey(0)
cv2.destroyAllWindows()
Sample Image
kernel_3 = np.ones((5,5),np.uint8)
dilation = cv2.dilate(img_third,kernel_3,iterations = 1)
#Display image
window_name='imagedialte'
cv2.namedWindow(window_name, cv2.WINDOW_NORMAL)
cv2.imshow(window_name,dilation)
cv2.waitKey(0)
cv2.destroyAllWindows()
Output
Example2: Dilation with cv2.dilate()
#reading an image
img_fourth=cv2.imread("j.png")
#Display image
window_name='imagefourth'
cv2.namedWindow(window_name, cv2.WINDOW_NORMAL)
cv2.imshow(window_name,img_fourth)
cv2.waitKey(0)
cv2.destroyAllWindows()
Sample Image
kernel_3 = np.ones((5,5),np.uint8)
dilation_1 = cv2.dilate(img_fourth,kernel_3,iterations = 1)
#Display image
window_name='imagedilate_1'
cv2.namedWindow(window_name, cv2.WINDOW_NORMAL)
cv2.imshow(window_name,dilation_1)
cv2.waitKey(0)
cv2.destroyAllWindows()
Output
Conclusion
- Also Read – OpenCV Tutorial – Reading, Displaying and Writing Image using imread() , imshow() and imwrite()
- Also Read – 12 Amazing Computer Vision Datasets You Should Know
- Also Read – Python OpenCV – Image Smoothing using Averaging, Gaussian Blur and Median Filter
- Also Read – OpenCV Tutorial – Image Colorspace Conversion using cv2.cvtColor()
- Also Read – Learn Image Thresholding with OpenCV cv2.threshold() and cv2.adaptiveThreshold() functions
Reference – https://docs.opencv.org/master/d6/d00/tutorial_py_root.html

