
Introduction
Edge detection is a fundamental problem in image processing. Opencv offers a function Canny() that helps to detect edges of the image. Canny edge detection is a multi-step algorithm that can detect edges. This algorithm consists of four stages –
- Noise Reduction
- Gradient Computation
- Non-Max Suppression
- Hysteresis Thresholding
1. Noise Reduction
2. Gradient Computation
So in this step, 2-D first derivative operator like Sobel operator is applied to the smoothened image in both horizontal as well as vertical directions. This will help to get the first derivative in the horizontal direction (G_x) and vertical direction (G_y) to highlight regions of the image with high first spatial derivatives.
Edges give rise to ridges in the gradient magnitude image. The Gradient Computation detects the edge intensity and direction by calculating the gradient.

3. Non-Max Suppression
In this step, for each pixel, it is checked if it is a local maximum in its neighborhood in the direction of the gradient.
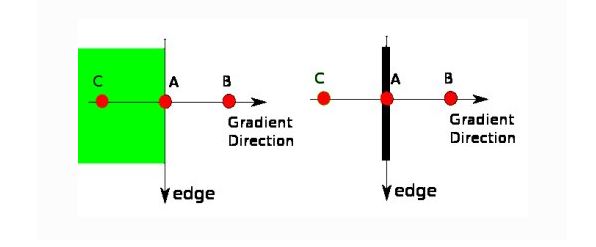
then if I(m,n) is greater than its two neighbors along the gradient direction theta(m,n) then keep I(m,n) unchanged, otherwise, set it to 0.
4. Hysteresis Thresholding
- Any edges with intensity gradient more than High threshold are sure to be edges.
- Any edges below minVal are sure to be non-edges, so discarded.
- Those who lie between these two thresholds are classified edges or non-edges based on their connectivity. i.e if they are connected to “sure-edge” pixels, they are considered to be part of edges. Otherwise, they are also discarded.
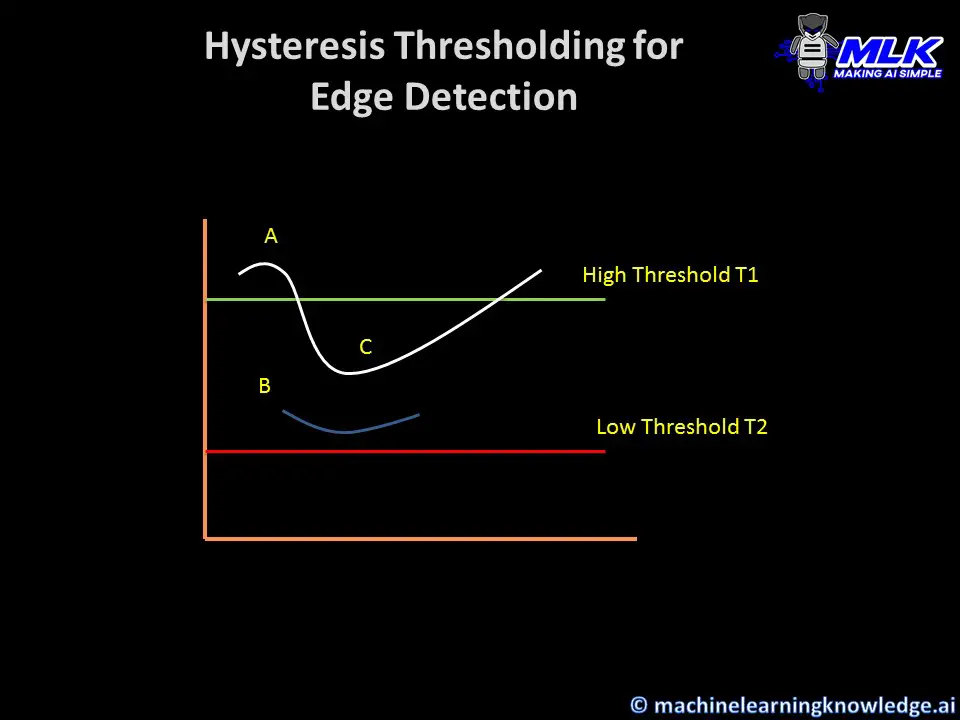
- Edge A is above the High Threshold(T1). so it is considered as “sure-edge”.
- Although edge C is below High THreshold, it is connected to edge A. So that is also considered as a valid edge and we get that full curve.
- Although Edge B is above Low Threshold and is in the same region as that of edge C, it is not connected to any “sure-edge”, so that is discarded.
So it is very important that we have to select Low Threshold and High Threshold accordingly to get the correct result.
Note: The canny edge detector algorithm is based on grayscale pictures.
[adrotate banner=”3″]
Some important points
The effect of the Canny operator is determined by three parameters – i) Width of the Gaussian kernel used in the smoothing phase, ii) the upper threshold and iii) lower thresholds used by the tracker.
So if we increase the width of the Gaussian kernel then it reduces the detector’s sensitivity to noise, at the expense of losing some of the finer detail in the image. The localization error in the detected edges also increases slightly as the Gaussian width is increased.
The upper tracking threshold can be set quite high, and the lower threshold quite low for good results. Setting the lower threshold too high will cause noisy edges to break up. On the other hand, setting the upper threshold too low increases the number of spurious and undesirable edge fragments appearing in the output.
OpenCV Canny Edge Detection: cv2.Canny()
Syntax
- image −input image for this operation.
- edges −It represents the destination (edges) for this operation.
- Low_Threshold − It represents the Low threshold for the hysteresis procedure.
- High_Threshold − It represents the High threshold for the hysteresis procedure.
- apertureSize – aperture size for the Sobel() operator.It is the size of Sobel kernel used for find image gradients. By default it is 3.
- L2gradient :L2gradient which specifies the equation for finding gradient magnitude. If it is True, it uses the equation mentioned above which is more accurate, otherwise it uses this function: Edge_Gradient(G) = |G_x| + |G_y|. By default, it is False.
Importing OpenCV library
import cv2
#read image
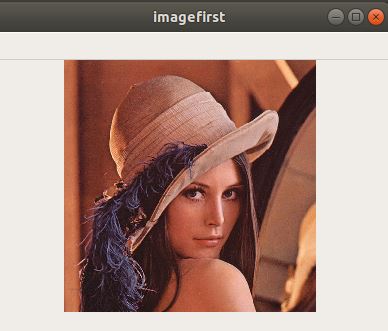
img=cv2.imread("lena.png")
#Display image
window_name='imagefirst'
cv2.namedWindow(window_name, cv2.WINDOW_NORMAL)
cv2.imshow(window_name,img)
cv2.waitKey(0)
cv2.destroyAllWindows()
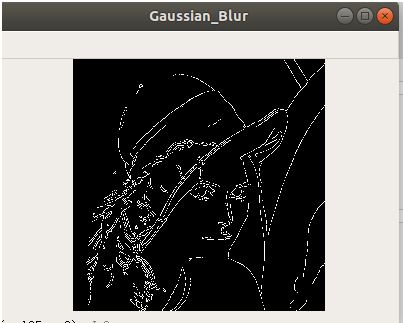
Opencv canny() function does not do Gaussian blurring to remove noise from the image. Hence we will have to carry out this step as a prerequisite by using another opencv function GaussianBlur()
#Gaussian Blurring
gaussian_blur = cv2.GaussianBlur(img,(5,5),sigmaX=0)
#Display image
window_name='Gaussian_Blur'
cv2.namedWindow(window_name, cv2.WINDOW_NORMAL)
cv2.imshow(window_name,gaussian_blur)
cv2.waitKey(0)
cv2.destroyAllWindows()

#Canny Edge Detector
edges = cv2.Canny(gaussian_blur,100,200)
#Display image
window_name='Gaussian_Blur'
cv2.namedWindow(window_name, cv2.WINDOW_NORMAL)
cv2.imshow(window_name,edges)
cv2.waitKey(0)
cv2.destroyAllWindows()
Conclusion
In this tutorial, we understood how the canny edge detection technique works and how opencv canny() function can be used to achieve the same.
Click here to download the code
- Also Read – OpenCV Tutorial – Reading, Displaying and Writing Image using imread() , imshow() and imwrite()
- Also Read – 12 Amazing Computer Vision Datasets You Should Know
- Also Read – Python OpenCV – Image Smoothing using Averaging, Gaussian Blur and Median Filter
- Also Read – OpenCV Tutorial – Image Colorspace Conversion using cv2.cvtColor()
- Also Read – Learn Image Thresholding with OpenCV cv2.threshold() and cv2.adaptiveThreshold() functions
Reference – https://docs.opencv.org/master/d6/d00/tutorial_py_root.html

