Introduction
cv2.imread() function of OpenCV that is commonly used to read the image from the file. The image is loaded as a numpy array which can be used for further image processing or transformation operations. Although it is quite a straightforward function, but cv2 imread has many features that are not commonly known. In this post, we will give you a detailed explanation of cv2.imread() function of Python OpenCV along with examples. Finally, at the end we will discuss the commonly faced error AttributeError: ‘NoneType’ object has no attribute associated with imread.
Syntax of OpenCV cv2.imread() Function
The syntax of cv2.imread() is as follows –
cv2.imread(filename [, flag])
Parameters
- filename – Path and name of the image file to be read.
- flag – This is optional and denotes how the image should be read. The flag values can be one of the following –
[ninja_tables id=”7261″]
File format supported by cv2 imread function
You can read the following file format with imread() function of OpenCV.
[ninja_tables id=”7263″]
Example of cv2.imread() OpenCV Python
Sample Image for Examples
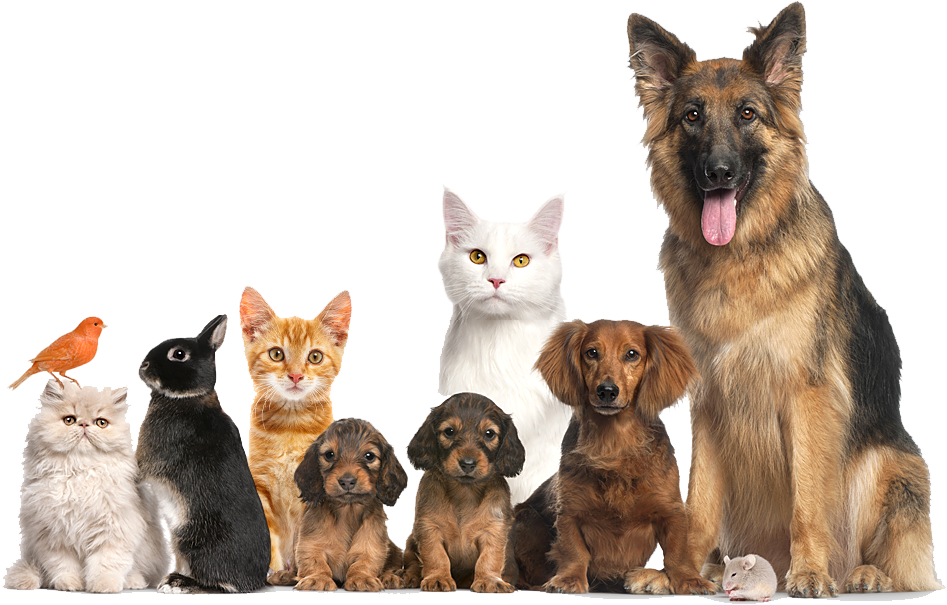
For all the examples below we shall be using the above image whose dimension is 399x 625. This image is in png format with transparent background and thus has an alpha channel besides the three blue, red, and green channels. So overall this image has 4 channels.
Importing OpenCV Library
First of all, let us import the OpenCV library as shown below –
In [0]:
import cv2
Example 1 – Reading Image with Default Flag Value
In the first example, we read the sample image with imread() function without passing any other flag value. After reading the image its details are printed and we can observe that it is showing 3 channels (for BGR channels) instead of 4 in the actual image.
This is because here the default value of the flag is used as cv2.IMREAD_COLOR which has removed the alpha channel.
In [1]:
#read image
img=cv2.imread("animals.png")

print('Image Dimension is',img.shape)
print('Image Height is',img.shape[0])
print('Image Width is',img.shape[1])
print('Number of Channels is',img.shape[2])
Out[1]:
Image Dimension is (399, 625, 3)
Image Height is 399
Image Width is 625
Number of Channels is 3
Example 2 – Reading Image with Flag Value cv2.IMREAD_COLOR
Next, we use the flag value as cv2.IMREAD_COLOR and it can be seen that it gives the number of channels as 3 (same output as 1st example). Thus it validates the fact alpha channel gets removed with flag value cv2.IMREAD_COLOR which also happens to be the default flag value.
In [2]:
#read image
img=cv2.imread("animals.png")

print('Image Dimension is',img.shape)
print('Image Height is',img.shape[0])
print('Image Width is',img.shape[1])
print('Number of Channels is',img.shape[2])
Out[2]:
Image Dimension is (399, 625, 3)
Image Height is 399
Image Width is 625
Number of Channels is 3
Example 3 – imread() with Flag Value cv2.IMREAD_UNCHANGED
cv2.IMREAD_UNCHANGED ensures that cv2.imread reads the image as it is and even preserves the alpha channel. It can be seen that number of channels is 4 this time in the below output.
In [3]:
#read image
img=cv2.imread("animals.png", cv2.IMREAD_UNCHANGED )

print('Image Dimension is',img.shape)
print('Image Height is',img.shape[0])
print('Image Width is',img.shape[1])
print('Number of Channels is',img.shape[2])
Out[3]:
Image Dimension is (399, 625, 4)
Image Height is 399
Image Width is 625
Number of Channels is 4
Example 4 – imread() with Flag Value cv2.IMREAD_GRAYSCALE
The flag value of cv2.IMREAD_GRAYSCALE enables imread() function to read the image in grayscale.
In the output of the below example, there is no channel as the image is read in grayscale.
In [4]:
#read image
img=cv2.imread(filename, cv2.IMREAD_GRAYSCALE)

print('Image Dimension is',img.shape)
print('Image Height is',img.shape[0])
print('Image Width is',img.shape[1])
Out[4]:
Image Dimension is (399, 625)
Image Height is 399
Image Width is 625
Example 5 – Using Flag Value cv2.IMREAD_REDUCED_COLOR_2
cv2.IMREAD_REDUCED_COLOR_2 reads the image in BGR format and also reduces the image size by half. The same can be seen in the below example where the dimension of the image has become 199×312 from the original image 399×625.
In [5]:
#read image
img=cv2.imread("animals.png", cv2.IMREAD_REDUCED_COLOR_2 )

print('Image Dimension is',img.shape)
print('Image Height is',img.shape[0])
print('Image Width is',img.shape[1])
print('Number of Channels is',img.shape[2])
Out [5]:
Image Dimension is (199, 312, 3)
Image Height is 199
Image Width is 312
Number of Channels is 3
Example 6 – Using Flag Value cv2.IMREAD_REDUCED_COLOR_4
cv2.IMREAD_REDUCED_COLOR_2 reads the image in BGR format and also reduces the image size by one-fourth.
In the below example, the image is reduced to 99×156 which is one-fourth of the original image.
In [6]:
#read image
img=cv2.imread("animals.png", cv2.IMREAD_REDUCED_COLOR_4 )

print('Image Dimension is',img.shape)
print('Image Height is',img.shape[0])
print('Image Width is',img.shape[1])
print('Number of Channels is',img.shape[2])
Out [6]:
Image Dimension is (99, 156, 3)
Image Height is 99
Image Width is 156
Number of Channels is 3
Example 7 – Using Flag Value cv2.IMREAD_REDUCED_COLOR_8
cv2.IMREAD_REDUCED_COLOR_8 reads the image in BGR format and also reduces the image size by one-eight.
In the below example, the image is reduced to 49×78 which is one-eighth of the original image.
In [7]:
#read image
img=cv2.imread("animals.png", cv2.IMREAD_REDUCED_COLOR_8 )

print('Image Dimension is',img.shape)
print('Image Height is',img.shape[0])
print('Image Width is',img.shape[1])
print('Number of Channels is',img.shape[2])
Out [7]:
Image Dimension is (49, 78, 3)
Image Height is 49
Image Width is 78
Number of Channels is 3
Example 8 – Flag Value cv2.IMREAD_REDUCED_GRAYSCALE_2
cv2.IMREAD_REDUCED_GRAYSCALE_2 flag value reads the image in grayscale and reduces the image by half while loading it.
In the below example, the image is loaded in grayscale, and the image size has been reduced to 199×312 which is half of the original.
In [8]:
img=cv2.imread("animals.png", cv2.IMREAD_REDUCED_GRAYSCALE_2 )

print('Image Dimension is',img.shape)
print('Image Height is',img.shape[0])
print('Image Width is',img.shape[1])
Out[8]:
Image Dimension is (199, 312)
Image Height is 199
Image Width is 312
Example 9 – Flag Value cv2.IMREAD_REDUCED_GRAYSCALE_4
cv2.IMREAD_REDUCED_GRAYSCALE_4 flag value reads the image in grayscale and reduces the image size to one-fourth while loading it.
In the below example, the image is loaded in grayscale, and the image size has been reduced to 99×156 which is one-fourth of the original.
In [9]:
img=cv2.imread("animals.png", cv2.IMREAD_REDUCED_GRAYSCALE_4 )

print('Image Dimension is',img.shape)
print('Image Height is',img.shape[0])
print('Image Width is',img.shape[1])
Out[9]:
Image Dimension is (99, 156)
Image Height is 99
Image Width is 156
Example 10 – Flag Value cv2.IMREAD_REDUCED_GRAYSCALE_8
cv2.IMREAD_REDUCED_GRAYSCALE_8 flag value reads the image in grayscale and reduces the image size to one-eight while loading it.
In the below example, the image is loaded in grayscale, and the image size has been reduced to 49×78 which is one-eighth of the original.
In [10]:
img=cv2.imread("animals.png", cv2.IMREAD_REDUCED_GRAYSCALE_8 )

print('Image Dimension is',img.shape)
print('Image Height is',img.shape[0])
print('Image Width is',img.shape[1])
Out[10]:
Image Dimension is (49, 78)
Image Height is 49
Image Width is 78
cv2.imread() Pitfall Alert – attributeerror: ‘nonetype’ object has no attribute
It is very common for beginners who get frustrated with the error attributeerror: ‘nonetype’ object has no attribute and they are unable to resolve it only to realize after hours that they passed the wrong image filename or path to imread function.
Yes! imread function does not throw any error if the filename is wrong, but the moment you try to perform some operations at the subsequent steps, you start seeing errors of type attributeerror: ‘nonetype’ object has no attribute leaving you confused.
Let us dig down more into it. cv2.imread() creates an object of numpy.ndarray type if it reads an image successfully as shown below.
In [11]:
#read image
img=cv2.imread("animals.png")

type(img)
Out[11]:
numpy.ndarray
But when we try to read an incorrect image filename or path, imread creates an object of NoneType but does not give any error to indicate that the file name or path is incorrect.
In [12]:
#read image
img=cv2.imread("doesnotexist.png")

type(img)
Out[12]:
NoneType
And now, if you try to perform any operation on it subsequently you will start getting errors. For example, if you try to get the shape, you will get the error AttributeError: ‘NoneType’ object has no attribute ‘shape’
In [13]:
img.shape
Out[13]:
---------------------------------------------------------------------------
AttributeError                            Traceback (most recent call last)
<ipython-input-23-32ad6cb7aa56> in <module>
----> 1 img.shape

AttributeError: 'NoneType' object has no attribute 'shape'
Reference – OpenCV Documentation