Introduction
As anticipated, OpenAI has released the ChatGPT API for developers and enterprises, thus opening gates for native integration with third-party applications. In this article, we will do an in-depth ChatGPT API tutorial in Python. We will first understand the specifications of ChatGPT API endpoints, and then see a few examples of ChatGPT API in Python.
ChatGPT API Endpoint
The endpoint of ChatGPT API is as below –
https://api.openai.com/v1/chat/completions
Request Body Specification
The request body of ChaGPT API consists of the following parameters. Only the first two parameters are mandatory and the rest are for advanced usage.
- model (string) [required]: It denotes the ChatGPT model to be used. Usually, it will be gpt-3.5-turbo which always ensures you work with the stable version. However, you can give a specific version like gpt-3.5-turbo-0301 which is the current stable version that will be supported for the next few months until the next release of a new version. Future updates and releases of the model would be available on this OpenAI page.
- messages (array) [required] : The input message prompt for generating ChatGPT completion in response. (Please see the next section for more details)
- temperature (number) : This is a value between 0 and 2 that controls the randomness of the response. A higher number will make the response quite random whereas a lower number makes the response deterministic. By default, the value is 1.
- top_p (number) : This is an alternative sampling method for the temperature discussed above. Here the model considers the output of the token with top_p probability mass. By default, the value is 1. (It is recommended to either use temperature or top_p instead of using both.)
- n (integer) : It denotes the number of chat response choices to be generated for each input prompt. By default is is 1.
- stream (boolean) : By default is is false but if set to true sents back generated chat completion data in a stream as they become available.
- stop (string or array) : It denotes up to four sequences where ChatGPT API will stop generating more tokens for completion. By default, it is null.
- max_tokens (integer) : It denotes the maximum allowed number of tokens in the response output.
- presence_penalty (number) : It is a value between -2.0 and 2.0 that penalizes text depending on whether it has already appeared or not. A positive value can influence the model to talk about the new topic. By default, it is 0.
- frequency_penalty (number) : It is a value between -2.0 and 2.0 that penalizes text depending on its frequency in the response so far. A positive value can influence the model to avoid repeating the same text. By default, it is 0.
- logit_bias (map) : It helps to change the likelihood of specified text’s presence in the output, By default it is null.
- user (string) : It is a unique identifier that denotes the end user and is helpful for tracking and monitoring abuse by OpenAI.
Creating Prompt Messages in ChatGPT API
Let us now elaborate on the message that is a mandatory field of ChatGPT API. We can pass multiple prompts as objects in a message array and each prompt objects has two parts – i) role and ii) content as shown in the below example –
messages=[ {"role": "system", "content": "You are my homework assistant."},
           {"role": "user", "content": "What is square root of 16?"},
           {"role": "assistant", "content": "Square root of 16 is 4"},
           {"role": "user", "content": "What is its square"},
           {"role": "assistant", "content": "Square of 16 is 256"},
]
What is Role in ChatGPT API ?
In ChatGPT API, each prompt object inside the message array has to be associated with one of the three roles – system, user, and assistant.
- System – Although it is not compulsory to pass a message with a system role, however, it is useful to set up the model behavior for conversation. In the above example, we told the model that it should act as our homework assistant.
- User – The user role signifies that it is an input prompt from the end-user or it can also be a prompt triggered by an application.
- Assistant – This role indicates that the message was a response by the assistant (model). This role is useful when you are required to save the prior conversation between the user and assistant in your application and again send it in a prompt request to maintain continuity. Alternatively, the assistant message can also be created manually by the developer to influence a desired behavior in the assistant’s subsequent responses.
ChatGPT API Model
The ChatGPT API is making use of gpt-3.5-turbo model under the hood, which is the same model that is powering the ChatGPT product that was released 3 months back.
From the developer’s perspective, it is recommended to use gpt-3.5-turbo in the API call which will ensure you are making use of the most latest stable version of the model. However, you can use the explicit version of the model as well in the API requests. For example, currently, you can use gpt-3.5-turbo-0301 in the API call which is the latest version released by OpenAI. You can refer to this page to get information on future version releases and their names.
ChatGPT API Pricing
The ChatGPT API Pricing has been kept at $0.002/1K tokens. Tokens can be considered as words but not strictly though. As a point of reference around 750 words consists of 1000 tokens. However, the token spent on one API call is calculated for both the input prompt message and the response message from ChatGPT.
When you create a new account you get $5 worth of free credits that can be used in 3 months. This free credit is really good for you to get started and do a considerable amount of API calls for your initial research or POC purposes.
Generating API Keys for ChatGPT
Before we can start using ChatGPT API, the first pre-requisite is to generate API Keys after you open an OpenAI account. This API key can also be used to access any other APIs provided by OpenAI.
To create the API Key please follow the below steps –
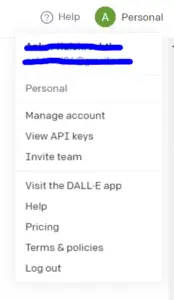
- In your OpenAI account click on your profile name in the top right corner. And then click on the “View API keys” submenu.
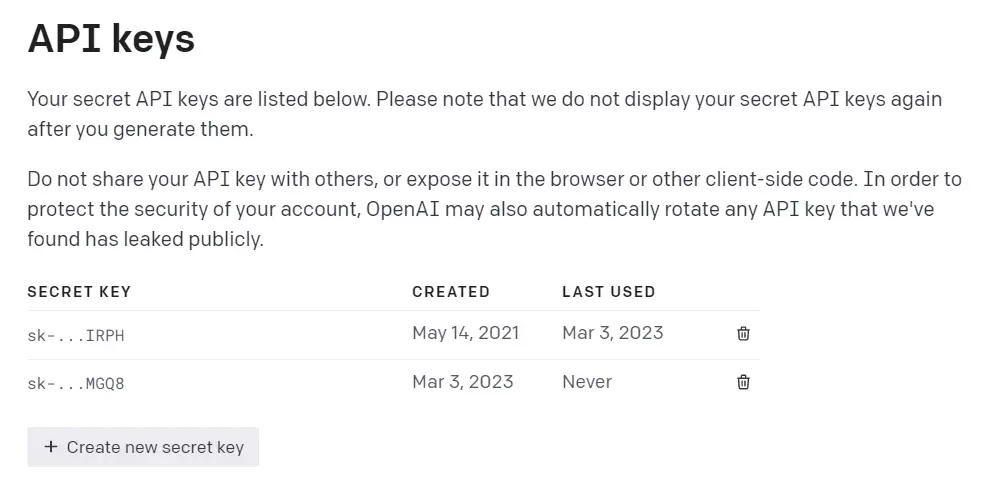
2. In the API key page you can see the list of keys generated by you earlier and also an option to generate a new key.
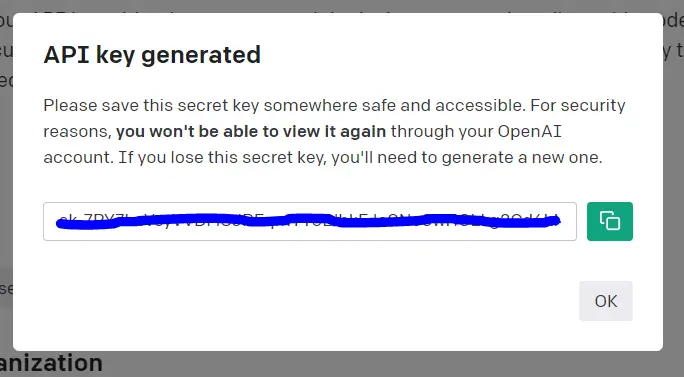
3. When you click on “Create new secret key”, it will instantly generate a key for you. Be careful to save the API key safely somewhere because you would not be able see it again in which case you will have to generate a new one again.
Example of ChatGPT API in Python
In this section, we will cover various examples of ChatGPT API tutorial in Python
Install OpenAI Python Package
The first prerequisite is to install the Python package provided by OpenAI with the help of PIP command –
In [0]:
pip install openai
Load OpenAI Package
Next, let us import the OpenAI package as shown below.
In [1]:
import openai
Set OpenAI API Key
To be able to use ChatGPT API, you should create an API Key that we explained in the previous section. You then need to set API Key as shown below and make sure you replace <your API key> with the actual API key that you have generated.
In [2]:
openai.api_key = "<your API key>"
Example – 1: Simple Use of ChatGPT API
In the first example, we just pass a single prompt in the message with the user role. We simply ask it to tell a random joke in the API request and in the response object we can see a message from the assistant role that contains a random joke. The response object also has a bunch of other details like tokens usages, etc.
In [3]:
response = openai.ChatCompletion.create(
  model="gpt-3.5-turbo",
  messages=[
        {"role": "user", "content": "Hello, can you tell me a random joke ?"},
    ]
)

response
Out [3]:
<OpenAIObject chat.completion id=chatcmpl-6pj42XeBT7OKGYkdGNOz2rGU29rFx at 0x7f6702eccd60> JSON: {
  "choices": [
    {
      "finish_reason": "stop",
      "index": 0,
      "message": {
        "content": "\n\nSure, here's a random joke: Why don't scientists trust atoms? Because they make up everything.  \ud83d\ude02",
        "role": "assistant"
      }
    }
  ],
  "created": 1677785974,
  "id": "chatcmpl-6pj42XeBT7OKGYkdGNOz2rGU29rFx",
  "model": "gpt-3.5-turbo-0301",
  "object": "chat.completion",
  "usage": {
    "completion_tokens": 26,
    "prompt_tokens": 17,
    "total_tokens": 43
  }
}
Example – 2: Setting ChatGPT with Shakespearean English
response = openai.ChatCompletion.create(
  model="gpt-3.5-turbo",
  messages=[
        {"role": "system", "content": "You are an assistant that speaks shakespearean english"},
        {"role": "user", "content": "Hello, can you tell me a random joke ?"}
    ]
)

response
Out[4]:
<OpenAIObject chat.completion id=chatcmpl-6pjDmou7XRkeSPxTm1FyxR0Et2BjV at 0x7f6702de94f0> JSON: {
  "choices": [
    {
      "finish_reason": "stop",
      "index": 0,
      "message": {
        "content": "Good morrow, fair sir or maiden! Forsooth, I shall impart a mirthful jest to lighten your spirits: \n\nWhy did the chicken cross the road? \n\nTo get to the other side, of course! Ha ha ha! Verily, 'tis an ancient joke, but a timeless one nonetheless.",
        "role": "assistant"
      }
    }
  ],
  "created": 1677786578,
  "id": "chatcmpl-6pjDmou7XRkeSPxTm1FyxR0Et2BjV",
  "model": "gpt-3.5-turbo-0301",
  "object": "chat.completion",
  "usage": {
    "completion_tokens": 68,
    "prompt_tokens": 32,
    "total_tokens": 100
  }
}
In [4]:
response = openai.ChatCompletion.create(
  model="gpt-3.5-turbo",
  messages=[
        {"role": "user", "content": "What was first president of America ?"},
        {"role": "assistant", "content": "The first president of America was George Washington."},
        {"role": "user", "content": "For which duration?"}
    ]
)

response
Out [4]:
<OpenAIObject chat.completion id=chatcmpl-6pjZZAJvhyvxO9vUBO16slcxO36sd at 0x7f6702ddcb80> JSON: {
  "choices": [
    {
      "finish_reason": "stop",
      "index": 0,
      "message": {
        "content": "George Washington served as President of the United States for two terms, from April 30, 1789, to March 4, 1797.",
        "role": "assistant"
      }
    }
  ],
  "created": 1677787929,
  "id": "chatcmpl-6pjZZAJvhyvxO9vUBO16slcxO36sd",
  "model": "gpt-3.5-turbo-0301",
  "object": "chat.completion",
  "usage": {
    "completion_tokens": 33,
    "prompt_tokens": 38,
    "total_tokens": 71
  }
}
Reference: OpenAI Documentation