Introduction
In this article, we will take you through the YOLOv4 object detection tutorial for beginners. It is an easy-to-use multi-purpose model which can be used for the detection, classification, and segmentation of day-to-day objects. We will have a brief introduction to the YOLOv4 model and then explain to you how to use YOLOv4 for object detection in images and videos.
- Also Read – YOLOv5 Object Detection Tutorial
What is YOLOv4?
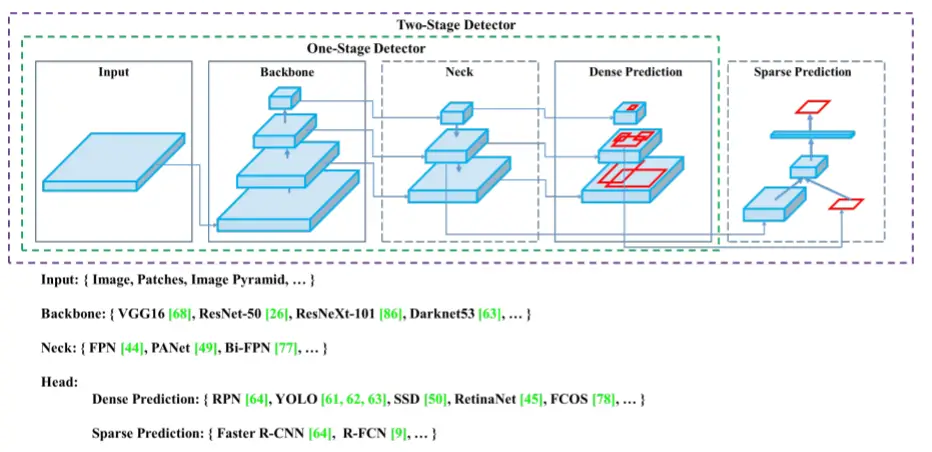
YOLO stands for ‘you only look once’ and YOLOv4 is the 4th addition to the family of YOLO object detector models. It is a milestone model which solidified YOLO’s name and position in the computer vision field. It was released with the concept of BoF (bag of freebies) and BoS (bag of specials) techniques to enhance model performance.
BoF: Techniques that enhance model accuracy without increasing the inference cost (computation or inference times). Examples: Data augmentation, regularization, Normalization.
BoS: Techniques that improve accuracy while slightly increasing the inference cost. These techniques are generally in the form of plugin modules i.e. One can add or remove these techniques from the model at any time. Examples: Spatial attention modules, Non-max suppression, Non-linear activations.
Other characteristics of YOLOv4 includes:
- Self adversarial training for data augmentation.
- Genetic algorithm to find optimal hyper-parameters.
- New normalization techniques.
In testing environments, the model obtained average precision of 43.5 percent on the MS COCO dataset along with an inference speed of 65 FPS.

YOLOv4 Object Detection Tutorial
For the purpose of the YOLOv4 object detection tutorial, we will be making use of its pre-trained model weights on Google Colab. The pre-trained model was trained on the MS-COCO dataset which is a dataset of 80 classes engulfing day-to-day objects. This dataset is widely used to establish a benchmark for the purposes of detection and classification. We will showcase its powerful object detection capabilities on both images and videos.
i) Setting up Google Colab
Launch a jupyter notebook on the web using google colab. It is a free GPU service on the web provided by the Google research team.
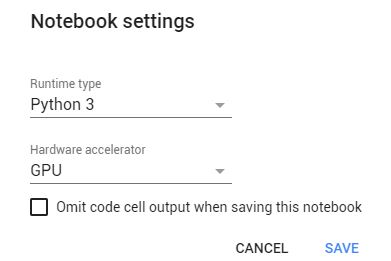
Visit the Runtime section –> Change Runtime Type –> Change hardware accelerator to GPU.
ii) Mount Personal Drive
Run the below code to mount your personal Google drive. It will enable us to use our files (images, videos) kept in Google Drive.
from google.colab import drive
drive.mount('/content/gdrive')
You will see the following output, it is just an authentication step to verify its the user trying to connect to Google Colab. Visit the URL, copy and paste the authorization code, and press enter.
Go to this URL in a browser: https://accounts.google.com/o/oauth2/auth?client_id=947318989803-6bn6qk8qdgf4n4g3pfee6491hc0brc4i.apps.googleusercontent.com&redirect_uri=urn%3aietf%3awg%3aoauth%3a2.0%3aoob&response_type=code&scope=email%20https%3a%2f%2fwww.googleapis.com%2fauth%2fdocs.test%20https%3a%2f%2fwww.googleapis.com%2fauth%2fdrive%20https%3a%2f%2fwww.googleapis.com%2fauth%2fdrive.photos.readonly%20https%3a%2f%2fwww.googleapis.com%2fauth%2fpeopleapi.readonly

Enter your authorization code:
··········
Mounted at /content/gdrive
iii) Cloning the Repository
YOLOv4 uses Darknet which is a neural network framework written in C and CUDA. Let us clone the Github repository of the official Darknet YOLOv4 architecture.
!git clone https://github.com/AlexeyAB/darknet
Output:
Cloning into 'darknet'...
remote: Enumerating objects: 15069, done.
remote: Counting objects: 100% (13/13), done.
remote: Compressing objects: 100% (13/13), done.
remote: Total 15069 (delta 1), reused 7 (delta 0), pack-reused 15056
Receiving objects: 100% (15069/15069), 13.44 MiB | 16.64 MiB/s, done.
Resolving deltas: 100% (10235/10235), done.
In order to accelerate the efficiency and building process make sure that the environment is using CUDA and CUDA GPU enables OpenCV. Run:
%cd darknet
!sed -i 's/OPENCV=0/OPENCV=1/' Makefile
!sed -i 's/GPU=0/GPU=1/' Makefile
!sed -i 's/CUDNN=0/CUDNN=1/' Makefile
!sed -i 's/CUDNN_HALF=0/CUDNN_HALF=1/' Makefile
Output:
/content/darknet
iv) Build Darknet
Run the make command that builds darknet i.e. convert the darknet code into an executable file/application.
!make
Output:
mkdir -p ./obj/
mkdir -p backup
chmod +x *.sh
g++ -std=c++11 -std=c++11 -Iinclude/ -I3rdparty/stb/include -DOPENCV `pkg-config --cflags opencv4 2> /dev/null || pkg-config --cflags opencv` -DGPU -I/usr/local/cuda/include/ -DCUDNN -DCUDNN_HALF -Wall -Wfatal-errors -Wno-unused-result -Wno-unknown-pragmas -fPIC -Ofast -DOPENCV -DGPU -DCUDNN -I/usr/local/cudnn/include -DCUDNN_HALF -c ./src/image_opencv.cpp -o obj/image_opencv.o
./src/image_opencv.cpp: In function ‘void draw_detections_cv_v3(void**, detection*, int, float, char**, image**, int, int)’:
./src/image_opencv.cpp:910:23: warning: variable ‘rgb’ set but not used [-Wunused-but-set-variable]
                 float rgb[3];
                       ^~~
./src/image_opencv.cpp: In function ‘void cv_draw_object(image, float*, int, int, int*, float*, int*, int, char**)’:
./src/image_opencv.cpp:1391:14: warning: unused variable ‘buff’ [-Wunused-variable] char buff[100];
^~~~
.......................... # Much More
v) Download Pre-trained YOLOv4 Model Weights
You can download the weight from here and place it in the working directory or use the ‘wget’ command to download pre-trained model weights as below. Run:
!wget https://github.com/AlexeyAB/darknet/releases/download/darknet_yolo_v3_optimal/yolov4.weights
Output:
Resolving github-releases.githubusercontent.com (github-releases.githubusercontent.com)... 185.199.108.154, 185.199.109.154, 185.199.110.154, ...
Connecting to github-releases.githubusercontent.com (github-releases.githubusercontent.com)|185.199.108.154|:443... connected.
HTTP request sent, awaiting response... 200 OK
Length: 257717640 (246M) [application/octet-stream]
Saving to: ‘yolov4.weights’

yolov4.weights 100%[===================>] 245.78M 82.8MB/s in 3.0s

2021-06-06 14:45:55 (82.8 MB/s) - ‘yolov4.weights’ saved [257717640/257717640]
vi) Utility Functions
We now create a custom function ‘imshow()’ that helps us to visualize our predictions using matplotlib. It is important since we cannot use Colab to output images in new windows. We have to use matplotlib. Run:
import cv2
import matplotlib.pyplot as plt
%matplotlib inline
def imShow(path):
  image = cv2.imread(path)
  height, width = image.shape[:2]
  resized_image = cv2.resize(image,(3*width, 3*height), interpolation = cv2.INTER_CUBIC)
  fig = plt.gcf()
  fig.set_size_inches(18, 10)
  plt.axis("off")
  plt.imshow(cv2.cvtColor(resized_image, cv2.COLOR_BGR2RGB))
  plt.show()
vii) Darknet CLI command for Object Detection in Images
Below is the syntax of the Darknet command to be executed from CLI for object detection in images with the YOLOv4 model.
!./darknet detector test <path to .data file> <path to config> <path to weights> <path to image>- !./darknet: On Linux executable files are used like this.
- detector test: We can use the ‘test’ or the ‘demo’ argument to use the pre-trained models or custom models.
- <path to .data file>: Path to the data file. It is a list of parameters that defines values like class names, train/testing conditions, evaluation metrics.
- <path to config>: Path to the config file. An important part of the YOLO model. They define the structure of the model (layers, hyperparameters, training/testing parameters like epochs, batches).
- <path to weights>: Path to the weight file.
- <path to images>: Path to the query image.
viii) Object Detection in Image with YOLOv4
Example – 1
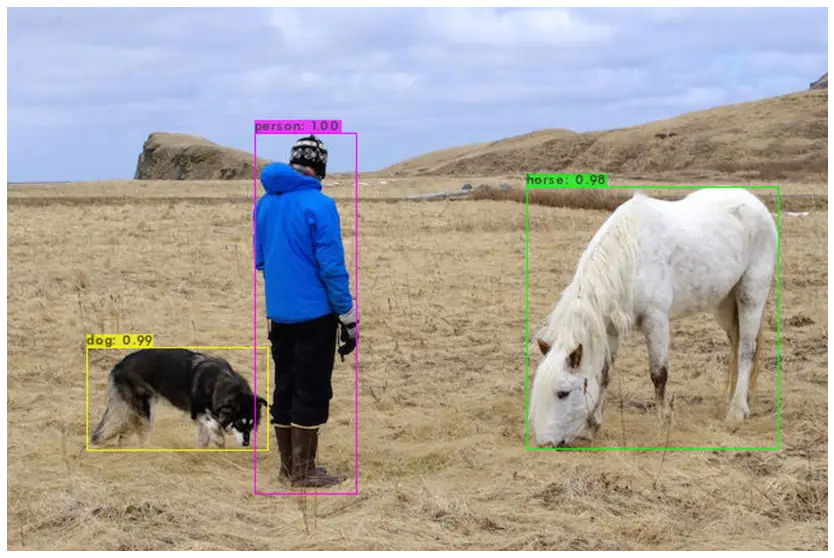
Let use the “person.jpg” image from the official repository and perform the object detection.
!./darknet detector test cfg/coco.data cfg/yolov4.cfg yolov4.weights data/person.jpg
Output:
The output shows the model architecture and lastly, it shows the inference time and the predictions along with the confidence.

Run the following code to show the prediction image as YOLO automatically saves the prediction(as ‘predictions.jpg’) with bounding boxes put on the detected objects.
imShow('predictions.jpg')
Output:
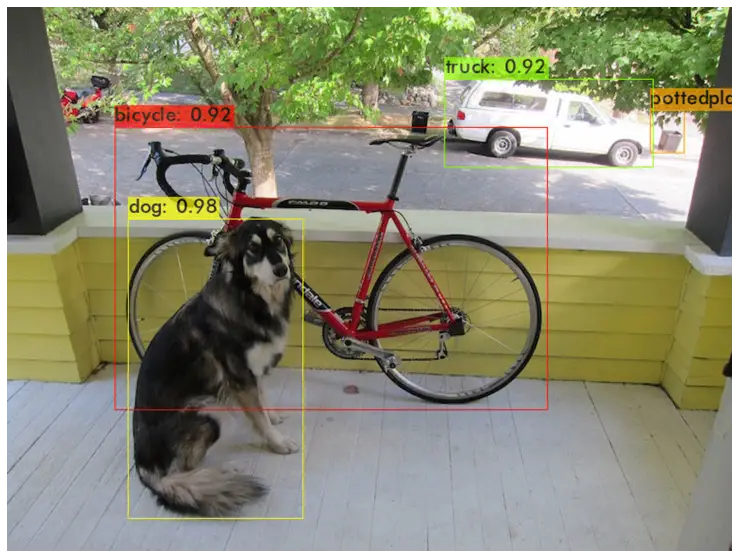
Example – 2
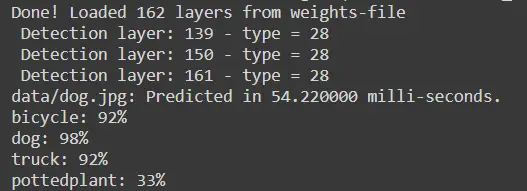
Let us use another image “dog.jpg” from the official repository.
!./darknet detector test cfg/coco.data cfg/yolov4.cfg yolov4.weights data/dog.jpg
Output:
Again run the following code to show the prediction image as in the earlier example.
imShow('predictions.jpg')
Output:
ix) Darknet CLI command for Object Detection in Videos
Below is the syntax of the Darknet command to be executed from CLI for object detection in video with the YOLOv4 model.
!./darknet detector demo <path to .data file> <path to config> <path to weights> <path to video file> -i <x> -out_filename <output file name.avi>- <path to video file>: The path of the video on which the object detection process is to be performed.
- -dont_show flag: A flag parameter, lets the user control whether the output video is shown to the user. (We use it since colab doesn’t support additional windows)(Optional)
- -i <x>: Threshold value ‘x’ to be considered a valid prediction (optional)
- -out_filename <filename>: Output filename. The video on which object detection has been performed is saved by the specified name (optional).
Other arguments are the same as object detection on images as discussed in the above sections.
x) Object Detection in Video with YOLOv4
Here we will be making use of the Google Drive that we mounted on Google Colab. In the below section put the path to the video that you uploaded to your drive. (You can upload the video by visiting your Google Drive).
You can copy the path by right-clicking on it and selecting ‘copy path’ from the ‘Files’ menu present on the right-hand side.
Now we will run the CLI command that we saw in the previous section. (My video is named ‘india.mp4’)
!./darknet detector demo cfg/coco.data cfg/yolov4.cfg yolov4.weights -dont_show /content/drive/MyDrive/india.mp4 -i 0 -out_filename results.avi
Output:
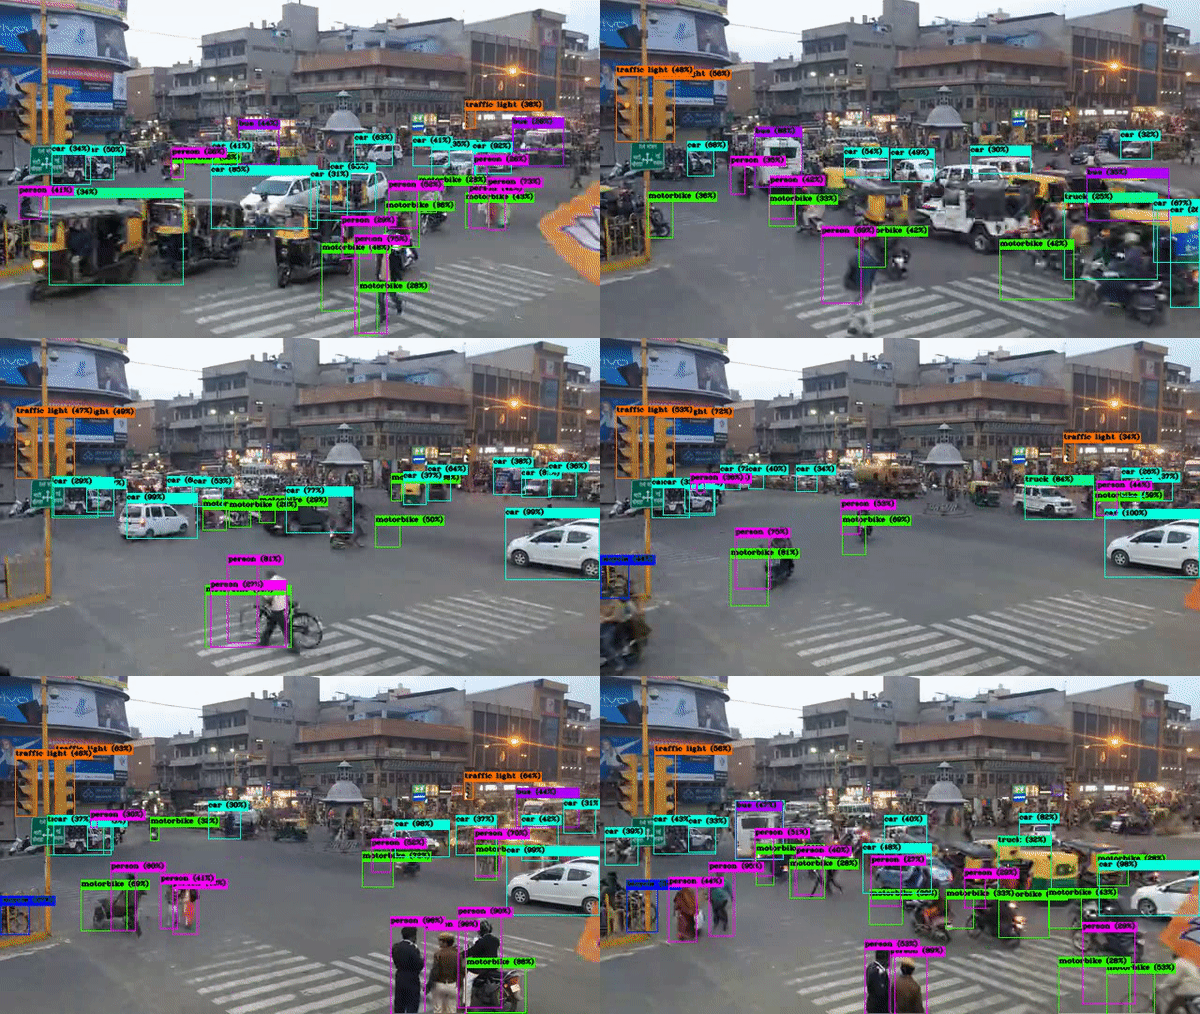
The model processes it frame-by-frame and gives the detection.
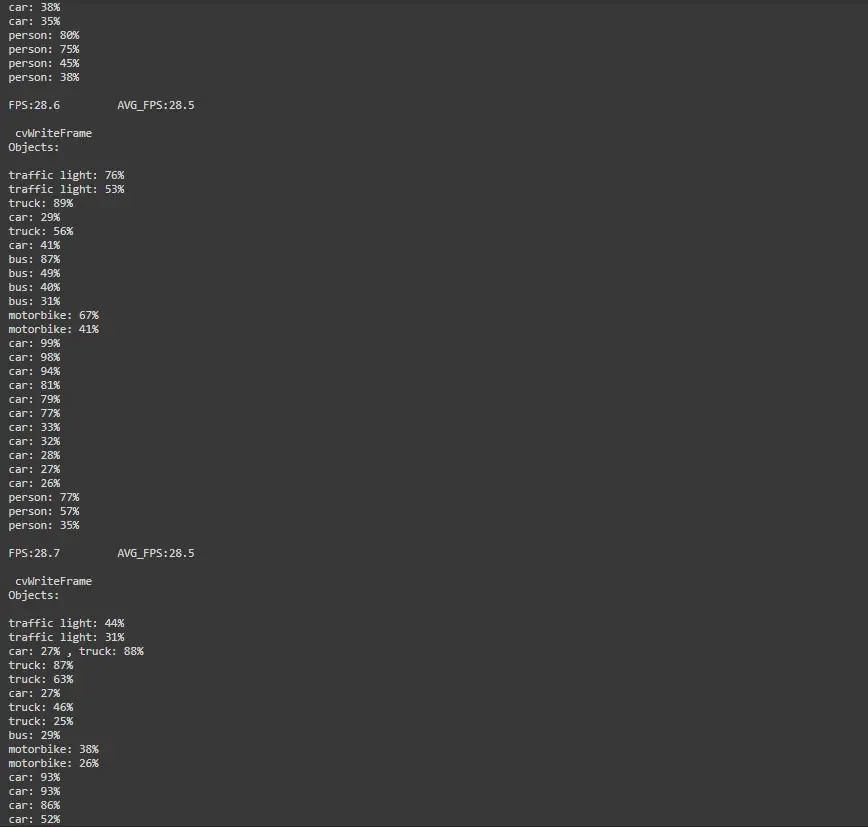
If we want to see the output video we have to remove dont_show flag from the command.
!./darknet detector demo cfg/coco.data cfg/yolov4.cfg yolov4.weights /content/drive/MyDrive/india.mp4 -i 0 -out_filename results.avi
Output Video:
- Also Read – YOLOv5 Object Detection with Tutorial
-
I am a machine learning enthusiast with a keen interest in web development. My main interest is in the field of computer vision and I am fascinated with all things that comprise making computers learn and love to learn new things myself.
View all posts


