Introduction
In this tutorial, we will see how to implement the 2D convolutional layer of CNN by using PyTorch Conv2D function. We will first understand what is 2D convolution actually is and then see the syntax of Conv2D along with examples of usages. Finally, we will see an end-to-end example of PyTorch Conv2D in a convolutional neural network by using the MNIST dataset.
What is 2D Convolution
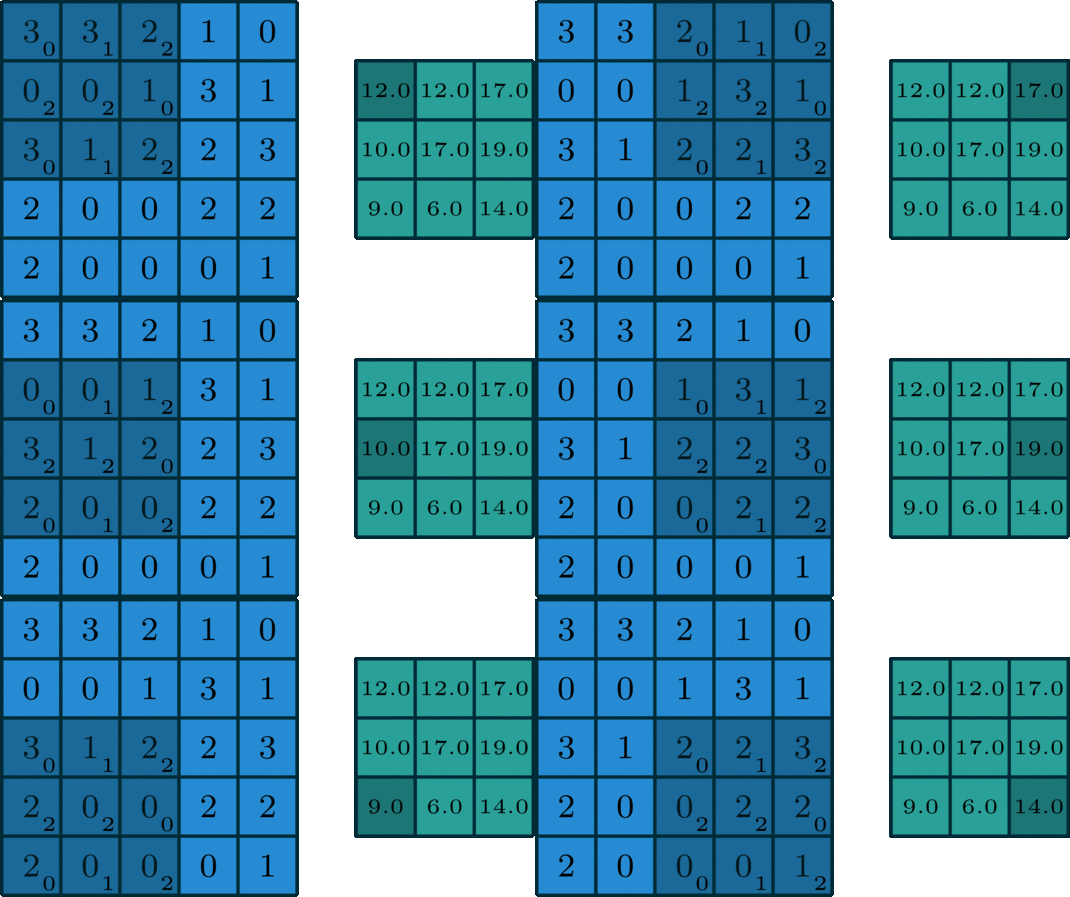
You will usually hear about 2D Convolution while dealing with convolutional neural networks for images. It is a simple mathematical operation in which we slide a matrix or kernel of weights over 2D data and perform element-wise multiplication with the data that falls under the kernel. Finally, we sum up the multiplication result to produce one output of that operation.
We move the kernel in strides, throughout the input data, till we get the final output matrix of the 2D convolution operation. In the below illustration, the kernel is moving at a stride of 1, it is, however, possible to move with a higher stride of 2,3, etc.

A colored image consists of 3 color channels Red, Blue, and Green, hence the 2D convolution operation is done individually for the three color channels, and their results are added together for the final output.
The convolutional neural network that performs convolution on the image is able to outperform a regular neural network in which you would feed the image by flattening it. This is why CNN models have been able to achieve state-of-the-art accuracies in working with images.
To perform convolution operation there is a function Conv2D in PyTorch, let us go through the details of it in the below sections.
PyTorch Conv2D
Below are the syntax and parameters of the Conv2D PyTorch function.
Syntax of Conv2D
torch.nn.Conv2d(in_channels: int, out_channels: int, kernel_size: Union[T, Tuple[T, T]], stride: Union[T, Tuple[T, T]] = 1, padding: Union[T, Tuple[T, T]] = 0, dilation: Union[T, Tuple[T, T]] = 1, groups: int = 1, bias: bool = True, padding_mode: str = 'zeros')
Parameters
- in_channels (int) – Number of channels in the input image
- out_channels (int) – Number of channels produced by the convolution
- kernel_size (int or tuple) – Size of the convolving kernel
- stride (int or tuple, optional) – Stride of the convolution. Default: 1
- padding (int or tuple, optional) – Zero-padding added to both sides of the input. Default: 0
- padding_mode (string, optional) – ‘zeros’, ‘reflect’, ‘replicate’ or ‘circular’. Default: ‘zeros’
- dilation (int or tuple, optional) – Spacing between kernel elements. Default: 1
- groups (int, optional) – Number of blocked connections from input channels to output channels. Default: 1
- bias (bool, optional) – If True, adds a learnable bias to the output. Default: True
Example of using Conv2D in PyTorch
Let us first import the required torch libraries as shown below.
import torch
import torch.nn as nn
m = nn.Conv2d(2, 28, 3, stride=1)

input = torch.randn(20, 2, 50, 50)

output = m(input)
Other Examples of Conv2D
# With square kernels and equal stride
m = nn.Conv2d(3, 33, 3, stride=2)

# non-square kernels and unequal stride and with padding
m = nn.Conv2d(3, 33, (3, 4), stride=(3, 1), padding=(4, 2))

# non-square kernels and unequal stride and with padding and dilation
m = nn.Conv2d(3, 33, (3, 5), stride=(3, 1), padding=(4, 2), dilation=(3, 1))
Example of PyTorch Conv2D in CNN
In this example, we will build a convolutional neural network with Conv2D layer to classify the MNIST data set. This will be an end-to-end example in which we will show data loading, pre-processing, model building, training, and testing.
i) Loading Libraries
import torch
from torch.autograd import Variable
import torchvision.datasets as dsets
import torchvision.transforms as transforms
import torch.nn.init
ii) Setting Hyperparameters
Now we will set the hyperparameters for the model that we’re building.
# hyperparameters
batch_size = 32
keep_prob = 1
iii) Loading Dataset
The MNIST dataset is available in the in-built datasets of Pytorch. We use the PyTorch Datalaoader function to load the dataset. While loading the dataset only, it is split into the training part and the testing part.
- Also Read – PyTorch Dataloader Tutorial with Example
# MNIST dataset
mnist_train = dsets.MNIST(root='MNIST_data/',
                          train=True,
                          transform=transforms.ToTensor(),
                          download=True)

mnist_test = dsets.MNIST(root='MNIST_data/',
                         train=False,
                         transform=transforms.ToTensor(),
                         download=True)

# dataset loader
data_loader = torch.utils.data.DataLoader(dataset=mnist_train,
                                          batch_size=batch_size,
                                          shuffle=True)
Downloading http://yann.lecun.com/exdb/mnist/train-images-idx3-ubyte.gz
Downloading http://yann.lecun.com/exdb/mnist/train-images-idx3-ubyte.gz to MNIST_data/MNIST/raw/train-images-idx3-ubyte.gz

Downloading https://ossci-datasets.s3.amazonaws.com/mnist/train-images-idx3-ubyte.gz
Downloading https://ossci-datasets.s3.amazonaws.com/mnist/train-images-idx3-ubyte.gz to MNIST_data/MNIST/raw/train-images-idx3-ubyte.gz
iv) Exploring Dataset
Here we explore how much data are present in the test and train set that we have downloaded.
# Display informations about the dataset
print('The training dataset:\t',mnist_train)
print('\nThe testing dataset:\t',mnist_test)
The training dataset:	 Dataset MNIST
    Number of datapoints: 60000
    Root location: MNIST_data/
    Split: Train
    StandardTransform
Transform: ToTensor()

The testing dataset:	 Dataset MNIST
    Number of datapoints: 10000
    Root location: MNIST_data/
    Split: Test
    StandardTransform
Transform: ToTensor()
v) Creating CNN Model
We will now create the CNN model as per the architecture shown below. Do note that there are 3 convolutional layers in this architecture.

Below we have implemented the CNN architecture in PyTorch, do note the Conv2D layer is highlighted for your reference.
# Implementation of CNN/ConvNet Model
class CNN(torch.nn.Module):

    def __init__(self):
        super(CNN, self).__init__()
        # L1 ImgIn shape=(?, 28, 28, 1)
        # Conv -> (?, 28, 28, 32)
        # Pool -> (?, 14, 14, 32)
        self.layer1 = torch.nn.Sequential(
            torch.nn.Conv2d(1, 32, kernel_size=3, stride=1, padding=1),
            torch.nn.ReLU(),
            torch.nn.MaxPool2d(kernel_size=2, stride=2),
            torch.nn.Dropout(p=1 - keep_prob))
        # L2 ImgIn shape=(?, 14, 14, 32)
        # Conv      ->(?, 14, 14, 64)
        # Pool      ->(?, 7, 7, 64)
        self.layer2 = torch.nn.Sequential(
            torch.nn.Conv2d(32, 64, kernel_size=3, stride=1, padding=1),
            torch.nn.ReLU(),
            torch.nn.MaxPool2d(kernel_size=2, stride=2),
            torch.nn.Dropout(p=1 - keep_prob))
        # L3 ImgIn shape=(?, 7, 7, 64)
        # Conv ->(?, 7, 7, 128)
        # Pool ->(?, 4, 4, 128)
        self.layer3 = torch.nn.Sequential(
            torch.nn.Conv2d(64, 128, kernel_size=3, stride=1, padding=1),
            torch.nn.ReLU(),
            torch.nn.MaxPool2d(kernel_size=2, stride=2, padding=1),
            torch.nn.Dropout(p=1 - keep_prob))

        # L4 FC 4x4x128 inputs -> 625 outputs
        self.fc1 = torch.nn.Linear(4 * 4 * 128, 625, bias=True)
        torch.nn.init.xavier_uniform(self.fc1.weight)
        self.layer4 = torch.nn.Sequential(
            self.fc1,
            torch.nn.ReLU(),
            torch.nn.Dropout(p=1 - keep_prob))
        # L5 Final FC 625 inputs -> 10 outputs
        self.fc2 = torch.nn.Linear(625, 10, bias=True)
        torch.nn.init.xavier_uniform_(self.fc2.weight) # initialize parameters

    def forward(self, x):
        out = self.layer1(x)
        out = self.layer2(out)
        out = self.layer3(out)
        out = out.view(out.size(0), -1)   # Flatten them for FC
        out = self.fc1(out)
        out = self.fc2(out)
        return out


#instantiate CNN model
model = CNN()
model
CNN(
  (layer1): Sequential(
    (0): Conv2d(1, 32, kernel_size=(3, 3), stride=(1, 1), padding=(1, 1))
    (1): ReLU()
    (2): MaxPool2d(kernel_size=2, stride=2, padding=0, dilation=1, ceil_mode=False)
    (3): Dropout(p=0, inplace=False)
  )
  (layer2): Sequential(
    (0): Conv2d(32, 64, kernel_size=(3, 3), stride=(1, 1), padding=(1, 1))
    (1): ReLU()
    (2): MaxPool2d(kernel_size=2, stride=2, padding=0, dilation=1, ceil_mode=False)
    (3): Dropout(p=0, inplace=False)
  )
  (layer3): Sequential(
    (0): Conv2d(64, 128, kernel_size=(3, 3), stride=(1, 1), padding=(1, 1))
    (1): ReLU()
    (2): MaxPool2d(kernel_size=2, stride=2, padding=1, dilation=1, ceil_mode=False)
    (3): Dropout(p=0, inplace=False)
  )
  (fc1): Linear(in_features=2048, out_features=625, bias=True)
  (layer4): Sequential(
    (0): Linear(in_features=2048, out_features=625, bias=True)
    (1): ReLU()
    (2): Dropout(p=0, inplace=False)
  )
  (fc2): Linear(in_features=625, out_features=10, bias=True)
)
Next is to set the learning rate, decide the loss function and also decide the optimizer.
- Also Read – PyTorch Optimizers – Complete Guide for Beginner
learning_rate = 0.001
criterion = torch.nn.CrossEntropyLoss()    # Softmax is internally computed.
optimizer = torch.optim.Adam(params=model.parameters(), lr=learning_rate)
vi) Model Training
The next step is to perform the training of our model. Here we will train the model for 15 epochs.
print('Training the Deep Learning network ...')
train_cost = []
train_accu = []

training_epochs = 15
total_batch = len(mnist_train) // batch_size

print('Size of the training dataset is {}'.format(mnist_train.data.size()))
print('Size of the testing dataset'.format(mnist_test.data.size()))
print('Batch size is : {}'.format(batch_size))
print('Total number of batches is : {0:2.0f}'.format(total_batch))
print('\nTotal number of epochs is : {0:2.0f}'.format(training_epochs))

for epoch in range(training_epochs):
    avg_cost = 0
    for i, (batch_X, batch_Y) in enumerate(data_loader):
        X = Variable(batch_X)    # image is already size of (28x28), no reshape
        Y = Variable(batch_Y)    # label is not one-hot encoded

        optimizer.zero_grad() # <= initialization of the gradients

        # forward propagation
        hypothesis = model(X)
        cost = criterion(hypothesis, Y) # <= compute the loss function

        # Backward propagation
        cost.backward() # <= compute the gradient of the loss/cost function
        optimizer.step() # <= Update the gradients

        # Print some performance to monitor the training
        prediction = hypothesis.data.max(dim=1)[1]
        train_accu.append(((prediction.data == Y.data).float().mean()).item())
        train_cost.append(cost.item())
        if i % 200 == 0:
            print("Epoch= {},\t batch = {},\t cost = {:2.4f},\t accuracy = {}".format(epoch+1, i, train_cost[-1], train_accu[-1]))

        avg_cost += cost.data / total_batch

    print("[Epoch: {:>4}], averaged cost = {:>.9}".format(epoch + 1, avg_cost.item()))


print('Learning Finished!')
Training the Deep Learning network ...
Size of the training dataset is torch.Size([60000, 28, 28])
Size of the testing dataset
Batch size is : 32
Total number of batches is : 1875

Total number of epochs is : 15
Epoch= 1,	 batch = 0,	 cost = 2.2972,	 accuracy = 0.125
Epoch= 1,	 batch = 200,	 cost = 0.1557,	 accuracy = 0.90625
Epoch= 1,	 batch = 400,	 cost = 0.0378,	 accuracy = 1.0
Epoch= 1,	 batch = 600,	 cost = 0.1439,	 accuracy = 0.9375
Epoch= 1,	 batch = 800,	 cost = 0.0156,	 accuracy = 1.0
Epoch= 1,	 batch = 1000,	 cost = 0.0328,	 accuracy = 1.0
Epoch= 1,	 batch = 1200,	 cost = 0.0089,	 accuracy = 1.0
Epoch= 1,	 batch = 1400,	 cost = 0.0397,	 accuracy = 1.0
Epoch= 1,	 batch = 1600,	 cost = 0.0123,	 accuracy = 1.0
Epoch= 1,	 batch = 1800,	 cost = 0.0180,	 accuracy = 1.0
[Epoch:    1], averaged cost = 0.118849419
Epoch= 2,	 batch = 0,	 cost = 0.0195,	 accuracy = 1.0
Epoch= 2,	 batch = 200,	 cost = 0.0339,	 accuracy = 0.96875
Epoch= 2,	 batch = 400,	 cost = 0.0293,	 accuracy = 0.96875
Epoch= 2,	 batch = 600,	 cost = 0.0015,	 accuracy = 1.0
Epoch= 2,	 batch = 800,	 cost = 0.1233,	 accuracy = 0.96875
.
.
.
Epoch= 14,	 batch = 1000,	 cost = 0.0001,	 accuracy = 1.0
Epoch= 14,	 batch = 1200,	 cost = 0.0025,	 accuracy = 1.0
Epoch= 14,	 batch = 1400,	 cost = 0.0001,	 accuracy = 1.0
Epoch= 14,	 batch = 1600,	 cost = 0.0000,	 accuracy = 1.0
Epoch= 14,	 batch = 1800,	 cost = 0.0010,	 accuracy = 1.0
[Epoch:   14], averaged cost = 0.0116119385
Epoch= 15,	 batch = 0,	 cost = 0.0000,	 accuracy = 1.0
Epoch= 15,	 batch = 200,	 cost = 0.0000,	 accuracy = 1.0
Epoch= 15,	 batch = 400,	 cost = 0.0004,	 accuracy = 1.0
Epoch= 15,	 batch = 600,	 cost = 0.0000,	 accuracy = 1.0
Epoch= 15,	 batch = 800,	 cost = 0.0000,	 accuracy = 1.0
Epoch= 15,	 batch = 1000,	 cost = 0.0040,	 accuracy = 1.0
Epoch= 15,	 batch = 1200,	 cost = 0.0020,	 accuracy = 1.0
Epoch= 15,	 batch = 1400,	 cost = 0.0000,	 accuracy = 1.0
Epoch= 15,	 batch = 1600,	 cost = 0.0000,	 accuracy = 1.0
Epoch= 15,	 batch = 1800,	 cost = 0.0000,	 accuracy = 1.0
[Epoch:   15], averaged cost = 0.0121322656
Learning Finished!
vii) Visualize Training
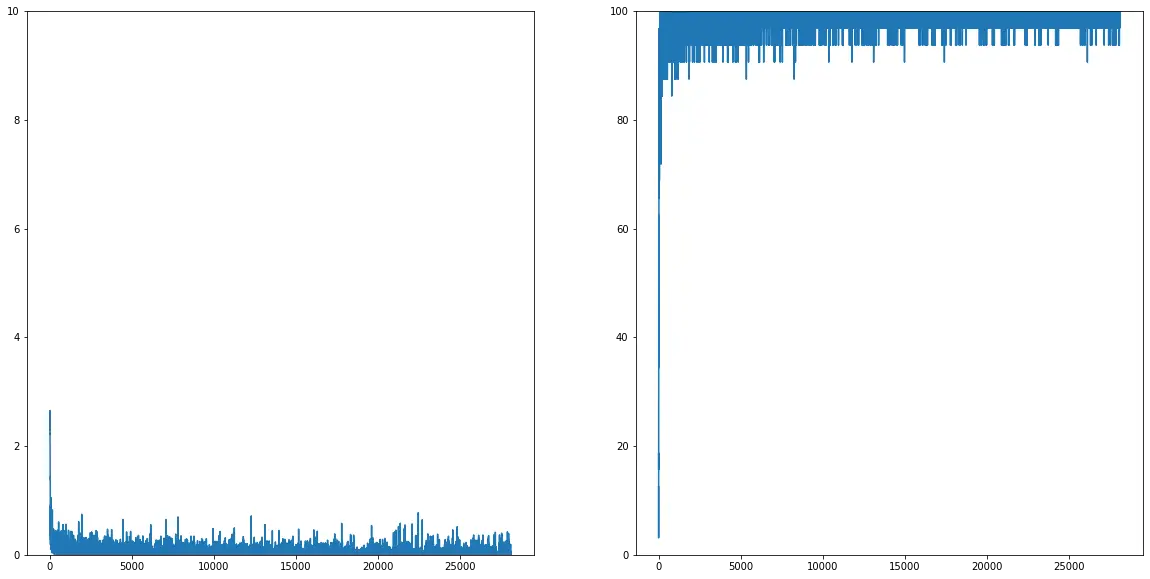
With the help of the matplotlib library, we will now visualize the accuracy of our training process.
from matplotlib import pylab as plt
import numpy as np
plt.figure(figsize=(20,10))
plt.subplot(121), plt.plot(np.arange(len(train_cost)), train_cost), plt.ylim([0,10])
plt.subplot(122), plt.plot(np.arange(len(train_accu)), 100 * torch.as_tensor(train_accu).numpy()), plt.ylim([0,100])
(<matplotlib.axes._subplots.AxesSubplot at 0x7f0a17b24890>,
 [<matplotlib.lines.Line2D at 0x7f0a17be5410>],
 (0.0, 100.0))

viii) Evaluation of the Model
Here we calculate the accuracy of our model and can see it is 82.59%.
# Test model and check accuracy
model.eval()    # set the model to evaluation mode (dropout=False)

X_test = Variable(mnist_test.data.view(len(mnist_test), 1, 28, 28).float())
Y_test = Variable(mnist_test.targets)

prediction = model(X_test)

# Compute accuracy
correct_prediction = (torch.max(prediction.data, dim=1)[1] == Y_test.data)
accuracy = correct_prediction.float().mean().item()
print('\nAccuracy: {:2.2f} %'.format(accuracy*100))
Accuracy: 82.59 %
xi) Final Result
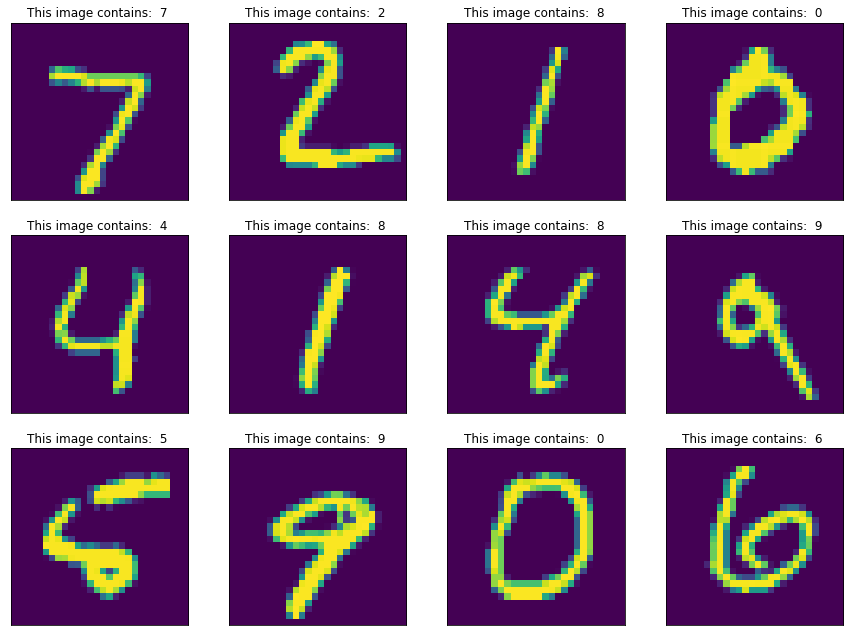
As our model has been built now, let us visually verify whether our model can classify the dataset images or not. As we can see with the help of the following code, the images are getting classified correctly by our convolutional neural network model.
from matplotlib import pylab as plt

plt.figure(figsize=(15,15), facecolor='white')
for i in torch.arange(0,12):
  val, idx = torch.max(prediction, dim=1)
  plt.subplot(4,4,i+1)
  plt.imshow(X_test[i][0])
  plt.title('This image contains: {0:>2} '.format(idx[i].item()))
  plt.xticks([]), plt.yticks([])
  plt.plt.subplots_adjust()

Reference – PyTorch Documentation
-
I am Palash Sharma, an undergraduate student who loves to explore and garner in-depth knowledge in the fields like Artificial Intelligence and Machine Learning. I am captivated by the wonders these fields have produced with their novel implementations. With this, I have a desire to share my knowledge with others in all my capacity.
View all posts


