
Introduction
In this tutorial, we will do a project in which we will create an Alexa like personal AI voice assistant that can understand voice command using speech recognition in Python. As difficult it may sound but creating an AI personal assistant is quite easy with the help of Python SpeechRecognition and PyAudio libraries along with some creativity.
Let us start the project but first let us clear the basics of speech recognition.
What is Speech Recognition?
Speech Recognition is the ability given to machines and computers to interpret the voice of humans and then take appropriate action. Speech recognition is commonly used for speech-to-text conversion but is now more popular with voice assistants like Alexa.
This process of recognition is done by breaking down audio into individual sounds, then converting them into a digital format where we will be using Machine learning algorithms ad models to find the word for that sound.
How Speech Recognition Works?
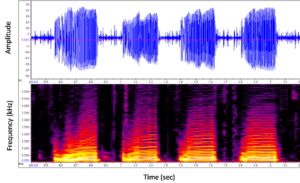
When people speak any word, line, or para in their languages those sounds make vibrations in the air. All these vowels uttered by us have different frequencies pattern. Since the sound is analog in nature, these vibrations can be recorded in an analog device, and then with help of analog to digital converter, we change sound waves into a digital format that the computer understands.
Now we can train state of art deep learning models to make them understand different frequency patterns of these vowels. Such is the impressive advancement in this area in recent times that speech recognition accuracy has now reached 95% nowadays.
Personal Assistant with Speech Recognition in Python
Let us start building our AI personal assistant and let us give it a name – Max.
So the first step is to import all the libraries that we will require for this project. All the libraries are as follows:-
1. Installing Libraries
i) SpeechRecognition
pip install SpeechRecognition
SpeechRecognition is a Python speech recognition library that is used to convert our human speech into text.
ii) PyAudio
SpeechRecognition library doesn’t work alone, it uses PyAudio Library. PyAudio provides Python bindings for PortAudio, the cross-platform audio I/O library. Using PyAudio, you can easily use Python to play and record audio on a variety of platforms.
pip install PyAudio
NOTE: PyAudio installation requires a build-in set-up for C++ binaries in your system and will throw an error if it is not installed already. The C++ binaries can be installed from the following link –
https://visualstudio.microsoft.com/visual-cpp-build-tools/

iii) pyttsx3
pip install pyttsx3
pyttsx3 is a text-to-speech conversion library in Python. Unlike other alternative libraries, it works offline and is compatible with both Python 2 and 3.
iv) pywhatkit
pip install pywhatkit
pywhatkit library will give power of the internet to our personal assistant Max for certain functionality for example using the youtube to play songs.
v) wikipedia
pip install wikipedia
Wikipedia is a Python library that makes it easy to access and parse data from Wikipedia. We want our AI assistant Max, to be more knowledgeable and informative so we use this approach for it.
2. Speech Recognition
We start by importing speech_recognition, we do not import the Pyaudio library but speech_recognition uses it for conversion purposes.
The speech_recognition module is used to create a Recognizer() object which takes audio data as input captured by another Microphone() object. This is then passed to recognize_google() function for actual speech recognition to text. We print this to verify if our setup is working properly as expected.
import speech_recognition as sr

listener = sr.Recognizer()

try:
    with sr.Microphone() as data_taker:
    print("Say Something")
    voice = listener.listen(data_taker)
    instruct = listener.recognize_google(voice)
    instruct = instruct.lower()
    print(instruct)
except:
    pass
3. Activating Personal Assistant
We have named our personal assistant Max, so here we add a logic to recognize if the speech contains the word “Max” or not by using a simple if condition. If the speech matches “Max” then we just print it. We will put more logic in the upcoming sections.
import speech_recognition as sr

listener = sr.Recognizer()

try:
    with sr.Microphone() as data_taker:
    print("Say Something")
    voice = listener.listen(data_taker)
    instruct = listener.recognize_google(voice)
    instruct = instruct.lower()
    print(instruct)
    if'Max' in instruct:
        print(instruct)
except:
    pass
4. Adding Speech for Assistant
In the above section, we converted speech to text for our assistant Max to understand what we say but we also want it to reply back to us. So for this, we have to add text to speech capability to Max.
We use Pyttsx3 library text to speech conversion, using it as an engine that answers us back or reads the output of our question. Here we initialize pysttsx3 after the listener and we test it by making it read some of the sample text.
import speech_recognition as sr
import pyttsx3

listener = sr.Recognizer()
engine = pyttsx3.init()
engine.say('hey Sir how are you')
engine.say('Hey what you want')
engine.runAndWait()

try:
    with sr.Microphone() as data_taker:
        print("Say Something")
        voice = listener.listen(data_taker)
        instruct = listener.recognize_google(voice)
        instruct = instruct.lower()
        print(instruct)
        if'Max' in instruct:
            print(instruct)
except:
    pass
5. Making AI Assistant Take “Play Song” Command
We have come this far by establishing to and fro communication with Max but how about making him do something for example asking him to play a song.
We encapsulate the logic discussed in the above section in two functions talk() and take_command(). Then we create another function run_Max() to take voice command using take_command() and reply back using the talk() function.
Now that we want Max to play the song we want it to play the song when we say “MAX Play <song name> song” for example, “MAX Play Despacito song”.
We extract the song name from the voice command and print it to test if it is working properly. In the next section, we will add code to actually make Max play the song from the internet.
import speech_recognition as sr
import pyttsx3

listener = sr.Recognizer()
engine = pyttsx3.init()
def talk(text):
    engine.say(text)
    engine.runAndWait()

def take_command():
    try:
        with sr.Microphone() as data_taker:
        print("Say Something")
        voice = listener.listen(data_taker)
        instruct = listener.recognize_google(voice)
        instruct = instruct.lower()
        print(instruct)
        if'Max' in instruct:
            print(instruct)
    except:
        pass
def run_Max():
    instruct = take_command()
    if 'play' in instruct:
        song = instruct.replace('play', '')
        talk('playing' + song)
        print(song)

run_Max()
6. Giving AI Assistant Internet Access to Play Song
Making Max play song requires the internet where we have many sources for the song and in our case we choose YouTube. For this, we use pywhatkit library’s playonyt() function where we pass the song name and it opens YouTube with that song.
import speech_recognition as sr
import pyttsx3
import pywhatkit

listener = sr.Recognizer()
engine = pyttsx3.init()
def talk(text):
    engine.say(text)
    engine.runAndWait()
def take_command():
    try:
        with sr.Microphone() as data_taker:
        print("Say Something")
        voice = listener.listen(data_taker)
        instruct = listener.recognize_google(voice)
        instruct = instruct.lower()
        print(instruct)
        if'Max' in instruct:

            instruct = instruct.replace('Max', '')
            print(instruct)
    except:
        pass
def run_Max():
    instruct = take_command()
    if 'play' in instruct:
        song = instruct.replace('play', '')
        talk('playing' + song)
        pywhatkit.playonyt(song)
        print(song)

run_Max()
7. Adding DateTime and Wikipedia access to AI Assistant
We will now add more capabilities into our Max such as telling time or date and having the information about anything from Wikipedia. For this, we use Python built-in library datetime and external library wikipedia.
We add these two functionalities in our run_Max() function by using elif logic. For Wikipedia we are using the command as “tell me about <something>” and it returns the summary from the Wikipedia page.
import speech_recognition as sr
import pyttsx3
import pywhatkit
import datetime
import wikipedia

listener = sr.Recognizer()
engine = pyttsx3.init()
def talk(text):
    engine.say(text)
    engine.runAndWait()
def take_command():
    try:
        with sr.Microphone() as data_taker:
        print("Say Something")
        voice = listener.listen(data_taker)
        instruct = listener.recognize_google(voice)
        instruct = instruct.lower()
        print(instruct)
        if'Max' in instruct:

            instruct = instruct.replace('Max', '')
            print(instruct)
    except:
        pass
def run_Max():
    instruct = take_command()
    if 'play' in instruct:
        song = instruct.replace('play', '')
        talk('playing' + song)
        pywhatkit.playonyt(song)
        print(song)
    elif 'time' in instruct:
        time = datetime.datetime.now().strftime('%I: %M')
        print(time)
        talk('current time is' + time)
    elif 'tell me about' in instruct:
        thing = instruct.replace('tell me about', '')
        info = wikipedia.summary(thing, 2)
        print(info)
        talk(info)

run_Max()
8. Adding personal Information about Assistant
Our Max is ready to do some task which we assign to him but what Max knows about itself? In case if we ask him about himself. it should be able to answer it.
So we add this information in the run_Max() function using multiple elif blocks about question and answer. You can add more items if you wish.
import speech_recognition as sr
import pyttsx3
import pywhatkit
import datetime
import wikipedia


listener = sr.Recognizer()
engine = pyttsx3.init()
def talk(text):
    engine.say(text)
    engine.runAndWait()
def take_command():
    try:
        with sr.Microphone() as data_taker:
        print("Say Somethig")
        voice = listener.listen(data_taker)
        instruct = listener.recognize_google(voice)
        instruct = instruct.lower()
        if'Max' in instruct:
            instruct = instruct.replace('Max', '')
            print(instruct)
    except:
        pass
    return instruct

def run_Max():
    instruct = take_command()
    if 'play' in instruct:
        song = instruct.replace('play', '')
        talk('playing' + song)
        pywhatkit.playonyt(song)
    elif 'time' in instruct:
        time = datetime.datetime.now().strftime('%I: %M')
        print(time)
        talk('current time is' + time)
    elif 'tell me about' in instruct:
        thing = instruct.replace('tell me about', '')
        info = wikipedia.summary(thing, 2)
        print(info)
        talk(info)
     elif 'who are you' in instruct:
         talk('I am your personal Assistant Max')
     elif 'what can you do for me' in instruct:
         talk('I can play songs, tell time, and help you go with wikipedia')
     else:
         talk('I did not understand, can you repeat again')

while True:
    run_Max()
//Here using while loop for continous usage
Conclusion
Hope you liked our project where we created a personal voice assistant that can understand voice command using speech recognition in Python. We just showed you a prototype, but you can add as many creative features and functionalities as you require.


One Response
Greatly Explained the concept!!!!!!