Introduction
In this article, we will be building a speech toxicity checker which takes as input the spoken word from our microphone and notifies whether the speech is toxic or not. For this purpose, we will be employing Tensorflow.js (pre-trained toxicity model) and the SpeechRecognition API of our browser.
Note- The web app that we will be building is only supported in newer browsers such as Google Chrome or Mozilla firefox.
Tensorflow.js Toxicity Model
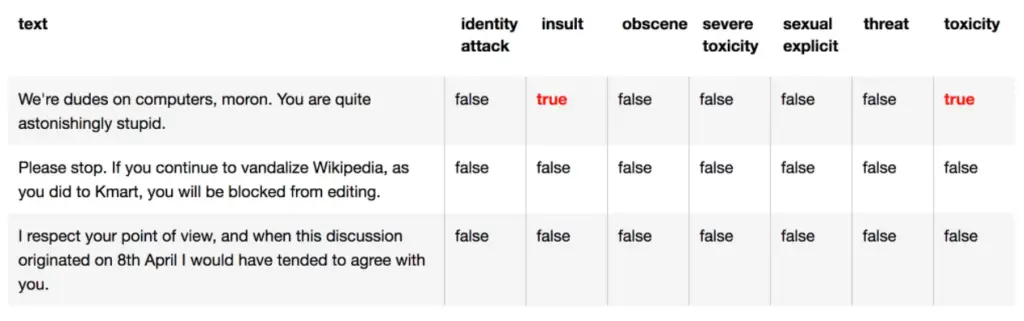
Built on the universal sentence encoder, the Tensorflow.js toxicity model is a classification model that can detect toxic language. It can classify text into 7 different classes of toxic language (insults, obscenities, identity-based hate, threats, sexually explicit, severe, and general toxicity). It was trained on 2 million comments labeled for toxicity (civil comments dataset).
The speech-recognition browser API
Google lets us use its speech-recognition engines in the form of the Web speech API. Additionally, for the purpose of allowing javascript to access the browser’s audio stream and convert that stream to text, we use the Web Speech API.
So we will be using this API to detect what the user said (through the microphone).
1. Frontend HTML Part
i) Create Starter HTML File
We will begin by making an HTML file called ‘index.html’. This will contain our starter code for importing all the libraries, module files, and stylesheets going forward.
In the ‘head’ tag of our HTML file, we will be importing the frameworks, models, modules, and other script files.
ii) Importing Tensorflow.js
For the purpose of using deep-learning models in the browser, we need to import tensorflow.js in the header tag as below –
<script src="https://cdn.jsdelivr.net/npm/@tensorflow/tfjs/dist/tf.min.js"> </script>
iii) Importing the Toxicity Model
The toxicity model that will be used to classify our inputs can be easily imported using the script tag. It will essentially be imported from the Google API for tensroflow.js pre-trained models.
<script src="https://cdn.jsdelivr.net/npm/@tensorflow-models/toxicity"></script>
iv) Importing Bootstrap
Bootstrap 4.1.1 will help us to handle the styling for this project with ease. You can import it like so:
<link rel="stylesheet" href="https://stackpath.bootstrapcdn.com/bootstrap/4.1.1/css/bootstrap.min.css"
        integrity="sha384-WskhaSGFgHYWDcbwN70/dfYBj47jz9qbsMId/iRN3ewGhXQFZCSftd1LZCfmhktB" crossorigin="anonymous">
v) Importing jquery
Jquery is a wonderful framework that provides various functions and utilities. Essentially we will be using it to initialize and vacate HTML elements.
<script src="https://code.jquery.com/jquery-3.3.1.min.js"></script>
vi) Importing the script file
This file is responsible for initializing the model, getting the predictions and representing them on the HTML.
<script src="index.js"></script>
vii) HTML Architecture
It is essential that our HTML has the capability to record what the user is saying, initialize the model for prediction, and finally display the predictions.

vii) Body of the HTML
Here we are using the bootstrap columns format. We are creating a ‘Talk’ button which when pressed will initialize the browser’s speech-recognition API and record what the user has spoken.
Another button called ‘Predict’, initialized with an ‘onclick’ function ‘getPred()’ which will ultimately get the predictions from the model and present them on the screen.
<body>
    <main>
        <div class="container mt-5">
            <div class="row">
                <div class="col-6">
                    <button id="talk">Talk</button>
                    <h3 id="allclear">Query : <p id="content"></p></h3>
                </div>
                <div class="col-6">
                    <button id="predict-button" class="btn btn-dark float-right" onclick="getPred()">Predict</button>
                </div>
            </div>
            <hr>
            <div class="row">
                <div class="col-12">
                    <h2 class="ml-3">Predictions</h2>
                    <ol id="prediction-list"></ol>
                </div>
            </div>
        </div>
    </main>
</body>
An HTML list element is also initialized which will be populated when the model returns the predictions on our input.
2. Javascript Part
We will now create a javascript file called ‘script.js’ which will contain all the code discussed in the below sections.
i) Initializing the Web Speech API
We initialize a ‘window.onload’ function which is called when the window is loaded. All the upcoming code will be enclosed inside a ‘try’ block which will immediately be followed by a catch block that will execute if your browser does not support the SpeechAPI.
window.onload=function(){
   try{
     //Code goes here
   }catch(e){
      //Error handling code example
      console.log('Your browser does not support the SpeechAPI, Try with google chrome')
 }}
a) Initializing the recognition process
In the further sections, we will be adding event listeners to our buttons but first, we need to fetch them inside const values to be referred to later. Next, we initialize the speech-recognition object and then use the ‘onstart’ event which will inform us if the recognition process has started or not.
const btn = document.getElementById("talk");
const content = document.getElementById("content");
const SpeechRecog = window.SpeechRecognition|| window.webkitSpeechRecognition;
const recog = new SpeechRecog();
recog.onstart = function(){
    console.log('voice is activated, you can speak into the microphone');
  };
b) An insight into the Recognition results
The speech-recognition process returns an event that looks like the below image
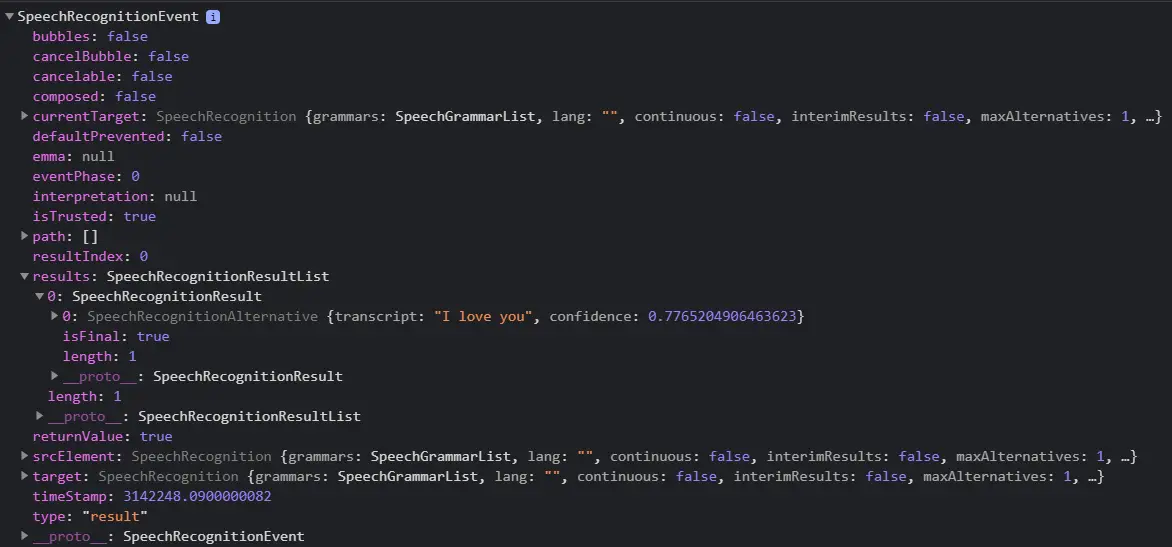
We need to access the ‘SpeechRecognitionResultList’ key which returns the predicted output of the speech-recognition API (approximate value of what was spoken by the user through the microphone).
c) Processing the speech
Once we get our prediction from the Speech API we need to update our HTML so that the user can check whether what he/she said was correctly interpreted or not. For this purpose, we use the ‘value’ attribute of an <p> HTML element with id ‘content’ and change it to our prediction.
recog.onresult = function(event) {
    console.log(event);
    const current = event.resultIndex;
    const transcript = event.results[current][0].transcript;
    content.textContent = transcript;
    document.getElementById("content").value = transcript;
    }

btn.addEventListener('click',()=>{
    $('#content').empty()
    $('#prediction-list').empty()
    recog.start();
  });
Next, we add the ‘onclick’ event listener to our ‘talk’ button so that it can initialize and start the recognition process. Additionally, it empties the prediction list and the ‘content’ paragraph element so that they can be populated again when the ‘Predict’ button will be pressed.
The ‘window.onload’ function ends here. Take a look!:
window.onload=function(){
  try{
  const btn = document.getElementById("talk");
  const content = document.getElementById("content");
  const SpeechRecog = window.SpeechRecognition|| window.webkitSpeechRecognition;
  const recog = new SpeechRecog();
  recog.onstart = function(){
    console.log('voice is activated, you can speak into the microphone');
   };

 recog.onresult = function(event) {
    console.log(event);
    const current = event.resultIndex;
    const transcript = event.results[current][0].transcript;
    content.textContent = transcript;
    document.getElementById("content").value = transcript;
    }

 btn.addEventListener('click',()=>{
    $('#content').empty()
    $('#prediction-list').empty()
    recog.start();
  });}catch(e){
    console.log('Your browser does not support the SpeechAPI, Try with google chrome')
  }
}
ii) Getting the Predictions of Toxicity
The ‘getPred()’ function will be an async function since loading the model and getting predictions is an asynchronous function.
async function getPred(){
    //Code goes here
};
a) Initializing the Model and getting Predictions
Now, we fetch the ‘content’ paragraph’s value in the const sentences. Now we initialize the model using ‘load()’ and pass the ‘sentences’ const as an argument to get predictions on it. The ‘threshold value is the minimum threshold value for probability for which a sentence will belong to a particular class.
const threshold = 0.8;
const sentences=document.getElementById("content").value;
toxicity.load(threshold).then(model => {
        model.classify(sentences).then(predictions => {
              console.log(predictions)
           // More code will follow here
    });
});
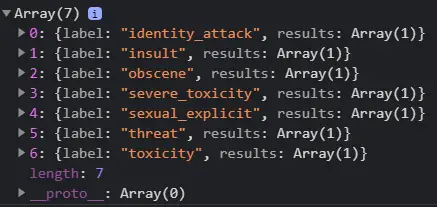
b) An insight into the Predictions Array
Prediction is an array of objects which contains the raw probabilities for each prediction head i.e. for each class of the classification model. It also returns a final prediction value in ‘match’ (either ‘true’ or ‘false’) and if neither prediction exceeds the threshold value ‘match’ is ‘null’
The output of the above code:
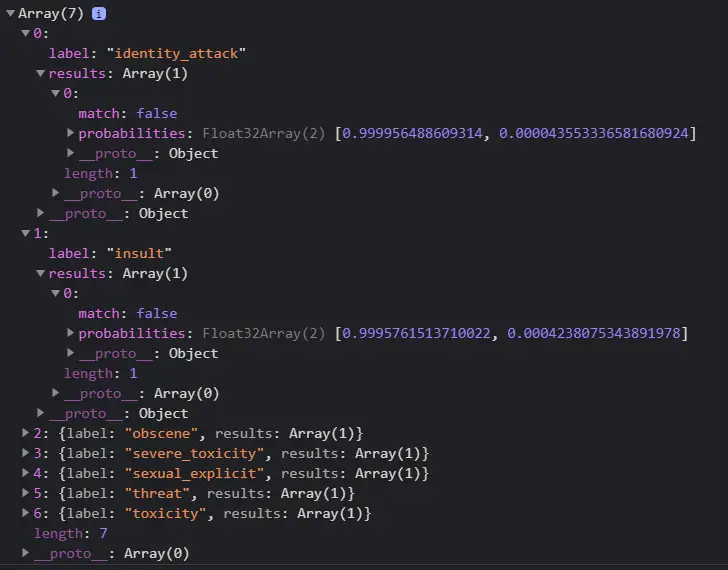
You can see in the below image that the array contains probability and a match value for each major class. We will be fetching both of those keys to represent our predictions
c) Representing the Prediction
The representation code-block consists of a for-each loop which is called on the predictions array. It fetches the probabilities, name tag, and the ‘match’ value for each class. Then we use the jquery ‘append’ function and add the predictions to the HTML ordered list with id ‘prediction-list’.
predictions.forEach(function (p){
        const className = p.label;
        const probability = p.results;
        const value = probability[0];
        const value1 = value.probabilities;
        const trueprob = (value1[1]*100).toPrecision(5);
        const tag = value.match;
        if (tag) {
          $('#prediction-list').append('<b><li>'+className+' | Tag : '+tag+' | Confidence : '+trueprob+'</li></b>')
        }
        else {
          $('#prediction-list').append('<li>'+className+' | Tag : '+tag+' | Confidence : '+trueprob+'%'+'</li>')
        }
    });
This marks the end of ‘getPred()’ function and it should look like:
const threshold = 0.8;
async function getPred(){
   const sentences=document.getElementById("content").value;
   toxicity.load(threshold).then(model => {
     model.classify(sentences).then(predictions => {
      console.log(predictions)
      predictions.forEach(function (p){
        const className = p.label;
        const probability = p.results;
        const value = probability[0];
        const value1 = value.probabilities;
        const trueprob = (value1[1]*100).toPrecision(5);
        const tag = value.match;
        if (tag) {
          $('#prediction-list').append('<b><li>'+className+' | Tag : '+tag+' | Confidence : '+trueprob+'</li></b>')
        } else {
          $('#prediction-list').append('<li>'+className+' | Tag : '+tag+' | Confidence : '+trueprob+'%'+'</li>')
        }
    });
});
});};
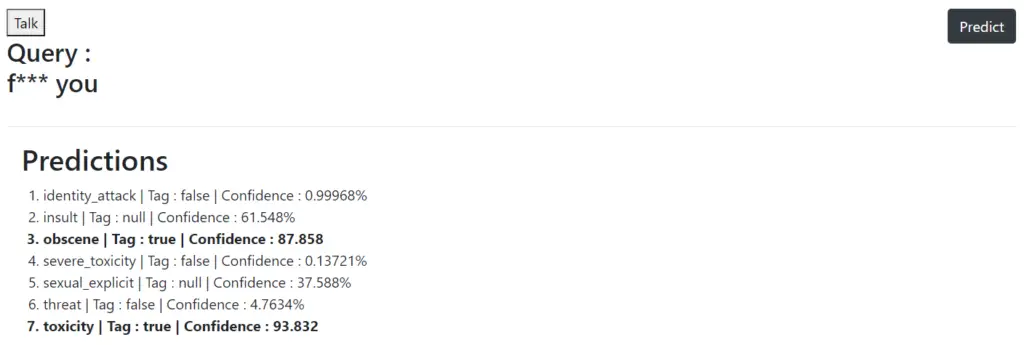
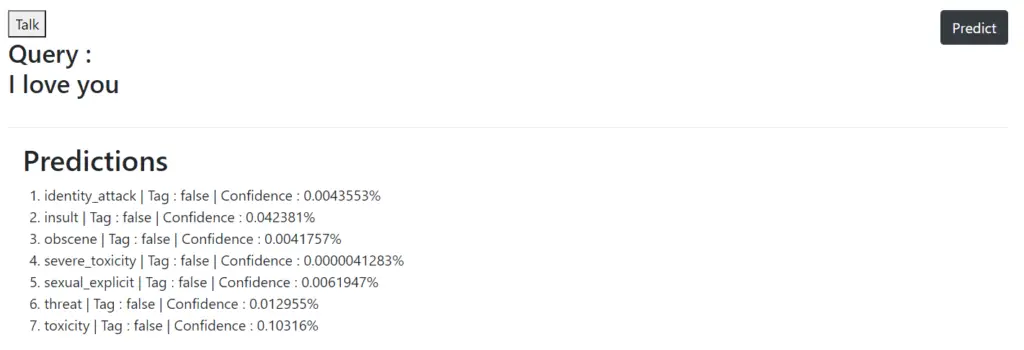
3. Results
Below is the result of our sample inputs to our web app for detecting toxicity. We can see that our web app is working as expected.
- Also Read – Face Recognition and Face Landmark Detection with Tensorflow.js BlazeFace
- Also Read – Tensorflow.js – Hand Gesture Recognition and Tracking using Handpose Model
Conclusion
Hope you found our cool project of Speech Toxicity Checker in Tensorflow.js. You can know more about the SpeechAPI here or about the SpeechRecognition class here. Below are the codes of our web app –
Source Code Files: