Introduction
In today’s article, we will be taking a look at instance segmentation by using Mask-RCNN in OpenCV Python. We will first understand what is instance segmentation and then briefly touch upon the Mask RCNN algorithm. Finally, we will explain the implementation of instance segmentation using Mask-RCNN in OpenCV python on image and video.
Instance Segmentation
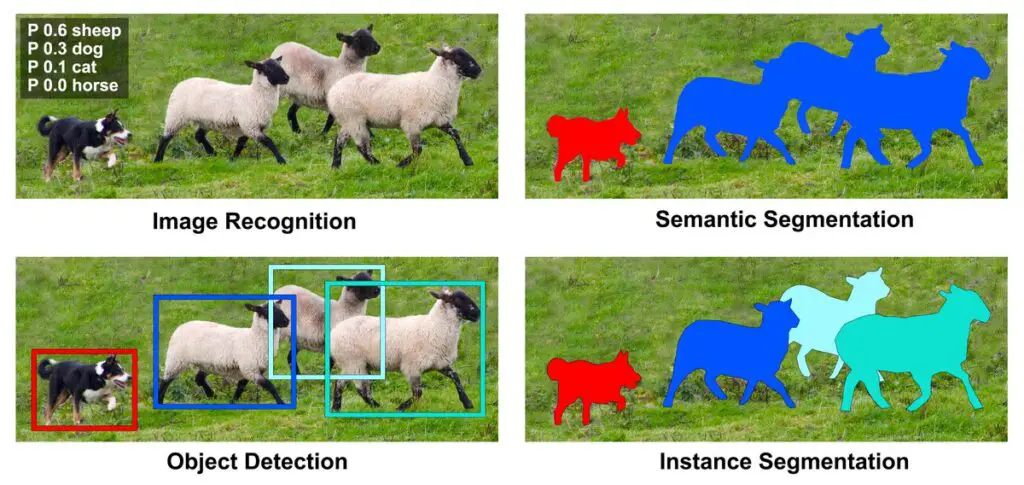
In the field of computer vision, beginners often find it confusing between object detection, semantic segmentation, and instance segmentation.
Object detection is the combinatory process of object localization & image classification. This means that an object detection algorithm, given a set of labels/classes first assigns a label/class to the image along with a confidence score. At the same time, the algorithm is also tasked with finding the position of the object in the said image (For example position(x,y coordinates), height, width).
Whereas an image segmentation algorithm is one step further from object detection, It generates pixel-wise masks for each object in the image. It can be said that it isolates the area covered by an object by representing it with a separate color mask. One can think of it as the visualization of the part or area of the image which our object detector classified as a viable object.
The instance segmentation represents each object in an image as an individual entity (they are represented by different colors). We can see this in our illustration above.
Additionally, it can also be said that deeper semantic segmentation is known as instance segmentation i.e. In the semantic segmentation image, all the cattle were given the label ‘cattle’ whereas in the case of instance segmentation the cattle were further subdivided into sheep no 1, sheep no 2 and so on.
What is Mask-RCNN?

Built by the Facebook research team in 2017, Mask RCNN is a deep neural network architecture used for instance segmentation. (RCNN stands for the regional convolutional neural network) It was built on two state-of-the-art deep learning models:
1. Faster R-CNN: It is an object detection model that returns the position of an object in the image along with the confidence score of the object detected.
2. FCN: It is a Fully convolutional network, model that uses only convolutional layers.
Mask RCNN Algorithm Steps
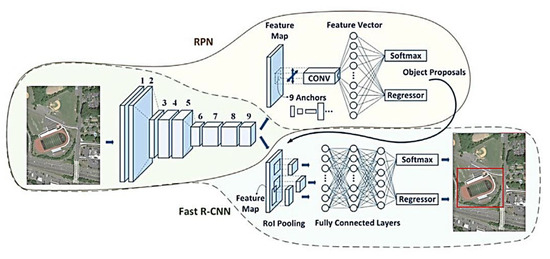
- The in-built faster R-CNN structure uses the FCN to apply convolutional filters to the input images in order to learn features.
- Next, the model uses a Region Proposal Network (RPN) to pass the features through and generate potential regions where an object could be present (along with their position).
- To make sure that each potential object is being processed we pass our features through max-pooling layers.
- In order to output our results, the potential object features are passed through a fully connected layer. It classifies them into different categories and provides coordinates for bounding boxes.
For more details please see the Mask RCNN paper.
Let us now see the tutorial for instance segmentation using Mask-RCNN in OpenCV Python.
Instance Segmentation on Image using Mask-RCNN in OpenCV Python
i) Install Libraries
1. OpenCV: Open source computer vision library. We will be using the DNN module which was built specifically to run deep learning models(built-in any framework) to be run with OpenCV. You can install it using pip like so:
pip install opencv-python
2. Numpy: Python library used for mathematical computations and data and data-structure manipulation. Install it using the following command:
pip install numpy
ii) Model weights and config files
You can download the weights and config files from Here
Or you can access the config files by cloning the official GitHub repository: Mask-RCNN GitHub(Keras/Tensorflow implementation by matterport)
iii) Import the required libraries
1 import cv2
2 import numpy as np
iv) Define the path to your resources
2 path_to_model = 'frozen_inference_graph_coco.pb'
3 path_to_config= 'mask_rcnn_inception_v2_coco_2018_01_28.pbtxt'
4 image_path='img.jpg'
5 colors = np.random.randint(125, 255, (80, 3))
Line 2-3: Define the path to model weights and config files.
Line 4: Define the image path(on which the segmentation algorithm is to be applied).
Line 5: Generate random colors using the numpy random module. These colors will be used to represent different objects in our mask.
v) Define variables and parameters
6 model = cv2.dnn.readNetFromTensorflow(path_to_model,path_to_config)
7 img = cv2.imread(image_path)
8 img = cv2.resize(img,(650,550))
9 height, width, _ = img.shape
10 black_image = np.zeros((height, width, 3), np.uint8)
11 black_image[:] = (0, 0, 0)
Line 6: Create a model object using the ‘readNetFromTensorflow’ function in the ‘dnn’ model. As arguments, we pass the model weights and the configuration files.
Line 7-9: Load the query image to memory, resize it (line 8) and compute its height and width(line 9).
Line 10-11: Create an empty image (numpy zeros array, same size as our query image) that will store our mask. Set its background color to whatever you like(line 11).
vi) Preprocess and Detecting objects
12 blob = cv2.dnn.blobFromImage(img, swapRB=True)
13 model.setInput(blob)
14 boxes, masks = model.forward(["detection_out_final", "detection_masks"])
15 no_of_objects = boxes.shape[2]
Line 12-13: Use the ‘blobFromImage’ function to preprocess the image and make it acceptable to the model as input. We also swap the red and blue filters since tensorflow accepts ‘RGB’ format and OpenCV accepts ‘BGR’. Next, use the ‘setInput’ function to prepare the model to propagate our query image through it.
Line 14: Here we define our output parameters. The ‘forward’ function takes as input an array that defines the layers from which we will be extracting our output. The ‘boxes’ array holds the value of x-y coordinates of the detected objects and the ‘masks’ array holds the mask values.
Line 15: Define the no of objects detected by our model. By default, the model detects 100 objects.
vii) Fetching Object Wise Outputs
16 for i in range(no_of_objects):
17   box = boxes[0, 0, i]
18   class_id = box[1]
19   score = box[2]
20   if score < 0.5:
21       continue
‘Boxes’ is a 3-D array containing the information about the detected objects. You can access the i’th object as boxes[0,0,i-1]. It returns of 7 elements. Example:
[0. 0. 0.99492836 0.92008555 0.27316627 0.98529506 0.53607523]
The last 4 elements are the (x, y, width, height) coordinates of the object. The first element defines if the object detected lies in the classes the model was trained on. Next, the second is the class of the object detected and the third is the confidence value.
Line 16: Initialize the ‘for’ loops that will run until all the detected objects are looped through(Loop runs for ‘i’ iterations where ‘i’ is the no of objects detected).
Line 19-21: We access the confidence value of the i’th object. If the confidence is under 0.5(50%) we drop the object.
viii) Getting the coordinates of our objects
22   x = int(box[3] * width)
23   y = int(box[4] * height)
24   x2 = int(box[5] * width)
25   y2 = int(box[6] * height)
26   cv2.rectangle(img, (x, y), (x2, y2), (255, 0, 0), 3)
As we discussed earlier the last 4 elements are the coordinates x, y, x2, and y2. These coordinates need to be multiplied by the width and height of the original image. Since the coordinates are returned to us according to the aspect ratio of the image.
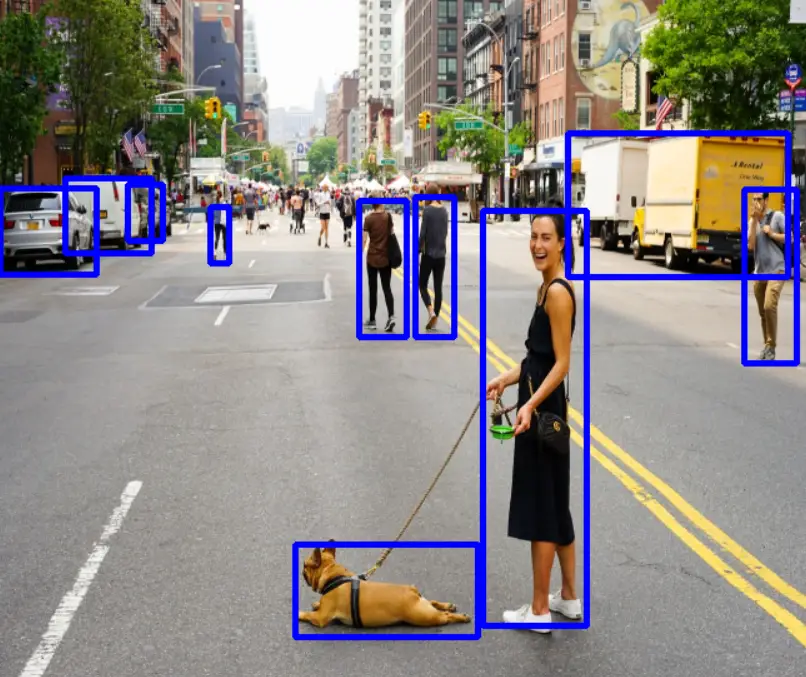
Line 26: Put a bounding box around the detected objects present in the image, using the coordinates accessed in the above lines (lines 22-25).
Now the image looks like this:
ix) Building our Mask
27   roi = black_image[y: y2, x: x2]
28   roi_height, roi_width, _ = roi.shape
29   mask = masks[i, int(class_id)]
30   mask = cv2.resize(mask, (roi_width, roi_height))
31   _, mask = cv2.threshold(mask, 0.5, 255, cv2.THRESH_BINARY)
Line 27-28: Define a variable ‘roi’ which is a sub-area of blank-image corresponding to the object in the real image. Next, fetch the height and width of the ‘roi’.
Line 29: Create a ‘mask’ variable that holds the mask (for the current object) that was returned to us by the mask-rcnn (use ‘i’ and class_id variable to access the current object’s mask).
Line 30: The ‘mask’ variable is a 15×15 array (downsized to support any aspect ratio) thus it needs to be resized to the shape of our ‘roi’ variable (since its position corresponds to the position of our object in the real image).
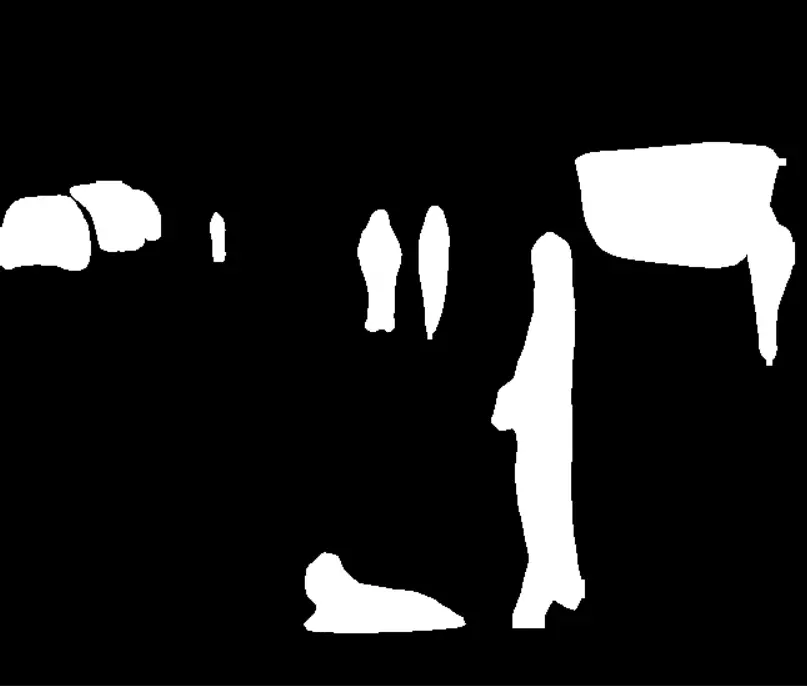
Line 31: Use the ‘cv2.threshold’ function to transform the ROI into a mask where all the pixels with values under 0.5 are converted to ‘0’ and the ones above 0.5 are ‘1’. This creates a binary mask ready to be filled(with the color corresponding to the class ID).
The mask looks like this:
x) Finding the contours and drawing them
32   contours, _ = cv2.findContours(np.array(mask, np.uint8), cv2.RETR_EXTERNAL, cv2.CHAIN_APPROX_SIMPLE)
33   color = colors[int(class_id)]
34   for cnt in contours:
35       cv2.fillPoly(roi, [cnt], (int(color[0]), int(color[1]), int(color[2])))
In order to visualize and draw the masks for the detected objects, we find the contours on our masks and later draw them.
Line 32: Use the ‘cv2.findContours’ to find the array in the binary masks that were created in the previous section.
Line 33: Fetch the color corresponding to the ‘class_id’ (line 18) in the colors arrays
Line 34-35: Loop through the detected contours and draw them using the ‘cv2.fillPoly’ function
xi) Visualizing the results
36 cv2.imshow("Final",np.hstack([img,black_image]))
37 overlay_frame = ((0.6*black_image)+(0.4*img)).astype("uint8")
38 cv2.imshow("Overlay Frame", overlay_frame)
39 cv2.waitKey(0)
Use the numpy ‘hstack’ function to show the original image and the generated masks next to each other.
Results:
xii) Full Code
import cv2
import numpy as np
path_to_frozen_inference_graph = 'frozen_inference_graph_coco.pb'
path_coco_model= 'mask_rcnn_inception_v2_coco_2018_01_28.pbtxt'
image_path='road.jpg'
colors = np.random.randint(125, 255, (80, 3))
img = cv2.imread(image_path)
img=cv2.resize(img,(650,550))
black_image = np.zeros((height, width, 3), np.uint8)
black_image[:] = (0, 0, 0)
blob = cv2.dnn.blobFromImage(img, swapRB=True)
net.setInput(blob)
boxes, masks = net.forward(["detection_out_final", "detection_masks"])
detection_count = boxes.shape[2]
for i in range(detection_count):
     box = boxes[0, 0, i]
     class_id = box[1]
     score = box[2]
     if score < 0.5:
         continue
     x = int(box[3] * width)
     y = int(box[4] * height)
     x2 = int(box[5] * width)
     y2 = int(box[6] * height)
     roi = black_image[y: y2, x: x2]
     roi_height, roi_width, _ = roi.shape
     mask = masks[i, int(class_id)]
     mask = cv2.resize(mask, (roi_width, roi_height))
     _, mask = cv2.threshold(mask, 0.5, 255, cv2.THRESH_BINARY)
     cv2.rectangle(img, (x, y), (x2, y2), (255, 0, 0), 3)
     contours, _ = cv2.findContours(np.array(mask, np.uint8), cv2.RETR_EXTERNAL, cv2.CHAIN_APPROX_SIMPLE)
     color = colors[int(class_id)]
     for cnt in contours:
         cv2.fillPoly(roi, [cnt], (int(color[0]), int(color[1]), int(color[2])))
cv2.imshow("Final",np.hstack([img,black_image]))
cv2.imshow("Overlay_image",((0.6*black_image)+(0.4*img)).astype("uint8"))
cv2.waitKey(0)
Instance Segmentation on Video using Mask-RCNN in OpenCV Python
Mask R-CNN with Python OpenCV can be used for instance segmentation of video frames too quite easily. The approach is similar to what we discussed, we only need to process each frame of the video in a loop.
Full Code
You can see the code below.
import cv2
import numpy as np
path_to_frozen_inference_graph = 'frozen_inference_graph_coco.pb'
path_coco_model= 'mask_rcnn_inception_v2_coco_2018_01_28.pbtxt'
VIDEO = 'race.mp4'
net = cv2.dnn.readNetFromTensorflow(path_to_frozen_inference_graph,path_coco_model)
colors = np.random.randint(125, 255, (80, 3))

video = cv2.VideoCapture(VIDEO)
while True:
    grabbed,frame=video.read()
    if not grabbed:
        break

    img=cv2.resize(frame,(650,550))
    height, width, _ = img.shape
    black_image = np.zeros((height, width, 3), np.uint8)
    black_image[:] = (0, 0, 0)
    blob = cv2.dnn.blobFromImage(img, swapRB=True)
    net.setInput(blob)
    boxes, masks = net.forward(["detection_out_final", "detection_masks"])
    detection_count = boxes.shape[2]
    for i in range(detection_count):
        box = boxes[0, 0, i]
        class_id = box[1]
        score = box[2]
        if score < 0.5:
            continue

        x = int(box[3] * width)
        y = int(box[4] * height)
        x2 = int(box[5] * width)
        y2 = int(box[6] * height)


        roi = black_image[y: y2, x: x2]
        roi_height, roi_width, _ = roi.shape

        mask = masks[i, int(class_id)]

        mask = cv2.resize(mask, (roi_width, roi_height))

        _, mask = cv2.threshold(mask, 0.5, 255, cv2.THRESH_BINARY)

        cv2.rectangle(img, (x, y), (x2, y2), (255, 0, 0), 3)
        contours, _ = cv2.findContours(np.array(mask, np.uint8), cv2.RETR_EXTERNAL, cv2.CHAIN_APPROX_SIMPLE)
        color = colors[int(class_id)]
        for cnt in contours:
            cv2.fillPoly(roi, [cnt], (int(color[0]), int(color[1]), int(color[2])))


    cv2.imshow("Black image", black_image)
    final_frame = ((0.6*black_image)+(0.4*frame)).astype("uint8")
    cv2.imshow("Overlay Frames",final_frame)

    key = cv2.waitKey(1) & 0xFF
    if key == ord("q"):
             break


video.release()
cv2.destroyAllWindows()
Conclusion
Hope you liked our tutorial on instance segmentation using Mask-RCNN in OpenCV Python. You can find the source code at the below links